
How to Store Onions, Garlic, & Shallots. For years I've stored onions, garlic and shallots in plastic bins in a kitchen drawer.
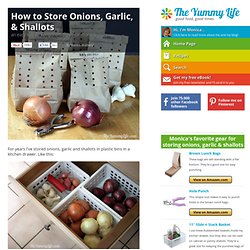
Like this: That works fine if I use everything up right away, but honestly that doesn't happen very often. Instead, I stock up on onions, garlic or shallots for use in specific recipes, and some of them end up hanging around in the drawer for awhile. Here's how some of them look after 2 or 3 months; rotten, moldy, or sprouting.....wasted: A few months ago, my mom (aka Grammy) came to the rescue. I've tried this with garlic and shallots, too, with the same great results. Lesson learned: always listen to your mother. Here's how Grammy showed me to store my onions, garlic, and shallots. Step-by-step photos forHow to store onions, garlic and shallots Step 1. Onions, garlic, and/or shallots--make sure they are firm and blemish free. View on Amazon: brown lunch bags, hole punch Step 2. Step 3. How easy is that? I store my bags in the same drawer in the kitchen as before. View on Amazon: my plastic bins By Monica.
Make a Free-Standing Clothing Rack from Galvanized Pipe. A step inside blogger Christine Keely’s West Philadelphia apartment reveals a stunning collection of found art, thrifted treasures and antique heirlooms that would make any vintage-lover drool.

Sourced from thrift stores and flea markets around her neighborhood, Keely’s collection is in constant rotation – as she scores new items and sells the old ones in her Etsy shop, Black Oak Vintage. In addition to curating a veritable history museum inside her home, Keely features handmade projects and inspiration on her blog by the same name. Made for the thrifting pro’s recently-rented studio and showroom, this free-standing clothing rack is a stunning solution for small-space living and puts cheap store-bought alternatives to shame. Made from common hardware store materials like galvanized pipe and plywood, this clever clothing rack perfectly showcases Keely’s collection of vintage dresses and is sure to add a stylishly industrial touch to any room.
Ready to free up some space in your own closet? Homemade Mason Jar Spice Holders. Simply Albany: DIY Tinted Glass Jar + Mod Podge Image Transfer. I started by making sure my jar was completely clean and dry.

Using a ramekin, I mixed one drop of blue food coloring with approximately 1 tablespoon of mod podge and a tiny amount of water. (You don't need the paint brush to mix - you can use whatever you want.) Once mixed, I dumped the ramekin contents into the empty jar and rotated the jar so the inside was completely coated with colored mod podge. I placed the wet jar upside down on wax paper to let it drip dry for approximately 30 minutes. You may need more or less time for this step depending on how thick your mod podge coating is. Next, I placed the upside down mason jar on a fresh sheet of wax paper in the oven, which was preheated to "warm. " I left the jar in the oven until all the mod podge was dry and the jar was clear. Here's my blue-tinted jar! Now for the fun part... I wanted my jar to have an image on it, so I used the mod podge transfer technique. I used this image from the Graphics Fairy. Mason Jars Craft Ideas.
Hanging baskets. 34 Ingenious Ways To De-Clutter Your Entire Life. 31 Things You Can Freeze To Save Time and Money. Storing and Preparing Foods.