
Air-Powered Soft Robotic Gripper. Update (1/24/2014): Important note about 3D printer materials added below.

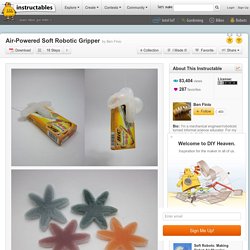
Read before you try this project! Update (11/22/2013): MUCH cheaper option added to the materials list to replace the squeeze bulbs. Thanks to the education staff at the Franklin Institute in Philadelphia, PA for pointing that out! Update (4/23/2013): smaller, cheaper "mini" gripper STL file has been added. This gripper will cost less to order from a 3D printing service and won't require as much air to inflate (easier to inflate with a single pump from a squeeze bulb). Credits: The soft robot technology in this project was originally developed in the Whitesides Group at Harvard University. "Soft robots" are all the rage in the robotics research community right now. This project will describe how to make simple, air-powered soft robots that are made from silicone rubber, and shaped using a 3D printed mold. CircuitWorks® Showcasing 3D Printing! How to make Clear Glass PCBs.
Create a POV-Ray file. ATtiny ISP/Programmer Arduino Shield. En:eagle3d:eagle3d [www.matwei.de] Some time ago there was a question in one of the Eagle-Newsgroups if it is possible to translate the 2D-layout into a 3-dimensional view.
![en:eagle3d:eagle3d [www.matwei.de]](http://cdn.pearltrees.com/s/pic/th/en-eagle3d-www-matwei-de-10351342)
It was not possible. So I started the development of Eagle3D. After a couple of days I had an ULP and a library with 3D-POVRay models of electronic components. Out of a board like this: a picture like this is generated. It is possible to change some of the colors. Load the board into Eagle Start the ULP Select the options in the ULP-dialog Let the ULP create the POVRay-file Start POVRay and load the produced file Start raytracing Wait for about 30s Finish You can download the latest version here Here are all parts as images. Before you use Eagle3D for the first time you should carefully read the documentation. With every new version I will send a newsletter. There are a lot of parts missing in the library. This picture was created with v0.93. Wiblocks. The PICO1TR is a physical computing board that is compatible with the Arduino software environment.

The board size is 2.1" x 1". All I/O pins from the ATmega168 (or ATmega328) are brought out on 2 rows of 14 pins (300mil spacing). See the PICO1TR datasheet for the assembly instructions, schematic and bill-of-materials. The PICO1TR is available in panels called a PICO1TR PANEL Each panel consists of ten PICO1TR pcbs arranged with v-scores between the rows and columns to enable individual PCBs to be separated after after the panel is assembled. The individual PCBs are arranged in two groups of five. 2.1" x 1"Replaceable and upgradeable CPU (ATmega168 or ATmega328) Compatible with the Arduino development tools.
Pricing Accessories. CIID final project — development blog. Universal Serial Bus. Overview[edit] In general, there are four basic kinds or sizes related to the USB connectors and types of established connections: the older "standard" size, in its USB 1.1/2.0 and USB 3.0 variants (for example, on USB flash drives)the "mini" size (primarily for the B connector end, such as on many cameras)the "micro" size, in its USB 1.1/2.0 and USB 3.0 variants (for example, on most modern cellphones)the versatile "USB On-The-Go" scheme, in both mini and micro sizes.

Unlike other data cables (Ethernet, HDMI etc.), each end of a USB cable uses a different kind of connector; an A-type or a B-type. This kind of design was chosen to prevent electrical overloads and damaged equipment, as only the A-type socket provides power. Counter-intuitively, the "micro" size is the most durable from the point of designed insertion lifetime, as the result of latching mechanism (parts providing gripping force) being moved into plugs on the cable side.[5] History[edit] Magic-Flight.com - Official Home of the Launch Box Vaporizer. Mini quadcopter. Thermochromatic Pigment - Red (20g) Description: We've all seen toys and things that change color when you run them under warm water or heat them up in the sun.

Some of us were especially mesmerized and had to find out what made them do that. It turns out that this is a property called "thermochromism" and it can be implemented in a number of ways. This particular pigment is a Leuco dye type pigment which is made up of a mixture of Leuco dyes, weak acids and salts microencapsulated in polymer. Sounds complicated, right? Nah, it's not so bad. All you need to know is that this is a very fine, colored powder that changes to a clear powder when you heat it to about 92°F (33°C). This pigment comes in a 20g bag, which is more than enough to play with and just enough for a good sized project (depending on what you're doing with it). Features: Red at Room Temperature Turns Clear at Around 92°F (33°C) Mix with paint, glue, resin, Polymorph, Sugru, etc. Documents: