
Add A Transparent Text Area To An Image With Photoshop. Step 1: Add A New Blank Layer With my photo newly opened in Photoshop, if we look in my Layers panel, we see the image sitting on the Background layer which is currently the only layer in my document: The Layers panel showing the original image on the Background layer.

Let's start by adding a new blank layer, which we can do by clicking the New Layer icon at the bottom of the Layers panel: Clicking the New Layer icon. Photoshop adds a new blank layer named Layer 1 above the image on the Background layer: The Layers panel showing Layer 1 above the Background layer. Step 2: Fill The New Layer With White We're going to use this new layer as the semi-transparent background surrounding our text, but we won't always know at this point exactly where the final text will appear in the image, so for now, we'll just fill the entire layer with a solid color and worry about resizing it later (and when I say "worry" about resizing it, I mean "easily" resize it since it's easy to do). How to Remove a Tattoo in Photoshop. Soft light vintage look in photoshop. Color Grade Like A Pro – The Secret To Cinematic Imagery. Getting it right in camera is one of the most important steps to achieving a great photograph, but color grading is what can really take your work to entirely new level.
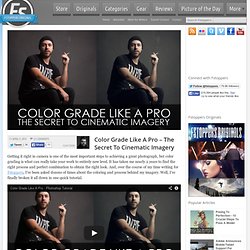
It has taken me nearly 2 years to find the right process and perfect combination to obtain the right look. And, over the course of my time writing for Fstoppers, I’ve been asked dozens of times about the coloring and process behind my imagery. Well, I’ve finally broken it all down in one quick tutorial. This grading technique uses a combination of adjustment layers; Hue/Saturation, Curves, Levels and Solid Color Fill.
Remodelling a Figure in Photoshop. Getting The Best Out Of Your Raw Files. Getting The Best Out Of Your Raw Files I have been teaching retouching and photography for a couple of years, and I found that even my advanced students often didn’t know some basic tools or techniques.

Those gaps in knowledge are to be expected among self-taught photographers and retouchers, of course. However, I have just returned from my trip to Italy where the amazing Italian Photoshop guru and Wacom evangelist Marianna Santoni organized a series of educational events, in which I taught Beauty photography and retouching. We had over 200 attendees overall, and I have to tell you that the level of Photoshop skills of our Italian fellow-photographers left me open-mouthed. They were all in love with life, drinking from a fountain... How To Make a Cool Cinemagraph Image in Photoshop. No doubt you’ll have heard of the term Cinemagraph since it exploded onto the Internets.

Originally coined by Photographers Kevin Burg and Jamie Beck, a cinemagraph is a clever revival of the classic animated GIF. Photoshop: How to Transform PHOTOS into Gorgeous, Pencil DRAWINGS. Lee Varis Video Tutorials. Awesome Video On How To Retouch Shiny Skin. #14 How to Enhance Eyes + Make Beards using Noise + Blur. Adding Rain To A Photo With Photoshop. Written by Steve Patterson.
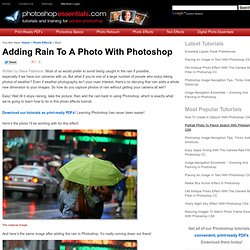
Most of us would prefer to avoid being caught in the rain if possible, especially if we have our cameras with us. But what if you’re one of a large number of people who enjoy taking photos of weather? Even if weather photography isn’t your main interest, there’s no denying that rain adds a whole new dimension to your images. So how do you capture photos of rain without getting your camera all wet? Easy! Here’s the photo I’ll be working with for this effect: The original image.
And here’s the same image after adding the rain in Photoshop. The final result. Let’s get started! Step 1: Duplicate The Background Layer The first thing we need to do for this effect is duplicate our Background layer. The Layers palette in Photoshop showing us the original image on the Background layer. We need to create a copy of this layer, so let’s use the quick keyboard shortcut, Ctrl+J (Win) / Command+J (Mac).
Step 2: Add Some Extra Canvas Space Around The Image Select the Crop Tool. Photoshop Tips to Add Light Rays or Sun Beams to Your Images. Create Beams Of Light From Nothing In Photoshop. How To Size Your Images So They Show Their Best on Facebook. Just about every day I read a comment from a photographer complaining about Facebook making their images look terrible.
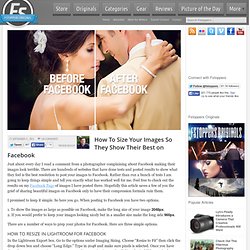
There are hundreds of websites that have done tests and posted results to show what they feel is the best resolution to post your images to Facebook. Rather than run a bunch of tests I am going to keep things simple and tell you exactly what has worked well for me. Feel free to check out the results on my Facebook Page of images I have posted there. Hopefully this article saves a few of you the grief of sharing beautiful images on Facebook only to have their compression formula ruin them. Make your Subject Stand Out In Photoshop With Curves Adjustment Layers. Photoshop: Replace The Sky in Your Images. Creating light rays in Photoshop CS6. Create Interesting Pictures (Warp Tool Photoshop) Old and Worn-Out Photo Effect. In this tutorial, you will learn how to add an old and worn-out effect to a photo in Photoshop with just a few easy steps!
This is a pretty simple tutorial but the outcome is great and this tutorial is useful most especially for Photoshop newbies. I’m sure this will come in handy in your future designs, too! Materials Needed:GrandeOmbre’s Old Frame TextureSlimmbarb’s Special Moment Stock Photo 1. Create a new document in Photoshop with dimensions 489×327 but if you intend this to be a large artwork, you may want to consider changing the size of the document. 2. 3. 4. 5. 6. 7. 8. 9. 10. Blog.DesignNocturne.com » Pure White Portrait Retouch. Skill Level: Intermediate Learn how to whiten skin and hair in this quick Photoshop tutorial.

The original photo is a little bit warm, so first we’ll add a Photo Filter adjustment layer set to Cooling filter (80) with a Density of 60%. Next we”ll bring the saturation way down. Add a Hue/Saturation layer and bring the saturation down to -90%. The last Adjustment Layer we’ll add is a Curves layer. Add two points to the chart, one at the dark side, one at the light side. How to Quickly and Easily Correct Red Blotchy Skin in Photoshop. When it comes to red blotchy skin, there are several ways to correct it.
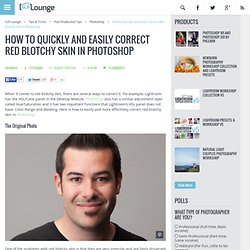
For example, Lightroom has the HSL/Color panel in the Develop Module. Photoshop also has a similar adjustment layer called Hue/Saturation and it has two important functions that Lightroom’s HSL panel does not have: Color Range and Masking. Here is how to easily and more effectively correct red blotchy skin in Photoshop. Let Me Throw You A Curve and Get You Away from Prepackaged Presets.
The hottest trend nowadays is Photoshop presets.
Presets to mimic the look of films past, to add a bit of editorial edge to those mundane studio shots, or to just expedite the editing process. Many companies have come out with pre-packaged presets, treatments, and plugins to help users reach a new level of creativity. What most people may not realize is that these pre-made presets aren’t anything special. We each have the ability to create these looks ourselves!
Topic: How to Photoshop Tip: Understanding Clone Tool and Removing Tourist! (1/1) Topic: How To Sharpen and Save Your Photos for Web (1/1) 32-Bit HDR Images in Lightroom and Photoshop. Photoshop Tip: Clone Source Window. Textures Made Simple. Lightroom Presets, Videos, Tips and News. Clothing for Portraits – How to Tell your Subjects What to Wear. Merge to 32 bit – HDR technique comparisons. Merge to 32 bit – HDR technique comparisons. Vintage Photo Effect in Photoshop. This tutorial will show you how to apply a simple vintage photo effect using Photoshop.
We’re going to use image adjustments, adjustment layers and layer styles to apply the vintage effect on a regular photo so that we can keep our work easily editable. Preview Tutorial Resources NYC by vonSchnauzer Step 1: Open the Photo. Dodging and Burning in Photoshop To Bring Light To Life. After nailing your lighting in camera, shape it even more by dodging and burning in Photoshop. By creating adjustment layers and masking them out where we don’t want to affect the image, we can mold the light and emphasize the parts we want. In this case we want to make it look like there’s a beam of light shining from the lamp, so we create a curves layer and pull up the reds and general brightness. By selecting the shape we want, blurring it, and adding a gradient, we get a natural looking spread of light that doesn’t look fake.
Think of it as a more advanced version of dodging and burning in photoshop. Adding Color. Dear Client, Stop Cropping My Photos on Facebook! Guest Writer, Matt Kennedy is an International Wedding Photographer and has been shooting weddings for 7 years throughout North America, Mexico and Italy. He is well known for his Sparkler Shots and Marketing techniques and is always willing to share and raise the bar for the industry. If there’s one thing the average Facebook user doesn’t seem to execute properly it’s cropping their images. Cropping is such an integral part to the composition of a finished image, and when so much time and consideration has gone in to a shot being polished and complete, it kills me to see images destroyed by poor cropping. We all know that Facebook can bring a lot of referrals in, so you want to make sure that your images are presented in the most attractive way possible. Now it’s not just the innocent bystanders fault… it’s Facebook, it’s mobile devices, it’s web browser windows, and it’s a lot to think about!
Here’s where you come in as the professional and the curator of your work. Related. Landscape Photography Post-Processing in Lightroom: Start to Finish. This week, Adobe released Lightroom 5, which adds even more sophisticated editing tools to its repertoire. Photographers who have already been using prior versions of the powerful software for processing their images know that it can help make a drab RAW file into a stunning work of art. See how French photographer Serge Ramelli used Lightroom to process a landscape scene of Venice from start to finish: Starting with the “before” image below, Ramelli adjusted his photograph using the following Lightroom workflow: Before: Exposure Stacking Tutorial in Adobe Photoshop.
Exposure stacking is the process of taking multiple photos with different types of lighting and exposure settings, then blending them together into one photograph. This technique is used frequently in night photography, when a photographer wants to capture an object in the foreground while also capturing the night sky. Because the lighting of the foreground object obscures visibility of the sky, many different photos must be taken with various lighting and exposure settings to achieve this effect. In the following video, Russell Brown explains the process of exposure stacking in Adobe Photoshop CS6: Russell captured each photo using a Canon 5D Mark II, an interval exposure unit, a strobe light and a tripod. Each photograph was taken in the exact same position. Lightroom 5 - Correcting Perspective using Upright. Share this Episode Autoplay. Photoshop Tricks of the Trade. Stacking Focus is a post-production technique used to give your final images a depth of field that is unattainable straight out of the camera.
Similar to HDR, you take multiple images and blend them together – the difference being with Focus Stacking you are blending the focus of the image rather than the exposure as you are with HDR. [Rewind: If you are curious more about HDR you can check out our Professional HDR Workshop] 16 Lightroom 4 tutorials for creative photographers. There are many tutorials out there to help you get started with Lightroom workflow, but there’s also a growing number of videos and good old-fashioned step-by-step guides to getting more creative with the software.
Here, we hand-pick 16 Lightroom 4 tutorials that explain some of the more creative effects you can apply to your photo collection. Let us know in the comments below how you get on with them… Turning your favorite photos into business cards with Lightroom (and some Photoshop help): part 1. Imagine someone asking you for a business card. Guerrilla lighting and the importance of removing distractions (photoshop breakdown) ft. Trio Dinicu. I had the opportunity to shoot the Trio Dinicu while touring through LA in December. They wanted an ultra clean image to portray their band and had chosen the Disney Concert Hall as the best possible location. The Photoshop Training Channel. How to Create The Popular Matte Look in Lightroom. While in Las Vegas attending the annual WPPI conference I stopped in and spent some time at the print competition. There I repeatedly noticed that many of the prints had a matte type of look to them.
Now part of this is the choice of paper they print on, but also how the photos is processed plays a big part as well. Your guide to Photoshop Hot Keys. The Photo Formula – Photography & Post-Processing Techniques, Business Branding, Reviews, Deals & More. The Photo Formula. Fashion Photography Tones in Lightroom & Photoshop. Photoshop CS6 Extracting Person and/or Object Professionally. How To Draw A Pixie Dust Effect In Photoshop. Photoshop CS6 Quick Reference Guide [BETA]