
Painted and Podged acorns. - Mod Podge Rocks! Top 10 Decor Hacks of 2011. We’re looking back over this year, and the sheer number of awesome DIY projects we’ve shared.
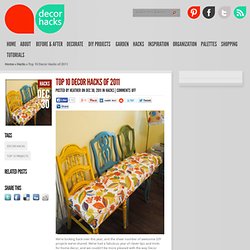
We’ve had a fabulous year of clever tips and tricks for home decor, and we couldn’t be more pleased with the way Decor Hacks has developed. Here are our top decor hacks of 2011, as determined by number of pageviews. 1. Mismatched Chair Bench (top) 2. Magnetic Makeup Holder 3. Positively Splendid: Mod Peacock Pillow Tutorial. I shared this tutorial on Tatertots and Jello back in April, but I wanted to share it with y’all here, too, just in case you missed it. I am loving the way peacocks are popping up everywhere in home decor realms of late! Today I’m going to share with y’all a tutorial for how to create a vibrant and fun peacock throw pillow cover to punch up your home decor. This project was inspired by this gorgeous rug I came across on Modern Chic Home a few weeks back. All set to make a peacock pillow of your own? Let’s get started! For this project, you will need… Printable Templates An 18″ pillow form White cotton twill fabric Washable ink marker Freezer paper Grey spray paint.
Dollar Store Crafts & Blog Archive & Make a Mounted Stuffed Animal Head. Mollys Sketchbook: Strawberry&Pillows - Knitting Crochet Sewing Crafts Patterns and Ideas! These pillows are easy and quick to make, a perfect end of summer project! The best thing about them is seeing other people's reactions to them.
Everyone who sees them wants to touch them, squeeze them, and carry them around. There is something about their large size (about 15-inches high) that just makes people smile! --Molly Materials To make a set of four (roughly) 15-inch high pillows: Cutting Fold and press the first of your dotted fabrics in half selvege to selvege. Here is a more close-up shot of marking a 60-degree angle. Repeat this step to cut out a second equilateral 24-inch triangle from your fabric on the fold. Each one of these triangular pieces will make one pillow.
Sewing the Berry Sew one of the open sides of one of the triangles with a 1/2-inch seam allowance. Open up and fold the shape so that the seam you just sewed lines up with the fold, and the open side is at the top, and press it flat. Sew along the marked line and then trim off the bottom of the triangle. How-to: Light Up Banner. Inspired by the sign hanging in Venice, CA and vintage carnival signs, I decided to make a light-up banner for my wedding (which is 5 months away as of tomorrow!). We’re having a non-denominational ceremony and have decided to add a couple of personal touches to the ceremony, this sign being one of them. The sign will remain dark until we’re officially wed, and then we’ll turn it on using a foot switch. Here’s how to make one of your own: Gather your supplies: set of 100 LED Christmas lights, an old cardboard box, straight pins, all of the letters you’ll need (I printed mine from the computer, but you could stencil them too), x-acto knife, sharpened pencil (non-mechanical), scissors, floral wire, wire cutter Cut out your letters and straight pin them to your cardboard.
Using an x-acto knife, cut around your letters, but don’t cut through the entire sheet of cardboard. Cut around the outside edges of your cardboard using a scissors. Flip your letter over. Turning Your Dining Table Into a Chalkboard. InspireMe Crafts: Gotta Make It: T-shirt Pillow. Free People Clothing Boutique Blog. Picture Frame Calendar. Happy Monday evening!
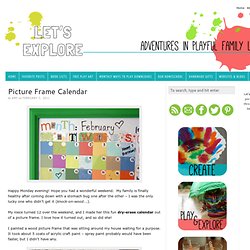
Hope you had a wonderful weekend. My family is finally healthy after coming down with a stomach bug one after the other – I was the only lucky one who didn’t get it (knock-on-wood….). My niece turned 12 over the weekend, and I made her this fun dry-erase calendar out of a picture frame. I love how it turned out, and so did she! I painted a wood picture frame that was sitting around my house waiting for a purpose. I covered the cardboard picture frame back with white easel paper. When it was finished, I just popped it into the frame and tied on a pack of dry erase markers (clickable – no lids!) Tagged as: calendar, dry-erase, handmade gifts, homemade. Mini Book Made From Scratch {Paper Craft Ideas} via TipJunkie.com. Create * Sell * Buy * Share - Buy Handmade Paper Crafts and Paper Arts. Here is the tutorial to make this multi-functional composition book with attached file-folder.
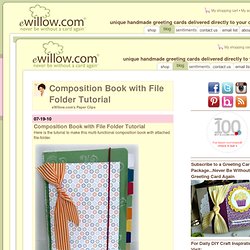
Supplies: Regular-size composition book Empty cereal box Eight envelopes, approximately 5" x 7" (but not larger) Stamp set and permanent ink 12 x 12 card stock, 12 x 12 decorative cardstock, and several pieces of scraps Tab punch.