
DIY Friendship Necklace. As soon as Lauren and I saw this editorial in Flare Magazine, we knew we had to recreate these awesome, friendship bracelet-like necklaces.

We promise they are super easy to make and the perfect way to pass the time during those long summer roadtrips. To make a 2-tone necklace, cut a long piece of rope and wrap two different colors of embroidery thread around its own bobbin. Tie a starter knot along with the two colored threads you are using, leaving at least 3 inches of slack, Tape down the slack to a flat surface or safety pin it something that will help keep it in place (feeling nostalgic yet?). Lay the color that isn’t being used (shown here in purple) in your left hand, along with the rope, and hold them taut. Take the active color (shown here in red) in your right hand, pass it over the rope, loop it under and back through the opening. To alternate colors, simply put the inactive color (red) in your left hand and the new active color (purple) in your right.
DIY Braided Hex Nut Bracelet. We’re nuts for nuts.

Is there a more versatile and inexpensive DIY component than a hex nut from the hardware store? You can imagine our excitement when we first discovered Philip Crangi’s Giles & Brother Hex Collection. Honestly, nuts braided into jewelry is WTF genius! With a few items that we always seem to have lying around, we tackled the technique and made our own spine-like braided hex nut wrap bracelet. You’ll need:3 strands of cotton butcher’s twine cut into one yard pieces18 small brass hex nutsa bit of dexterity! Gather the 3 strands of twine and tie a knot at the top, leaving about 2 inches of slack. Keep your thumb at the base of the braid, holding the nut in its place.
Repeat the steps, by threading the rest of the nuts to the outer pieces of twine before they are crossed over. The bracelet should wrap around your wrist at least two or three times. Good luck!! (top image from here, rest of images by Honestly…WTF) DIY Friendship Bracelet. For several months now, we’ve been receiving emails requesting a friendship bracelet DIY.
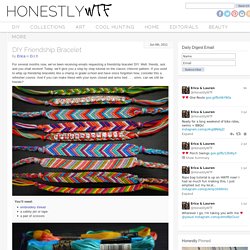
Well, friends, ask and you shall receive! Today, we’ll give you a step by step tutorial on the classic chevron pattern. If you used to whip up friendship bracelets like a champ in grade school and have since forgotten how, consider this a refresher course. And if you can make these with your eyes closed and arms tied . . . umm, can we still be friends? You’ll need:embroidery threada safety pin or tapea pair of scissors Start by cutting several strands of embroidery thread at about 24 inches each. Start on the left side with the outermost color (shown here in red) and make a forward knot by creating a 4-shape over the 2nd color, loop it under and back through the opening. Welcome to SaiFou – Inspiring images. DIY Macrame Bracelet. Growing up by the beach in Southern California, the ability to knot a macrame bracelet was practically a right of passage.

Although those days are long behind us, we’ve never forgotten the ever-so-simple square knot technique. This time, however, we’re replacing hemp and wooden beads for more updated elements like colorful nylon cord and glossy metal charms. Happy knotting! You’ll need: Start by cutting the knotting cord into two 30 inch, two 20 inch and one 10 inch lengths. Center the 30 inch cord under the two middle strands. Pull tightly and slide the knot up to the top. Finish the 2nd half of the square knot by folding the left cord over the middle strands and under the right cord. Pull tightly and repeat the steps – left, right, left, right . . . To finish the knots, thread one of the cords onto a needle and sew up the center of 3-4 knots along the backside. Repeat the same step on the other cord. After sewing up both knotting cords, trim away any excess. Welcome to SaiFou – Inspiring images.