
Cake postcard tutorial. Supplies Materials needed to make two cake postcards: 1 large sponge (yellow paints the best)Serrated knifeX-Acto or utility knifeSpray paint (brown, yellow, pink or white)1 tube acrylic latex caulk (brown, cream or white)Spray adhesive (3M Super 77 works great!)
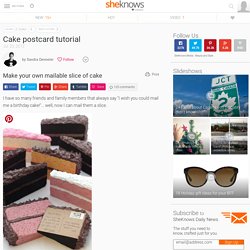
Cardboard, kraft paper or scrapbook paper Instructions Cut sponge into wedge shape With a serrated knife, using a sawing motion, cut a sponge into two, cake wedge shapes. Cut a center groove into sponge Using an X-Acto or utility knife, cut a section of foam from the center of the sponge. Paint the sponge wedges in desired color. Trace the slice of cake When the sponge wedges are dry, trace around them on a piece of cardboard, kraft paper or colorful scrapbook paper. Spray glue the postcards to the solid, flat sides of the sponge wedges. Using a caulking gun and your desired caulk, fill a plastic disposable piping bag with half of the caulk. Pipe the center of the cake Pipe the icing on the top Note from the editor. DIY String Art.
Hi guys! Dina here from Honey & Fitz back with another tutorial. This time I’m showing you how to make some string art for your little one’s room! Rather than deal with hammers and cutting wood, I decided to do this project using cork tiles. Not only are they easy to find and inexpensive, they’re also very light weight so you don’t have to worry about them falling off the wall and hurting anyone. Here are the supplies you’ll need: Cork tiles // Linoleum Nails // 3M Hanging Strips // Contact Cement Stack the cork tiles on top of each other and use your contact cement to glue them together.
I really wanted the look of a white background for my string art so I decided to paint the cork. Once the paint has dried, flip your cork tile over and apply your hanging strips. Create your template using whatever font you like. When you’ve traced the entire template, carefully remove the paper. Tie your string in a double knot onto your first nail now, and start weaving in a back and forth fashion. Makekind: a guest column by laura parke of a girl who makes. This week I’m sharing a simple, yet somewhat time intensive project.

It’s a catch-all of sorts made from sheets of cardboard. I did this project in steps so it didn’t seem so daunting – it’s worth it because the end product is custom and so, so useful. Here’s how to make your own! : MATERIALS // 25 pieces of cardboard measuring 10″ x 10″, straight edge ruler, a pencil, glue, utility knife with plenty of extra blades. STEPS // 01 MEASURE YOUR TEMPLATE Using the straight edge and a pencil, measure a 1″ border on one piece of cardboard. 02 // CREATE TEMPLATE Once you have everything measured out, use a utility knife to cut out each compartment to create a template. 03 // MAKE YOUR PIECES Using your template, you’ll cut out 20 sheets of cardboard, like this: 04 // GLUE PIECES TOGETHER First, glue 5 uncut pieces of cardboard together to create a bottom. 05 // KEEP GLUING Next, take the 10 pieces that have the two cutouts and glue them right on top of the stack of cardboard.
25 Handmade Gifts Under $5. If your gift list is long and your budget is small here are some great Handmade Gifts that you can make.

Keep in mind that handmade items are not just beautiful but special… I love to give them and I love to receive them. In my opinion they are the best! Jersey Knit Bracelet Lovely! This would make a perfect gift for any of your girlfriends. You can choose the colors and recycle t-shirts that you have around the house. Cheap and cute! Tutorial Paper Clip Earrings Tutorial This is a brilliant idea… and the possibilities are endless. Love it! Printed Candles Who doesn’t love a candle? Think about how many different stamps you could use to customize this project. tutorial Hot Chocolate Art! What a great gift for neighbors and teachers…
Sewing & Knitting. Household needs/wants. Jewlery. Clothing. Jars/Glass/Bottles.