
Make Your Own Heart Shaped Toggle Clasp. Cake Charm Tutorial by ~whitefrosty on deviantART. How to Make Earring Wire Tutorials with Variations - The Beading. Have you ever run out of ear wires or wish you could hand forge your own for the ultimate artisan look?
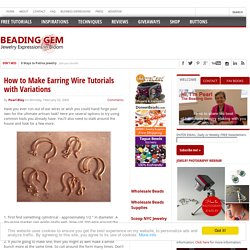
Here are several options to try using common tools you already have. You'll also need to stalk around the house and look for a few more. 1. First find something cylindrical - approximately 1/2 " in diameter. A dry erase marker pen works really well. Simple Turquoise Hoop Earrings Tutorial. Wire wrapping free tutorial by ~Aniolek-maly on deviantART. How to make a Lolli Pop Charm by *chat-noir on deviantART. Cake Tutorial by ~HanaClayWorks on deviantART. How to make a chibi jack charm by ~caithness155 on deviantART. HUGE strawberry charm tutorial by ~Oborochann on deviantART. Panda Charm Tutorial by ~Oborochann on deviantART. Chocolate Charm Tutorial by *chat-noir on deviantART. Tutorial - Polymer clay roses by ~Catgoyle on deviantART. Octopus Charm Tutorial by ~Oborochann on deviantART. Demon Wing Tutorial by ~nolwen on deviantART.
Rainbow cake tut by ~MissMusicmelon09 on deviantART. Milkshake Poly-Clay Tutorial by ~paperfaceparade on deviantART. How to Make Cupcake Earrings by ~geurge on deviantART. Now for the frosting. How to make a miniature cake with Polymer Clay, by IGMA Artisan. By popular request we are going to create a miniature chocolate and vanilla layer cake with vanilla icing.
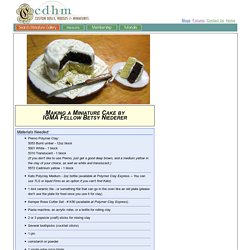
The chocoholics wanted the chocolate, and others wanted a good recipe for a realistic vanilla cake. So we're doing both. If you want an all chocolate or all vanilla cake, that's just fine! We'll do the chocolate layer first. Preheat your oven to either 275°F ( 135°C) if you are using Premo or Sculpey, or 265°F (129°C) degrees if you are using Fimo. 1. 2. 3. 4. 5. 6. 7. 8. 9. 10. 11. 12. 13. 14. 15. TIP: Remember, if your clay is sticky you can dust it with cornstarch, then brush it off when you're done! 16. 17. 18. 19. TIP: The key is to hold your cake lightly so it stays in shape. 20. 21. 21 (b)The Preferred method of texturing the cake: is to use a pin to tease up the clay on the cut surface.
ShiversTheNinja's Journal: On the subject of polymer clay... Dollhouse miniature mini food polymer clay fimo tutorial. You will need: green clay for lettuce flesh-colored clay for turkey red clay for cranberries artist pastels in brown, orange and gold (or whatever combination will give you a nice golden-brown color Gloss Varnish wad of aluminum foil paintbrush (to spread pastels) razor blade (to shave pastels) pic (to help move small items Platter for turkey--make or buy.
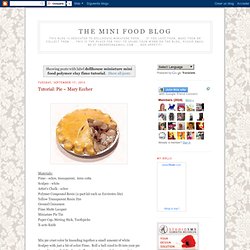
Start by pulling off pieces of the green, and shredding slightly in your fingers to achieve a 'torn' lettuce look. Go all the way around the platter. Next, take your flesh color and mold it into the shape of a breast of turkey. Pick off two smaller pieces from your clay, and form into drumsticks. Next--wings! Make sure your turkey is going to cover all the garnish on the tray. Shave off a small amount of each color, and blend until you have the right shade for a cooked turkey. Once it is done to your satisfaction, set it onto the tray. This turkey hasn't been baked yet, but this gives you an idea of what it will look like.
デコデン //// DECO DEN - Massive tutorial of death!!!! Alright, so you won't die from reading this tutorial, but I know I sure hurt after making it!

My neck as a crick in it after all those photos and editing/resizing them all. >. < gah! Anywho, when I did my intro post, a couple of people asked me to do a tutorial for my sweets deco stuff, so here it is!!! Paper Clay Set up your workspace. This includes materials. Here's my workspace. Items I have gathered are: Chalk pastels to colour the clay.
Tiny cookie cutters and plastic measuring spoons. The clay! A thin, square wood board (gotten at Hobby Lobby again) that I've covered with wax paper, a small paint brush, Steve the stiletto, a sewing pin, a tooth pick (these last three are used for making designs on the biscuits/cookies they each make a different sized dot/hole), a razor blade (be careful with this kids!) Liquitex gloss medium and varnish (Hobby Lobby or Micheals).