
Glennz Tees Designs 2008-09 on the Behance Network. DIY: Banana Republic Braided Neck Tee Shirt. Circle Zip Earbud Pouch Tutorial - Dog Under My Desk. I use a little zippered pouch to carry around my earbuds since they are the fancy microphone ones and I don’t want them to break or get tangled.
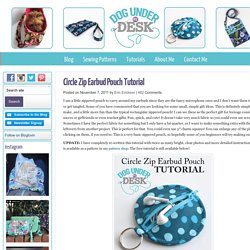
Some of you have commented that you are looking for some small, simple gift ideas. This is definitely simple to make, and a little more fun than the typical rectangular zippered pouch! I can see these as the perfect gift for teenage cousins or nieces or girlfriends or even teacher gifts. Fun, quick, and cute! It doesn’t take very much fabric so you could even use scraps! UPDATE: I have completely re-written this tutorial with twice as many bright, clear photos and more detailed instructions and it is available as a pattern in my pattern shop.
First, download the pattern template HERE. Cut from main fabric: 1 circle 2 half circles 1 tab Cut from lining fabric: 1 circle 2 half circles Cut from batting (or medium weight interfacing, if you prefer): 1 circle 2 half circles You will also need a 1″ wide nylon 5″ or longer zipper. Finger Knitting How-to. You know how I just wrote about how I like getting a handmade gift more than just about anything.
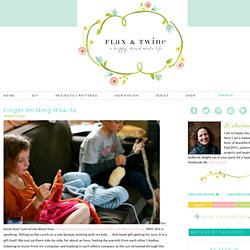
Well, this is anything. Sitting on the couch on a lazy Sunday, knitting with my kids . . . that beats gift-getting for sure. It is a gift itself. We just sat there side-by-side, for about an hour, feeling the warmth from each other’s bodies, listening to music from my computer and basking in each others company as the sun streamed through the windows. Ahhh . . .the experience was so delightful, it was hard to peel myself away to take the photos. The two kiddos are finger-knitting, which I’ve written about before and again, but it continues to be a favorite activity. You end up with a long coil of knitting like this, that curls itself into a sort of tube. My son is using a finer and less expensive yarn, here. Shaped blanket stitch scallops. How to Make Clothing Buttons from Shrink Plastic…
This tutorial is an old one of mine that’s too good not to share again.

Since posting the first time, I’ve had lots of questions about these buttons which will hopefully be answered in this revised post. Equipment Some handy notes: 1. The buttons. Single hole, hole punch (like this one here). 2. 3. Okay.. lets get started! Tracing tips: You can use either coloured pencils or permanent pens. Words must be writted backwards in order to be readable.
Shrinking the buttons: To shrink the buttons, you can use an oven or a heat gun (the kind used for embellishing). After the buttons have twisted and twirled, and are LYING FLAT, it’s time to take them out. Note: If the skrinking is taking too long, you may need to turn your oven up. Here’s a short little stop-motion to make sure you’ve got the gist of how easy this is!
Shrink Paper {here} Circle Punch {here}
Arrow bracelet - #2 Friendship Bracelet Tutorial. After you've done a few successful strip bracelets (pattern 1), you're ready to do the arrow one (chevron, #2).
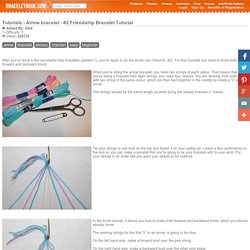
For this bracelet you need to know both forward and backward knots. When you're doing the arrow bracelet, you need two strings of each colour. That means that when you're doing a bracelet from eight strings, you need four colours. You are working from both sides with two string of the same colour, which are then tied together in the middle to create a 'V' or an arrow.
The strings should be the same length as while doing the striped bracelet (1 metre). Tie your strings in one knot on the top and fasten it on your safety pin. In the knots tutorial, it shows you how to make both forward and backward knots, which you should already know. The working strings for the first 'V' or an arrow, is going to be blue.
On the left hand side, make a forward knot over the pink string. On the right hand side, make a backward knot over the other pink string.