
DIY storybook paper roses. DIY storybook paper roses You’re going to love today’s DIY project so much that you’re going to want to start tearing pages out from old books tonight!
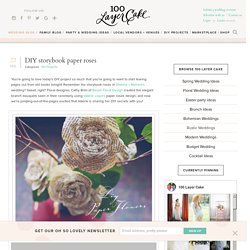
Remember the storybook roses in Shanna + Richard’s wedding? Sweet, right? Floral designer, Cathy Brim of Bloom Floral Design created the elegant branch bouquets seen in their ceremony using Valerie Lloyd’s paper roses design, and now we’re jumping-out-of-the-pages excited that Valerie is sharing her DIY secrets with you! <img class="alignnone size-full wp-image-17711" title="diy-paper-flowers-1" src="<a pearltreesdevid="PTD650" rel="nofollow" href=" class="vglnk"><span pearltreesdevid="PTD651">http</span><span pearltreesdevid="PTD653">://</span><span pearltreesdevid="PTD655">www</span><span pearltreesdevid="PTD657">. Craft Supplies:Paper Grosgrain Ribbon, ½ Width cut to 4 inch lengths 16 Gauge Wire cut to 15 inch lengths Glue Gun Glue Sticks (low temp) Scissors Wire Cutters Step 1: Gather materials.
Step 2: Cutting. Step 3: Shaping. {Decor DIY} A Step-by-Step How-To Guide To Making Colorful Paper Rosettes. How-To by A Good Affair Wedding & Event Production Photos: Luminaire Images Supplies: 2- 12”x12” sheets of paper Glue stick or Elmer’s Hot Glue Gun Scissors Step 1: Take your 12”x12” sheets of paper, and cut in half.

Step 2: Fold the 6”x12” papers accordion style with ½” folds. Step 3: After you finish folding all the pieces, glue the end of one piece to the end of a second piece so that they overlap. Step 4: After gluing all your pieces together to form one long accordion paper strip, take the two ends and join those together in the same fashion. Step 5: Making sure the glue has dried and all pieces are secure, stand your ring upwards, and gently press the top edge outwards, with the bottom edge remaining on your work surface. Step 6: If you are using two-sided paper, decide which side will be the front or back. Step 7: To secure your paper rosette, take your hot glue gun (it sets faster) and put a dollop of glue right in the center.
End Product: A beautiful 12” Paper Rosette! Xoxo. Girly Me (oh my gosh!! I’m so making these!!) Washington DC Wedding Blog ~ DIY Origami Bouquet Tutorial. I am SUPER excited for today’s DIY Wednesday tutorial feature coming to us from Lindsey of Elusive Photo Design.

You all know how much I love the unique, different, and offbeat when it comes to weddings [especially in the Washington, DC area], so naturally, I jumped out of my seat when Lindsey sent me this: DIY Origami Paper Flower Bouquet From Lindsey: These kusudama origami bridal bouquets are remarkably simple to make, and can be made to your taste using a variety of different types, colors, patterns and sizes of paper. I recommend doing a few practice flowers with pre-cut, thin origami paper first.
As someone who didn’t use live flowers in my own wedding, I am always pumped when I find other ideas for non-floral bouquets. I love how unique this bouquet is, and that it’s a DIY bouquet! You will need: PaperWooden Dowel RodsCraft GluePaper ClipsA Foam Ball Read more to get the full-on tutorial, with step-by-step pictures to make your own, DIY Origami Paper Flower Bouquet! 1. 2. 3.