
Digital Image Basics 101 - All about images from cameras and scanning. Nikon SB-600 - CLS Remote Mode - DavidPartington.com. Sometimes manufacturer’s manuals are not so easy to follow, or get lost, so for those wanting a more pictorial demonstration of using the Nikon SB-600 in CLS Remote (Slave) mode here goes: SB-600 CLS Custom Settings To set the SB-600 to Wireless Remote mode hold the ZOOM and [-] buttons at the same time for approx 2 seconds, or until the Custom Settings mode appears.

SB-600 Remote Indicator If the Wireless Remote Mode Indicator is not shown, Press the [+] or [-] buttons until the Wireless Remote Flash Mode appears. This is indicated by the arrow on the display. SB-600 Remote On Press the MODE button to toggle between OFF and ON (set to ON), to enable the Wireless Remote Mode, then press and hold the ZOOM and [-] buttons again to exit the Custom Settings menu. To disable Wireless Remote mode, simply repeat the procedure above, but press the MODE button to toggle the setting to OFF. SB-600 Remote Active Note that when the Wireless Remote mode is active a new icon will be displayed on the LCD. 6 simple lighting setups for shooting portraits at home (plus free cheat sheet) If you're looking to take your photography further you'll probably want to learn how to use off-camera flash.
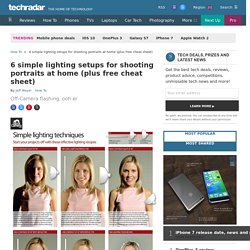
In this tutorial we show you 6 simple studio light setups that will help you capture some of the classic portrait lighting effects. What's more, these lighting techniques will provide you with a solid foundation from which you can start experimenting to find your own style. In our lighting setups cheat sheet below you'll learn how to use high contrast light at a 90-degree angle; diffused light and a reflector; high contrast light at 45 degrees; high contrast light at 45 degrees with a reflector; low contrast light at 45 degrees with a reflector; and finally rim lighting from behind. Lighting Setup 1: High contrast light at a 90-degree angle A striking result achieved with minimal kit. The light will show up bumpy skin textures and create stark shadows and bright highlights. By not using a reflector, shadows will be deep. Patdavid.net: Visualize Photography Lighting Setups in Blender. The most patient portrait model in the world...
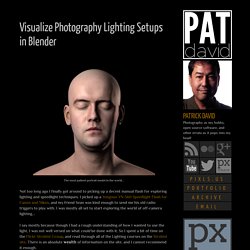
Not too long ago I finally got around to picking up a decent manual flash for exploring lighting and speedlight techniques. I picked up a Yongnuo YN-560 Speedlight Flash for Canon and Nikon , and my friend Sean was kind enough to send me his old radio triggers to play with. I was mostly all set to start exploring the world of off-camera lighting... I say mostly because though I had a rough understanding of how I wanted to use the light, I was not well versed on what could be done with it.
Having a reference for how the contribution of different types of light will affect the final outcome is very handy for me. This is nice, but what if I wanted to visualize the effect multiple lights will have all simultaneously? It occurred to me that I already had a great tool for doing this visualization already installed on my computer. I focused first on a softbox. 24" softbox 45° cam left, up 30°
Off Camera Flash, Studio Lighting Setups and Portraits. Cхемы студийного света. После того, как вы определились с выбором фотостудии, разобрались со студийным светом, насадками, необходимо научиться выставлять свет.
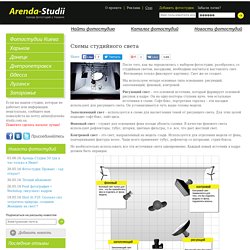
Фотокамера только фиксирует картинку. Свет же ее создает. Мы используем четыре основные типа освещения: рисующий, заполняющий, фоновый, контровой. Рисующий свет – это основной источник, который формирует основной рисунок в кадре. Он на одну-полторы ступени ярче, чем остальные источники в схеме. Заполняющий свет – используется в схеме для высветления теней от рисующего света. Фоновый свет – служит для освещения фона позади объекта съемки. Контровой свет – это свет, направленный на модель сзади. Но необязательно использовать все эти источники света одновременно. Настройка камеры для работы в студии При работе в фотостудии нам нужно установить на камере ручной режим управления - режим М.
Если при таких настройках ваш кадр будет переэкспонирован (очень светлый), вам нужно прикрыть диафрагму. Один источник света Два источника света Введем второй источник света. Cхемы студийного света.