
Felt Eggplant Spinach & Tomato Lasagna. Felt Eggplant, Spinach, and Tomato Lasagna I love making felt food - especially if it's easy, or not too hard to make.Today I have a delicious addition to my felt food line-up that's very simple to make!

It's a felt eggplant, spinach, and tomato lasagna! I got the idea from a yummy recipe I found here. Remember to click on a picture to ZOOM in! Materials needed:Red, white, off white (or pale yellow), green, yellow (goldish), and purple felt. Lasagna noodles:1. You now have lasagna noodles. Tomato Sauce:1.
You now have two square sauce pieces. Ricotta Cheese:1. You now have one square ricotta cheese piece. Cheese & Shredded Mozzarella:1. You now have one square cheese & shredded mozzarella piece. Felt Bow-Tie Pasta. I put this little set of Bow-Tie (Farfalle) pasta together using One Inch World's easy tute!
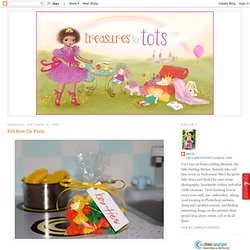
I used the colors like Haba's Biofino Store Farfalle Noodles 'cause they are so bright and colorful! Please ignore my sad little bow and plain label! I can't tie a bow and I have a horrible handwriting! I think I'm going to add these little bags of Bow-Ties (18 per bag) to the party favor bags I'm planning for Serenity's birthday. If I do, I think I'm gonna ask my sister to write the labels -her handwriting is much better than mine! I hot glued these together since I don't know how to needle felt (yet!). If you're going to use hot glue to hold your noodles together, here's a few tips I learned: FOLD the noodle first. Add a small, thin bit of glue down the middle. Pinch the noodle together until the glue dries a bit.
Once the glue has dried completely, cut any excess glue that might have beaded up while you were pinching it. It was easy once I somewhat got the hang of the glue gun. Felt Tortelloni Pasta and Tin. This is a very easy and cheap, no sew felt food tutorial!

I've never actually made real tortelloni pasta , so to learn how to fold it I used a wonderful picture pasta shaping tutorial over at a yummy cooking blog called Palachinka. Nice! Tortelloni Supplies:(makes 12)1 piece of 9"w x 12"l dark yellow craft felt cut into 12 3"x3" squareshot glue gun & glue stick12 cotton balls Turn the felt square so it looks like a diamond. Roll a cotton ball between your hands until it's a little oval-ish, place it in the center of the diamond.
Pinch it closed until the glue sets. Place a dot of glue on one side of the tortelloni, then lay the edge of the other side on top. Tin Supplies:Maxwell House tin (recycled!) Measure width of the tin and cut the paper. Put the paper on the tin starting at the tin's seam. All done!! Bethany was a HUGE help making the pasta and the tins while I took pictures.Thank you Bethy!! POST-IT-NOTE: Serenity's peas and carrots are from the Learning Resources. Felt Farfalle (Bowtie) Pasta « One Inch World. More playfood, this is ridiculously easy to make.

You may notice that the finished pasta is a different color than the in-process pasta… My daughter broke my last felting needle while I was wraping the second-to-last felting needle that I had just broken in tape to throw it away… Oy. Her punishment was having to go to the (boring) quilting store to buy me new felting needles. (^_^) Cut a felt rectangle 1.5" by however long you want. Each inch of length will make one pasta. Pink the long edges of your rectangle. Cut into approximately 1" wide sections. Fold felt into a W the long way, and needle felt, stitch, or heck, glue, in the middle. Felt Agnolotti Pasta.
Day to Day: Tutorial - felt food ravioli. This week's posting is an easy one (well, I think they've all been super easy, but this one is really fast).
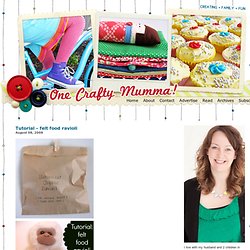
Pasta Ravioli. Bella has been begging for me to make her some pasta for a little while now. I was going to finish it off with a small felt bag to keep the pasta in, but then found the brown paper bag in the cupboard, stamped the title and closed it at the top with a sweet teeny tiny peg. Step 1: Cut out the ravioli (5cm X 5cm square) using pinking shears (crinkle cut scissors) for the edges. I fancied the finish that the pinking shears gave, but you could always use normal scissors if you didn't have any handy and just have straight lines. Step 2: Machine stitch around 3 edges of the ravioli. Step 3: Lift up your machine foot once you've stitched the three sides and carefully poke a little stuffing in the ravioli. Before I sign off for today I wanted to share a very yummy plate of food that Martine from Belgium made using my tutorials.