
Merry Christmas Lights Ornament Set 10 by DanielleLondon. ALL THAT GLITTERS...MINUS THE MESS. So...are you like me?...
You heart all things glittery...but hate it being all over you?... You know....looking like you're about ready to hit the clubs...well...here's some ornies that have all the sparkle...but none of the mess... i so wish i could claim this idea as mine own...because it's pure genius!... But i can't!... Insert sad face here...actually came across it on everyday cricut...these make the best gifties!... The trick?... Snowman Glue Craft. Snowman Crafts This snowman glue craft is an easy project for kids or adults alike.
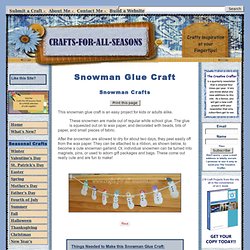
These snowmen are made out of regular white school glue. The glue is squeezed out on to wax paper, and decorated with beads, bits of paper, and small pieces of fabric. After the snowmen are allowed to dry for about two days, they peel easily off from the wax paper. They can be attached to a ribbon, as shown below, to become a cute snowman garland. All washi tapes: GUIRNALDA NAVIDEÑA CON WASHI TAPE. Glitter Christmas Ornaments. If you haven't seen this yet, you will be amazed!
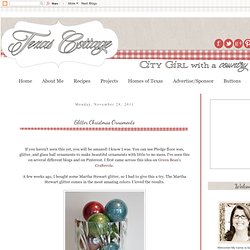
I know I was. You can use Pledge floor wax, glitter, and glass ball ornaments to make beautiful ornaments with little to no mess. I've seen this on several different blogs and on Pinterest. I first came across this idea on Green Bean's Crafterole. A few weeks ago, I bought some Martha Stewart glitter, so I had to give this a try.
All you need is a bottle of Pledge Future liquid floor wax, glitter, glass ball ornaments, and a funnel. Pour about a tablespoon of Future into an ornament. Using a funnel, pour glitter into the ornament. Holding your thumb over the hole, shake the ornament so that the glitter covers the entire surface. Tap the ornament and pour the excess glitter back into the bottle. Let it dry and insert hanger. Sock Snowman. Here's another quick and easy idea for Christmas.
It's inexpensive and great for younger children. For this craft, I modified The supplies you'll need are: 1 - small white sock1 - small piece of orange felt2 - 7mm black poms1 - 6" thin strip of black felt, cut on one side with pinking shears1 - 6" length of 1/8" red satin ribbon.1 - small embellishment, such as a star or snowflake2 - small rubber bandsfiberfilFor tools, you'll need sharp scissors and fabric glue, and optionally pinking sheers. Begin by cutting the cuff from the sock, cutting across at the heel.
Loosely stuff the toes with fiberfil. Secure the stuffed sock with a small rubber band. Fold the red ribbon in half and tie the ends together with a large knot. Insert the knotted end of the ribbon into the cut end of the sock cuff. Fabric ornaments with your little ones. - Mod Podge Rocks! I know that right now many of you have little ones at home – they are out of school, it’s cold outside and they are bored.
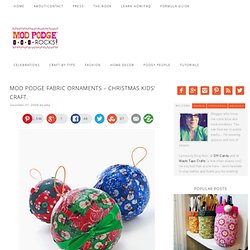
They might need a fun Christmas kids’ craft. Good news – Mod Podge is here to help. Finishing Your Ribbon Wreath. Kids' Holiday Crafts: Pom-Pom Snowman Magnet or Pin for Winter and Christmas. Easy pieced wreath: free pattern and tutorial. We've been dying to use our fabric stash to make a festive wreath.

We looked at many methods, including tying fabric strips to a wire frame, but we were put off by these words of wisdom: "You will tie and tie for days and days".... and: "I got blisters on my fingers from the fabric when I tied it" (see where beauty meets function). So we asked ourselves: why not stitch the strips together, then simply wrap them around the wreath? After some trial and error we came up with this easy pattern that produces a beautiful, full wreath. The bow is built in, and the wreath itself can be re-used (the fabric strips can be removed for storage !) This wreath has fabric all the way around, so it can be admired from both sides of a glass door. It also looks great on the front door: SCRaPPY CaNuCK STuDioS.
I'm not sure these little guys could scare anyone!
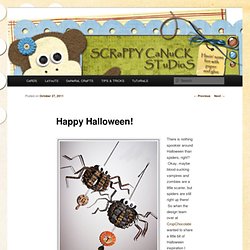
The Echo Park Happy Halloween paper is fabulous! There is nothing spookier around Halloween than spiders, right? Okay, maybe blood sucking vampires and zombies are a little scarier, but spiders are still right up there! So when the design team over at CropChocolate wanted to share a little bit of Halloween inspiration I thought spooky spiders were definitely the way to go!
Knitty Gritty Thoughts: Happy Thanksgiving and Free Fabric Styrofoam Ball Pattern! Supplies are easy, most of them you'll probably already have around the house.
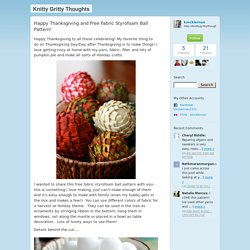
You'll need - Fabric - your choice of colors and prints. The amount you need depends on the size of the styrofoam balls you use and how thick you place the fabric. My mileage is between 1/4-1/2 yard per ball. Then she made...: Sock Snowmen. This morning when I went out to take my daughter to school it was -12.

That is too cold for my blood and despite the beautiful snow on the ground there is NO way you're getting me outside to make a snowman. So, instead, I'll opt for the inside version made out of socks. Free Santa Hat Pattern - Fleece Fun. This Santa Hat how to is a snap to make!

You can make a cute Santa Hat to bring holiday cheer to all who wear it… or at least a cute picture! For the hat you will need: A printed out version of this pattern. 1/3 yard ( a tad more for the largest size) fleece or felt 1/4 yard furry fleece or contrasting material for the brim and ball thread, needle small of batting or fabric scrapsJingle bell (optional)Sewing Essentials (scissors, pins, etc.)Sewing Machine Here’s the video tutorial, written tutorial below: Santa Hat How To Tutorial 1 – Cut out the pattern PinThere are multiple are multiple sizes to this pattern. 2 – Begin to sew PinTaking the two topper pieces, place them right sides together and sew all the way around the ball with a .5 seam allowance. Also for some extra Christmas cheer place a jingle bell inside the ball (optional). 3- Sew the hat PinSandwich the topper between the two hat triangle (right side should be facing in).
Felt Christmas tree Template and DIY · Felting. Dec. Felt Christmas Trees. Felt Christmas Trees I wanted to make four felt Christmas trees, one for each member of our family. These trees are very easy to make and cost about 30 cents each. They are also so much fun because you can make many different versions and you can even let your kids help you decorate them. These are generally based off of this pom pom felt flower that I love to make. First you need to make cardboard cones. Next, you need to make a lot of felt "leaves" (like the pom pom flowers). Oh Felty Christmas Tree! Homemade for the Holidays: Easy Felt Crafts: Pine Art.