
I Heart Fake Food - French Bread Tutorial. In case there have been any questions...yes, I still heart fake food.

If you still heart fake food as well, go grab the following supplies: Tan and Cream Felt Fiber Fill Straight pins *both hand sewing and machine sewing required There is no pattern. Simply cut {2} 5 inch x 15 inch pieces of tan felt {you'll need to buy felt from a bolt, the sheets of felt won't be long enough} and {1} 5 inch x 12 inch piece of cream felt. To give your bread some dimension you'll want to cut 3 sections across {1} piece of tan felt. Pin the side with the cutouts to the remaining piece of tan felt. And there you have it, gluten free, carb free French bread. Felt Spinach Can Tutorial. Halloween is right around the corner and I have the boys costumes ready to go!

I picked out Popeye and Swee' Pea costumes but decided they needed a little extra touch...spinach cans! These spinach cans were super easy and cheap to make. I know my spinach looks more like wavy green beans, but I wanted a dimensional look that was fast to create :-) I added 'crinkle' to the baby's can to it was more interesting to play with. Check out my tutorial below and look out for a Halloween costume giveaway within the next day or two! You will need:1 piece of gray felt1 piece of dark green felt1 piece of light green felt (or your choice of color for the label)1 empty plastic disposable wipe baghandful of poly fillelastic (optional) Use a drinking glass to trace the size of can you prefer. I cut a 6 1/2 piece of elastic to wrap around Cole's hand. First hand embroidery 'Spinach' on the label. Pin the label on to the main part of the can and stitch.
Felt Chili Pepper Keychain. Felt Soup Can and Chicken Noodle Soup. Felt Play Food Croissants. Free Felt Sandwich Pattern. Confessions of a Homeschooler Homeschool Mom Blog with Free Printables, Curriculum, Preschool, and More!

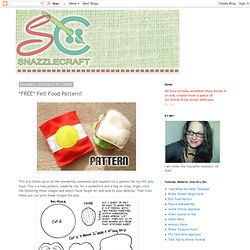
Recently Homeschooling 101: First Day of School Journey to the Center of the Earth Unit Study World Geography Unit Study: Argentina What’s in the Workbox? Homeschooling 101: Homeschool Storage Solutions. *FREE* Felt Food Pattern! This is a follow up to all the wonderful comments and requests for a pattern for my felt play food.

This is a free pattern, made by me, for a sandwhich and a bag of chips. Right-click the following three images and select "Save Target As" and save to your desktop. Then from there you can print these images full size. Basically the construction on these is pretty simple. Everything was handstitched using embroidery thread matching the color to the felt. Potato Chips and Bag:The chips were the only thing that were not handsewn. Blanket stitch the brown strip onto one side of the white bread part. Swiss Cheese:This was pretty simple. Vilten eten. Er is hier niet stilgezeten.

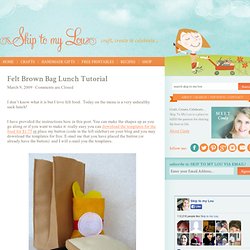
Sinds de kleine meid geboren is (en eigenlijk ook al daarvoor), ben ik druk geweest met het maken van vilten eten. Ik heb de stille hoop dat daar ooit natuurlijk fanatiek mee wordt gespeeld. Er was al eerder een pizza bodem gemaakt, nu zijn daar ook champignons bij gemaakt. Ook zijn er natuurlijk gezonde groenten bij, tot nu toe broccoli en bloemkool. En tomaten... want die horen daar gewoon bij. Heeft iemand nog ideeën wat ik nog meer van vilt kan maken? Free Tutorial Diy Felt Toast. Felt Brown Bag Lunch Tutorial. I don’t know what it is but I love felt food.

Today on the menu is a very unhealthy sack lunch! I have provided the instructions here in this post. You can make the shapes up as you go along or if you want to make it really easy you can download the templates for the food for $1.75 or place my button (code in the left sidebar) on your blog and you may download the templates for free. E-mail me that you have placed the button (or already have the button) and I will e-mail you the templates. The Brown Paper Bag You need two pieces of light brown felt. Pinch the side and bottom together and sew. Finished! The Chip Bag and Chips. Felt sushi tutorial « hoogli art. Felt Pizza Sauce: Felt Food-Cook Along Day 2. Felt food again: a children's lunch classic. One more day of my ninth craft till Christmas, and I suddenly went into a panic attack when I read this comment made by Polly from Helping Little Hands, "Wow!

My foray into felt foods. My foray into felt foods has been frustrated by a fantastically frantic April.

(Ahhh . . . alliteration . . . the overkill of one poor unsuspecting letter.) But seriously, I feel like this month has gone super fast. Monday Project - Felt Cheese. This weekend I made the last of my felt food project pieces - cheese!

I'm sure I'll be working on more felt food designs since I had so much fun with them. However, Thanksgiving is quickly approaching and little c will be flying down with her parents, so the "surprise" needs to get finished up. I can't show you what it is yet, but you'll get to see it next week. The cheese is put together a lot like the fruit pies from last week are. The Amazing Changing Pizza Crust (Tortilla) - Felt Food Cook-Along Begins.
Are you excited?!?!

It's the first day of our cook-along. I thought about starting with something super easy...like the pepperoni...but I thought we'd take a build up approach and start with the pizza crust. The pizza crust is just slightly more involved than a lot of what we'll be making, but don't let yourself get intimidated. Day to Day: Tutorial - Felt Food (egg & orange slices) Here's the first felt food tutorial, as requested. These are really simple to create and most importantly very fast to sew and I think teamed with a little felt (or fabric) bag to hold the food they would make gorgeous, economical gifts for little ones - especially with Christmas only 6 months away. I'm planning on making a bag at some stage to hold Bella's food - if you would a tutorial on that too, let me know here and I'll work on one. To begin right hand click on the template below and save to 'my documents'.
You can then print out the template on a4 paper and cut out your felt food pieces ready to begin. The small circle should measure (when printed) approximately 5cm in width - but remember, this is only a guide - your food can be any size :) I've included two different sized/shaped eggs for you. Free felt tutorial-Step by step DIY Felt Mini Hamburger course. How to make felt hamburger 1. Looking for a size suitable piece from the scraps. 2. Felt Easter Eggs {A Tutorial}
My daughter has a bunch of the plastic food from a big box store, and some of it has held up nicely. Her eggs, however, have been "eaten" and stepped on by her sweet little brother. So, as part of Project: Project's fun little series, Play Eats, I decided to make a tutorial for felt eggs. AND since it is so close to Easter, I thought, why not make BOTH kinds of eggs??
The colored variety and the plain 'ol whites. Play pizza restaurant in a box. Summer 2011. Sewn Egg Chick Tutorial by Kata Golda Making lots of eggs and some baskets for spring, I came up with the egg chick because something felt missing....an egg with a cute face...looked like Humpty Dumpty. A chicken, that was a bigger endeavor....so here is the egg chick.
Just the perfect size for little hands to hold, to slip in a bag when needing to bring along a little toy, to give as a gift. Materials. Tutorial: Over(ly)-Easy Pincushion « Speckless Blog. This here is a quick and easy project that uses up felt scraps. These pincushions make great little last-minute gifts — nothing says “you’re a good egg” like an egg-shaped pincushion. Here we go . . . Materials: scraps of white and yellow feltembroidery thread: yellow, white, and face colorstuffingneedlescissorspins.