
I am currently studying Cosmetology @ Tricoci University of Beauty Culture in Bridgeview, IL. I am a total fashionaholic!! I love all aspects of Fashion!!
Pinterest / Home. Jewelry Class. DIY Macrame Bracelet. Growing up by the beach in Southern California, the ability to knot a macrame bracelet was practically a right of passage.

Although those days are long behind us, we’ve never forgotten the ever-so-simple square knot technique. This time, however, we’re replacing hemp and wooden beads for more updated elements like colorful nylon cord and glossy metal charms. Happy knotting! You’ll need: Start by cutting the knotting cord into two 30 inch, two 20 inch and one 10 inch lengths. Center the 30 inch cord under the two middle strands. Pull tightly and slide the knot up to the top. Finish the 2nd half of the square knot by folding the left cord over the middle strands and under the right cord. Pull tightly and repeat the steps – left, right, left, right . . .
DIY Macrame Bracelet. Jewelry Making Classes Online at Beaducation: The Blog. How-To. DIY Gold Tube Bracelets. I have very vivid memories of walking into a bead store for the first time, almost 15 years ago, and being overwhelmed by the million and ten ideas that filled my mind.
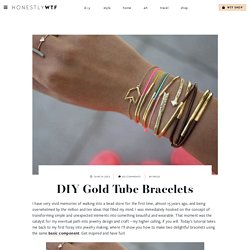
I was immediately hooked on the concept of transforming simple and unexpected elements into something beautiful and wearable. That moment was the catalyst for my eventual path into jewelry design and craft – my higher calling, if you will. Today’s tutorial takes me back to my first foray into jewelry making, where I’ll show you how to make two delightful bracelets using the same basic component. Get inspired and have fun! For single, adjustable gold tube bracelets, you’ll need: Start by cutting the knotting cord into 2 12 inch pieces. And now, all that’s left is the sliding closure! . . . and bring the top cord under both the bottom and middle overlapping strands through the loop, into a knot.
Repeat the same step on the right side. Continue to make 5-6 more knots. Trim away any excess cord. Layer and enjoy. DIY Gold Tube Bracelets. DIY Gold Tube Bracelets. Friendship Bracelets. Macraméd friendship bracelets were all the rage when I was growing up in the eighties.
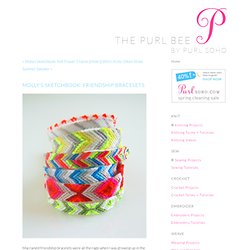
All the girls at my school would obsessively make them for one another in a dizzying variety of colors, widths, and patterns. It's amazing, thinking back, that such young girls could make such beautifully intricate accessories. I, of course, tried my hand at making them as well. I would ride my bike down to the five-and-dime store and pick out the most sophisticated color combinations of embroidery floss I could find, but when it came to the actual macramé I never got beyond plain stripes. There was nothing wrong with plain stripes, except that the other girls seemed so much more advanced with their diamonds and chevrons. Fast forward 20 years: Purl Soho started carrying DMC Cotton Embroidery Floss in every conceivable color (including fluorescents! Making friendship bracelets is a surprisingly easy craft, and best of all, in the end you'll have a bunch of cute summer bracelets to give to your pals. Quick gift: Cozy hand warmers. Still have a few people left on your list?
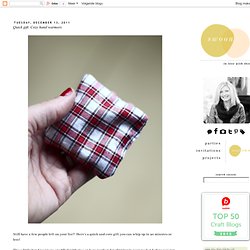
Here's a quick and cute gift you can whip up in 20 minutes or less! These little hand warmers are filled with rice and are perfect for slipping in your pocket before you run out the door! I made a few extra for myself for those chilly late evening/early morning walks with my dog. Supply list: 4 pieces of 3"x3" cotton fabric (no blends) sewing machine/supplies uncooked rice To Make: Pin two pieces of fabric together, wrong side out Use your machine to sew around the edges, leaving at least an inch open Turn square right side out Fill square 3/4 of the way with rice (I used a spoon) Hand sew or machine stitch the pocket opening Package your hand warmers in a cute bag and be sure to include instructions for use (shown in third photo above).
DIY Friendship Necklace. As soon as Lauren and I saw this editorial in Flare Magazine, we knew we had to recreate these awesome, friendship bracelet-like necklaces.

We promise they are super easy to make and the perfect way to pass the time during those long summer roadtrips. To make a 2-tone necklace, cut a long piece of rope and wrap two different colors of embroidery thread around its own bobbin. Tie a starter knot along with the two colored threads you are using, leaving at least 3 inches of slack, Tape down the slack to a flat surface or safety pin it something that will help keep it in place (feeling nostalgic yet?).
Lay the color that isn’t being used (shown here in purple) in your left hand, along with the rope, and hold them taut. Take the active color (shown here in red) in your right hand, pass it over the rope, loop it under and back through the opening.
CheckPoints - The App That Pays You Back. AllFreeCrochet.com - Free Crochet Patterns, Crochet Projects, Tips, Video, How-To Crochet and More.