
Tutorials/Materials/Clear Glass. From BlenderWiki Glass and other transparent materials are very easy to create if you use Raytracing.
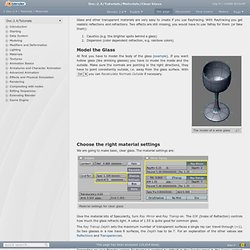
With Raytracing you get realistic reflections and refractions. Two effects are still missing, you would have to use Yafray for them (or fake them): Caustics (e.g. the brighter spots behind a glass) Dispersion (color dependent refraction, e.g. rainbow colors) Model the Glass The model of a wine glass At first you have to model the body of the glass (example). Choose the right material settings We are going to make basic, clear glass. Material settings for clear glass Give the material lots of Specularity, turn Ray Mirror and Ray Transp on. The Ray Transp Depth sets the maximum number of transparent surfaces a single ray can travel through (+1). Turn Raytracing on Depending on your Blender version Raytracing is enabled by default in the Render panel in the Scene context (F10). Use Ray Shadow lamps. Build an environment Some glass. Give your glass something to reflect and refract.
Blender 3D: Noob to Pro/HDRi. Introduction[edit] You may have heard various people talk about HDR images.

(WETA, Lucas, even Tim Sweeny). HDR images are part of a technology called HDRi which stands for "High Dynamic Range (image)". So... what on earth does that mean? Here's a link to Wikipedia's article on the HDR format which I personally give all my credit to Paul Debevec for putting it to use for computer graphics purposes. Also, visit Paul Debevec's website if you've got some more time to spare. To sum up the excitement of HDR CG, think of it like the hype of the next-generation videogames that are about to come out, except set the stage for 1996 instead of 2006.
To use HDRi images for 3D rendering, you need something called a light probe... Definitions[edit] Blender 3D: Noob to Pro/Creating Pixar-looking eyes in Blender. The final result, with a blue iris.

Note: This tutorial uses the same modelling and texturing technique described in the well-known MAX tutorial by Adam Baroody ( The sole purpose of my tutorial is to make this technique more popular among the Blender users by explaining how to achieve the same result with Blender. The goal of this tutorial is to make a Pixar-looking eye. One of the main reasons that Pixar's characters really convey life is in their eyes. They have depth, you can see how the eye not only shines but it "collects" light. You may think that you can't achieve this effect without raytracing but you're wrong. Parts of the Eye[edit] In this picture you can see the "ingredients" of the eye model. I won't go deep into modelling of each element - it uses Blender's subdivision surfaces and it's quite simple as you can see. Materials[edit] Now let's look at the materials. Sclera[edit] To make the eye white, press NUM3 to go into side view and add a UVsphere with 8 segments and 8 rings.
1/7 - Facial Intro Topology - Sintel.