
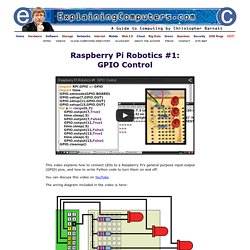
ExplainingComputers.com: Raspberry Pi Robotics. This video explains how to connect LEDs to a Raspberry Pi's general purpose input-output (GPIO) pins, and how to write Python code to turn them on and off.
Raspberry Pi Robotics #2:Zumo Robot This video shows how to construct a Pololu Zumo robot chassis, how interface it to a Raspberry Pi using an L298N H-bridge motor controller, and how to use Python code to bring the robot to life! You can discuss this video on YouTube. The micro metal gear motors used in the video are available from Pimoroni here, or from Pololu here. Pololu Zumo chassis kit is available from Pimoroni here, or from Pololu here. Male-to-male and male-to-female jumper leads are available from Pimoroni here, or from Pololu here. For the "L298N H-Bridge Motor Controller", search for that term on Amazon or eBay. Raspberry Pi Control of Dual H-Bridge with Software PWM. It seems like I've seen several LMRians who've finally gotten ahold of their RaspPi say something along the lines of "I'm planning on using it to run a robot using my Arduino for the I/O.
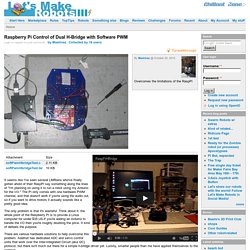
" The Pi only comes with one hardware PWM channel, and that doesn't work if you're using the audio out, so if you want to drive motors it actually sounds like a pretty good idea. The only problem is that it's wasteful. Think about it: the whole point of the Raspberry Pi is to provide a Linux computer for under $35 US-if you're adding an Arduino to handle the I/O then you're roughly doubling the price. It kind of defeats the purpose. There are various hardware solutions to help overcome this problem. In a web link I posted here a while ago, another walkthrough pointed viewers to Gordon Henderson's site.
First, the hardware. We're using pins 12 and 22 for the enables and 8&10 and 24&26 for our input pairs. I'm going to assume you're using the "Wheezy" distribution here. We'll start with the basics. Sudo . Adafruit PWM/Servo Driver - 16 Channel 12 BIT (PCA9685) Fancy making a cool robot such as a hexapod walker for your Raspberry Pi, or maybe you want to drive a lot of LEDs with precise PWM (Pulse Width Modulation) Output?
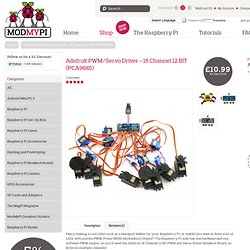
The Raspberry Pi only has one hardware and one software PWM output, so you'll need the Adafruit 16 Channel 12 Bit PWM and Servo Driver Breakout Board, so drive on multiple channels! You can control up to 16 free-running PWM outputs using only two pins and you can even chain up 62 breakouts to control up to 992 PWM outputs. It's an i2c-controlled PWM driver with a built in clock which means that, unlike the TLC5940 family, you do not need to continuously send it signal tying up your microcontroller, its completely free running!
This product comes with a fully tested and assembled breakout as well as 4 pieces of 3x4 male straight header (for servo/LED plugs), a 2-pin terminal block (for power) and a piece of 6-pin 0.1" header (to plug into a breadboard). The Adafruit 16 Channel 12 Bit PWM and Servo Driver Features: Tutorials. PicoBorg - Basic Motor Set Up Guide. PicoBorg - Basic Motor Set Up Guide Introduction The PicoBorg is an ultra compact motor controller for the Raspberry Pi.
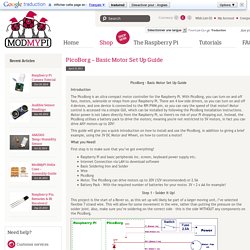
With PicoBorg, you can turn on and off fans, motors, solenoids or relays from your Raspberry Pi. There are 4 low side drivers, so you can turn on and off 4 devices, and one device is connected to the RPi PWM pin, so you can vary the speed of that motor! Motor control is accessed via a simple GUI, which can be installed by following the PicoBorg installation instructions. This guide will give you a quick introduction on how to install and use the PicoBorg, in addition to giving a brief example, using the 3V DC Motor and Wheel, on how to control a motor! What you Need! First step is to make sure that you’ve got everything! Raspberry Pi and basic peripherals inc. screen, keyboard power supply etc. Step 1 - Solder It Up!
This project is the start of a Rover so, as this set up will likely be part of a larger moving unit, I’ve selected flexible 7 strand wire. Mkdir ~/picoborg . Using the Dagu Pan/Tilt Kit with the Raspberry Pi. The Pan/Tilt kit that we sell, developed by Dagu with the guys over at Let’s Make Robots, is a great way to mount mobile sensors on your robotic projects.
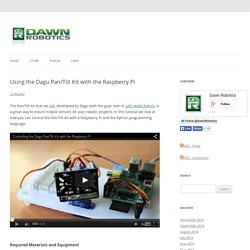
In this tutorial we look at how you can control the Pan/Tilt kit with a Raspberry Pi and the Python programming language. Required Materials and Equipment Pan/Tilt KitRaspberry PiBreadboard for making connectionsBreadboard header pinsWires with 2.54mm connectorsA separate power supply for the servo motors (optional) Assembly In order to control the servos of the pan/tilt kit with the Pi, we need to provide the servos with power, and connect their signal lines to GPIO pins on the Pi.
Raspberry Pi Controlling a Motor via GPIO. The aim of this exercise is to show students how to the Raspberry Pi may be used in conjunction with a L293D chip to control the direction of rotation a DC motor, and how the speed of a DC motor may be controlled using Pulse Width Modulation (PWM).
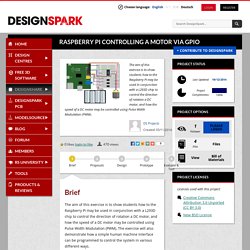
The exercise will also demonstrate how a simple human machine interface can be programmed to control the system in various different ways. Learning Objectives The exercise is split in to three “Steps” of increasing complexity.