
Bottle Butterflies! To prepare your bottle for being turned into a butterfly, first wash the label off.
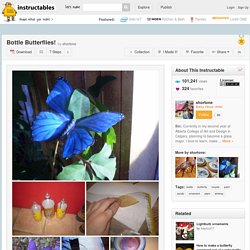
I do this by soaking it in my sink with some dish detergent, and then picking any bits off that don't come right off. If there is still a thin strip of gluey goo stuff, don't worry about it. Cut around the top of the bottle to get the top off-all you want to use is the straight part of the bottle-no curves. Recycled Crafts - Recyclable Crafts for Kids - Recycling Craft Ideas. Crafts: Bottle Fish. Can you believe this nice craft was made from trash?

It was a simple plastic bottle. Now it is transformed to an awesome piece of art or decoration. Before I start the instructions how to make it, let me tell you a story. One morning, I was driving on Riverwatch Pkwy (Augusta, Georgia). While driving, I saw a guy doing some exercise. Here are the list of material needed: A plastic soda bottle. This project uses a plastic soda bottle.
First, we need to remove the wrap and wash the bottle. Cut the bottleneck and the bottom. Now, we can dry the inside of the bottle using a paper towel. Using scissors, cut each side first, as the photo shows. Proceed to make two cuts, 'V' shaped, on the bottleneck. it will be the fish mouth. Gently, Pull each gill and each fin (sides) of the fish. Using spray paint, with a clear color first, paint the entire bottle.
Decorative Paper Lanterns - Martha Stewart Crafts - StumbleUpon. How to Make Leaf Skeletons - The Idea Room - StumbleUpon. I wanted to share with you a project from one of my readers who shares with us how to make leaf skeletons.

I LOVE this! I have several leafs in various forms displayed in my home and knew I needed to make some of her leaf skeletons to add to my decor. I love how a pattern of leaves can enhance the beauty in your home. So I asked Heather if she would mind sharing her project with you. You can find more great projects from Heather at her blog The Other White House. I have spent hours and tried various ways of making these. You need washing soda, not baking soda! Lace lamp/Doiliy Lamp – DIY. We are at our little cottage in Dalarna and we are fixing it up.

So we are able to use it even in the winter. (Dalarna is in th middle/north of Sweden. To me and Jenny it’s north but Sweden is a very tall country so I guess we are not even in the middle). Anyway it’s great cause I have the time and space to do lots of DIY projects. Cheap, trash bag Halloween decorating. In a burst of festivity, I decided we should have some Halloween decorations in the house.
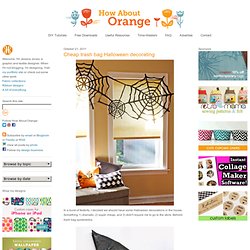
Something 1) dramatic, 2) super cheap, and 3) didn't require me to go to the store. Behold: trash bag spiderwebs. To make these, lay a trash bag out flat. Trim off the sides and bottom so you're left with two big rectangles of plastic. Cut each piece into an approximate square (eyeballing it is fine.) Fold one of the squares in half diagonally to form a triangle.
Use a black Sharpie to sketch some guides on the plastic: draw a "stem" from the folded point out to the end of your triangle. Colored Pencil Jewelry. Note from Design Mom: I asked Kate of Mini Eco to create a Back to School themed project for us to try.

I think making beads out of colored pencils is brilliant! Wouldn’t these beads be fun for your elementary school-ers to string for a class project? It would also be a fun activity at an art-themed birthday party. Here’s Kate: Lately I have become a little addicted to making (and wearing) colored pencil jewelry. I think the results look great and you, or your child, will definitely stand out from the crowd wearing them! You will need Colored PencilsJunior hacksawFine sandpaperDrill and small drill bitThread (for the necklace)Superglue (for the brooch and earrings)Brooch back (for the brooch)
DIY Cathrineholm candleholders. You're probably familiar with Cathrineholm enamelware, a line of iconic kitchen products made by a Norwegian factory that closed in 1970.

Vintage Cathrineholm pieces now cost an arm and a leg. But paper is cheap! Perhaps some DIY votive holders will suffice until we win the lottery? First I wrapped a glass candleholder with a piece of tracing paper and secured it with tape. Anything white and translucent will do the job; try parchment paper, tissue paper, or vellum if you've got some. Then I made a template, printed it onto colored computer paper, and cut out the designs with an X-acto knife. Or, if you have a Silhouette machine, you can download the .studio file and scale as needed. Or, if you hate computers, just sketch out the design by hand and wing it.
Layer the cut paper over the white paper and secure with more tape.