
Three-Tier Indoor Rope Planter - A BEAUTIFUL MESS. Three-Tier Indoor Rope Planter - A BEAUTIFUL MESS. DIY Planter with A Pair & A Spare. Flashback to our September catalog… full of women who are masters at their art; the influencers of our time who we all turn to for inspiration.

One of those gals was Geneva, founder and author of the blog, A Pair & A Spare. She’s been a maker since she can remember, and decided to create a place where her craft, writing and photography could live together as one. The DIY section of her blog is more than impressive, and today we’re collaborating with Geneva to bring you all a fun DIY planter, handcrafted by the woman herself. DIY Woven Pillow. There is something about the art of weaving that has really captured my heart.
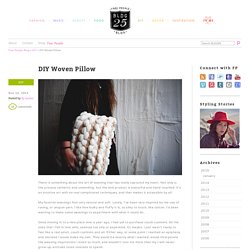
Not only is the process cathartic and unwinding, but the end product is beautiful and hand-touched. It’s an intuitive art with no real complicated techniques, and that makes it accessible by all. My favorite weavings feel very natural and soft. Lately, I’ve been very inspired by the use of roving, or unspun yarn. I like how bulky and fluffy it is, so silky to touch, like cotton. Since moving in to a new place over a year ago, I had yet to purchase couch cushions. And thus, this DIY was born. Fabric Planter DIY. It may be a "duh" statement, but since we are super into plants, we are also really into planters.
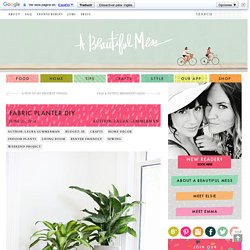
One type of planter that we haven't tried yet is a fabric planter, so I thought it would be a fun challenge to figure out how to make one. I lined the bottom of my planters with plastic and used a waterproofing spray on the fabric so it's a little more water-friendly when giving the plants a drink, but you could also skip those steps and throw the planters in the wash as needed. Ready to make one? Supplies:-fabric scissors-2 twill fabrics patterns-plastic liner (6 mm thick)-rope -extra large eyelet kit -hammer-waterproofing spray (optional) Lay your two fabrics on top of each other and cut out a rectangle of fabric that is 18" tall and 30" wide.
Use a sewing machine to sew across the top width of your fabric with a 1/2" seam allowance. Once sewn, flip your fabric over so the patterns face right side out, and iron your top seam flat. Sew down your fabric to attach the sides together. DIY Slatwood Bench. 5 Tips for Painting Your Front Door. It can be intimidating to paint.
Make Your Own Leaning Blanket Ladder. Hi!

It's Mandi here from Making Nice in the Midwest. I live in a little mid century ranch that doesn't waste any space on ceiling height. A little trick I learned in design school is using vertical elements to draw the eye upwards and give the illusion of height. Concrete Countertop DIY. DIY Geometric Wood Trivets. Hi!
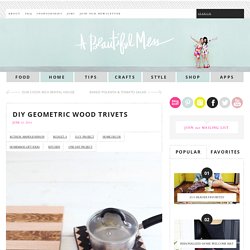
Mandi here! I just adore the beautiful geometric shapes created by marquetry craftsmen of yesteryear. You can find complex inlaid wood designs most commonly in antique wooden boxes, cabinet doors, serving trays, and tabletops, made by cutting and arranging pieces of wood veneer, then sealing the design with layers of shiny lacquer. Workshop Space Organization.
Hey, friends!
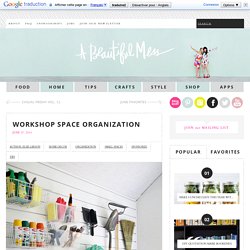
For the past few months we've been working on renovating and decorating the workshop space behind our studio house. What started out as a leaky, not-up-to-code building is now one of our favorite spaces! We'll be sharing a full tour soon, but today we wanted to start out by sharing the details of this organization wall in the garage's entryway that we worked on in collaboration with Martha Stewart Living (hi, Martha!
We LOVE you!) And the Home Decorators Collection. For this wall, we raided the Martha Stewart Living garage collection. Tip 1: Function first. Priorities, people! We started off by assessing our needs and making an inventory list of all the items we needed to store. Before you begin planning your wall, take some time to make a list of what you need to store, and sketch out possible arrangements for your wall. The awesome thing about this storage system is that it's super easy to customize and adapt as your needs change. DIY Simple Bed Frame. Today I'm happy to show you how I made my guest bedroom bed frame.
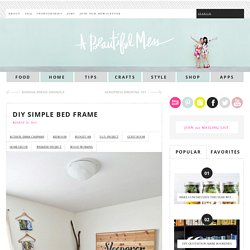
First off, I'm not talking about the headboard (the part in the back that says "Sleepover"). If you'd like to know how to make that, you can check out the tutorial here. Before I built the bed frame, we had the box spring and mattress sitting on the floor. Build Your Own Pergola (Part Three - Plants and Styling)
Yay, pergola post #3!

Thanks for letting me share this journey with you. It's been so much fun recapping the entire process with you guys. This post is going to go over planting the herbs and some other little things we did to make the pergola cozier. DIY Wire Utensil Rack. When I was planning my kitchen renovation, I didn't want to miss my chance to add some dream elements to our new space.
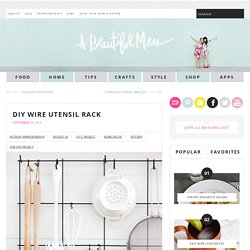
For me, kitchen dreaming is more about providing function, not just beauty, but sometimes those two qualities can collide. One of my dream elements was pretty simple— a utensil rail. A few of the kitchens I saved on my Pinterest kitchen inspiration board have rails or hooks for convenient utensil storage, and I loved the quirky look and functionality the display seemed to add to each space. Kitchen Renovation Reveal. Every morning I turn the light-filled corner into my kitchen, and I almost can't believe my eyes.
The past two months we've burned the midnight oil and spent seemingly every spare moment in our lives working on our kitchen transformation. Reno Update at our HFHS House Project. Try This: Easy (Washi Tape) Wall Art. Today I wasn't really sure what to post about. We're in between the holidays, and I'm mostly just trying to spend a little more time with family and clean up my house before the weekend is over. Hanging Copper Pipe Clothing Rack DIY. Hi guys, LaTonya here! Now that the holidays are over, I'm sure you're unpacking your kids' clothes and your own new duds, and trying to figure out where in the world it's all going to be stored!
This isn't just a holiday dilemma for us, it's a long time dilemma because of our small living space. I say our apartment is small, but really, by New York City apartment standards, it's a pretty good size. The only reoccurring issue that I wish did not exist is the lack of closet space. We only have one closet. Supplies:-large diameter mini tube cutter -3/4 pipe brush -(2) 3/4 in. galvanized malleable iron floor flange -marker -(2) 3/4 in. x 3/4 in. copper C x MPT male adapter -(8) anchors -(8) medium size screws -(2) 3/4 90 degree elbows -drill -3/4" x 5' Type L rigid copper pipe (We cut 8in. of the pipe for the hanging portion.
Step One. Step Two. Step Three. Step Four. Step Five. Step Six. Hanging Copper Pipe Clothing Rack DIY.