
A Professional Fashion Shoot With an iPhone 3GS. Sony α Portal. Photographing FOOD. 4 Inexpensive Ways To Improve Your Food Photography. Are you interested in adding food photography to your portfolio, but don’t know where to start?
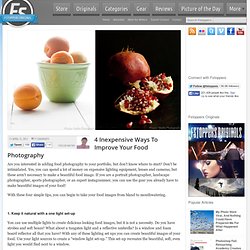
Don’t be intimidated. Yes, you can spend a lot of money on expensive lighting equipment, lenses and cameras, but these aren’t necessary to make a beautiful food image. If you are a portrait photographer, landscape photographer, sports photographer, or an expert instagrammer, you can use the gear you already have to make beautiful images of your food! With these four simple tips, you can begin to take your food images from bland to mouthwatering. 1. You can use multiple lights to create delicious looking food images, but it is not a necessity. Position the key light on the side or behind the subject. 2.
Unless you are shooting food before slaughter, your food will not move on set. Another type of shot that tripods are great for is one with many dishes. 3. In portrait photography, there are certain camera angles that are more flattering to the human body than others. 4. Food is full of color! Tips to prevent Blurry Photos. Photo credits: Alison Lyons Photography In one of my previous posts I wrote about the 7 causes for blurry photos.

In this article, I shall give you some tips I use to prevent blurry photos. 14 tips to prevent blurry photos Tip #1: Use a tripod or a support Avoiding camera movements while making an exposure prevents blurry photos. Tip #2: Use self timer/shutter release cable Eventhough a tripod or monopod makes a camera steady, it may not avoid camera shake in some situations. Tip #3: Hold your camera properly One of the reasons for camera shake is improper holding of the camera. Tip #4: Use mirror lock-up When you press the shutter release button your camera’s reflex mirror flips up and exposes the sensor.
Tip #5: Choose a proper shutter speed Blurry pictures are produced when the shutter speed is very slow. NOTE: This only works if you have a full frame (35mm) sensor camera. But in low light situations, you may not be able to select a higher shutter speed. Click on the image for a larger view. Digital Photography Tips. Ctrl+Paint - Digital Painting Simplified. Photo Extremist: Creative Photography Tutorials, Photoshop Tutorials, Instructional Videos. Excellent infographic shows what it really takes to become a professional photographer. By Dan Havlik posted Thursday, April 11, 2013 at 1:44 PM EDT Yes, anybody with a camera (or smartphone) who enjoys taking pictures thinks life would be much sweeter if they just became a professional photographer.
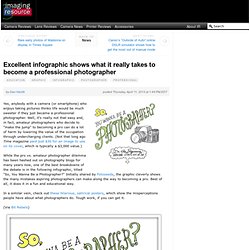
Well, it's really not that easy and, in fact, amateur photographers who decide to "make the jump" to becoming a pro can do a lot of harm by lowering the value of the occupation through undercharging clients. (Not that long ago Time magazine paid just $30 for an image to use on its cover, which is typically a $3,000 value.) While the pro vs. amateur photographer dilemma has been hashed out on photography blogs for many years now, one of the best breakdowns of the debate is in the following infographic, titled "So, You Wanna Be a Photographer? " In a similar vein, check out these hilarious, satirical posters, which show the misperceptions people have about what photographers do.
(Via Bit Rebels)