
Elsie marley & Blog Archive & the quick little bunny tutorial. I really wanted to make the sock bunny that Heidi (from My Paper Crane) created, but I didn’t have any of those fantastic red and brown monkey socks.

What I do have is baby socks: tons of cute, mismatched, totally useless, never stay on baby socks. Now that my littlest is very much not an infant and too soon will be a toddler it seems kind of silly to keep all those teeny tiny socks. So I made a bunny out of them. And a tutorial too. This is indeed a quick little bunny. Materials: baby socka handful of stuffingheavy duty threadscissors Make that bunny: Before you start sewing take second to look at the sock you have. The body: Take some stuffing and stuff the foot part of the sock–not too tight! The tail: On the top of the bunny’s back, sew a circle about an inch in diameter with a simple running stitch. The head: To make the head, put a little stuffing inside the sock and sew a running stitch around the top of the heel. The ears: Cut a big V shape out of the top of the sock. A Sock Bunny (A Tutorial) Move over sock monkey!

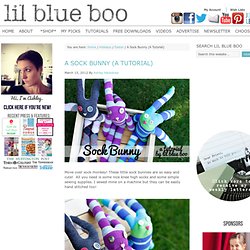
These little sock bunnies are so easy and cute! All you need is some nice knee high socks and some simple sewing supplies. I sewed mine on a machine but they can be easily hand stitched too! So cute as a gift or to stuff an Easter basket! Boo will be so excited to see these in her basket: If you are making them for a child under the age of 3, just stitch eyes on instead of using buttons so that there won’t be a choking hazard.
I bought these cute knee high socks at Target for $2.50 a piece. Step 1: Cut the foot of one of the socks right down the middle, but don’t cut all the way to the heel. Step 2: Cut the other side of the sock down the middle as shown. Step 3: Cut the foot off the second sock: Step 4: Cut the foot of the second sock down the middle. Step 5: Back to the first sock, hand stitch or use a machine to sew the ears shut: Step 6: Sew the bottom of the feet and insides of the bunny legs as shown…..leaving a 2 inch hole to insert stuffing into: Don't look, Kristyn. I had these visions last week of making some handmade gifts for my lovely friend, Kristyn, who is about to have her first baby.

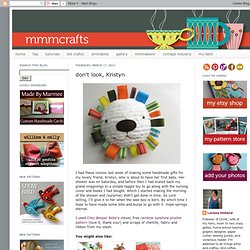
Her shower was on Saturday, and before then I had scaled back my grand imaginings to a simple taggie toy to go along with the nursing cover and books I had bought. Which I started making the morning of the shower and (surprise) didn't get done in time. So Lord willing, I'll give it to her when the wee boy is born. By which time I hope to have made some bibs and burps to go with it. Hope springs eternal. I used Chez Beeper Bebe's clever, free rainbow sunshine plushie pattern (love it, thank you!) Felted Finger Puppets.