
HomeAlarmPlus Pi. Web Control of Raspberry Pi GPIO (UPDATED) This is the part that runs on your Raspberry Pi checking for the values in the MySQL Database.
This script is pretty simple, but does require setting up. Firstly, download the script by inputting the commands below (on your Raspberry Pi).sudo -i and hit Return / Enter.wget and hit Return / Enter. Once this has downloaded, type in the following:chmod +x GPIOServer.sh and hit Return / Enter.nano GPIOServer.sh and hit Return / Enter. This will allow you to edit the script. You must change the following variables at the top of the file: mysqlusername="USERNAME HERE" mysqlpassword="PASSWORD HERE" These must be changed to the username and password you created previously in phpMyAdmin.
Once these have been changed, hold the Ctrl key and press x, then release the Ctrl key and press y, then hit Return / Enter. Adding a Real Time Clock to Raspberry Pi. To keep costs low, the Raspberry Pi does not include a Real Time Clock module.
RaspberryPi - DomotiGa. The Raspberry Pi is a credit-card sized computer that plugs into your TV and a keyboard.

It’s a capable little PC which can be used for many of the things that your desktop PC does, like spreadsheets, word-processing and games. It also plays high-definition video. We want to see it being used by kids all over the world to learn programming. The Raspberry Pi is low cost ($25 - $35), this makes it very attractive for projects like DomotiGa. Take a byte!
Chris's Digital Realm. IMPORTANT: You should no longer be using my kernels.
The official kernels shipped with Raspbian now include versions of my I2C and SPI drivers and are much newer. I am also no longer involved in Raspberry Pi development. The rest of the page is being kept for historical reasons only. As I have been posting so often about kernels for the Raspberry Pi I thought I had best create a central page on my blog that people can link to and always get the latest version. 1. You shouldn’t be using 3.2 any longer. An IO expander library. Hello, all!
If you were wanting to expand your GPIO to easily 112 pins, I've got a solution. The MCP23017 chip is really easy to use, and since it's i2C, and has three address pins, you can have up to seven chips on one bus. Furthermore, each chip has 16 GPIO pins on it. Thus, that's 112 GPIO pins. All wicked fast. Php and uart serial output. <?
Phpdefine ("SERIAL_DEVICE_NOTSET", 0);define ("SERIAL_DEVICE_SET", 1);define ("SERIAL_DEVICE_OPENED", 2); /** * Serial port control class * * THIS PROGRAM COMES WITH ABSOLUTELY NO WARANTIES ! PhpMyAdmin & Database Setup. This solution relies on a MySQL Database, so let's set it up!
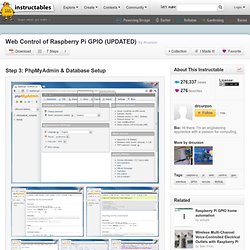
I am assuming that you have phpMyAdmin set up, alongside PHP5. If not, click here for an Instructable on how to do this. Firstly, download the sql file from here. Login to your phpMyAdmin control panel, then press the "Import" button on the top bar. Now, under the "File to Import" heading, click the "Choose File" button, and select the file you downloaded previously (gpio.sql).
Raspberry Pi startup guide to programming RS232. #include <stdio.h>#include <string.h>#include <unistd.h>#include <fcntl.h>#include <errno.h>#include <termios.h>// basic file operations (TXT files)#include <iostream>#include <fstream>#include <sstream>// time operations#include <time.h> //Functionsint initialize(void);const std::string currentDateTime();const std::string currentDate();const std::string currentTime(); //Variablesstd::string SDateTime, SDate, STime, filename;char CapturedKey, buf[256]; //buf[256] saves data and reads data from rs232, CapturedKey catches keyboard input.int fd,n,i,logSize; //fd is an identifier for the serial port, n refers to the bytes received from serial port, //structuresstruct termios options; int main(int argc, char ** argv) { initialize(); //initializes variables and sets the rs232 port.
WebIOPi : control your Pi’s GPIO with a browser. Initial setup - 1: Secure and Repartion & Swap. October 2012: Note: These pages are now rather old and possibly out of date with the new Raspbian release, however I’ll keep them online as they may be of help to someone… Note: These pages have been prepared for Debian Squeeze with some additions for the Debian testing release; Wheezy. Other Linux distributions may benefit from some of the information here, but you may need to work out some of the differences for yourself. So first things first. GPIO Examples 1 - A single LED. Before we even get started with the GPIO, lets make an LED light up by simply wiring it to the +3.3v supply and 0v.

Single LED Lit up One LED on the 3.3v supply So… We have a yellow wire from the Pi’s +3.3v supply to the breadboard and this connects to an LED then via a 270Ω (ohm) resistor to 0v. The green wire connects back to the Pi. (Note that here and in the following pages, the Fritzing breadboard layout is slightly different from the photos – it’s the same circuit, just laid out in a way that makes it easy to see in the images) Refer to the diagram here to work out the pins we’re using.
Tutorial: How to use your Raspberry Pi like an Arduino. Raspberry Pi. Update: 14th May, 2013 wiringPi version 2 has been released and now has its own website ( to look after it.

Most of the documentation on the projects site has been copied over to it the new site, but there may still be 1 or 2 pages that are still missing. I’d encourage you to use the new site if possible where there will be a forum and wiki (when I get time to implement them!) WiringPi is an Arduino wiring-like library written in C and released under the GNU LGPLv3 license which is usable from C and C++ and many other languages with suitable wrappers (See below) You may be familiar with the Arduino… Briefly; Arduino is really two things; one is a hardware platform, the other software, and part of the software is a package called Wiring. Serial Library. WiringPi includes a simplified serial port handling library. It can use the on-board serial port, or any USB serial device with no special distinctions between them.
Download & Install. WiringPi is now maintained under GIT for ease of change tracking, however there is a Plan B if you’re unable to use GIT for whatever reasons (usually your firewall will be blocking you, so do check that first!) If you do not have GIT installed, then under any of the Debian releases (e.g. Raspbian), you can install it with: sudo apt-get install git-core If you get any errors here, make sure your Pi is up to date with the latest versions of Raspbian: sudo apt-get update sudo apt-get upgrade.
Raspberry Pi and XBee. One nice gadget to play with is the quite new Raspberry Pi. I added a XBee (Coordinator AT) to the RasPi and sent some serial data to an Arduino UNO (and back) with a XBee attached (Router AT) via serial terminal (minicom) and Python. The RasPi is running on Debian wheezy and the perfboard is connected via two row header sockets to the GPIO pins. RPi Low-level peripherals. Back to the Hub Hardware & Peripherals: Hardware - detailed information about the Raspberry Pi boards. Hardware History - guide to the Raspberry Pi models.
View topic - RS485. What time is it? How to add a RTC to the Raspberry Pi via I2C. Setting up a VM for Raspberry Pi Development. Category:QtonPi. Raspberry Pi Programming Tutorials - Learn Raspberry Pi workspace environment. Scratchbox - installdoc. New Raspberry Pi development vm version 0.2 « Executing Gummiworms. [update (11/3/12): This version is now out of date. Please use v0.8 the torrent of which is at The readme and the sha1 ] Install and use TightVNC remote desktop on raspberry pi – through windows, Android or IOS » RasPi.tv. Raspberry Pi Tutorials. R-Pi Hub.