
Billroy/socket.io-arduino-client. nRF24 Multi-Network – Allowing for 255 addresses. As the nRF24L01 modules are so cheap I bought quite a lot of them and have been thinking about networking them together.
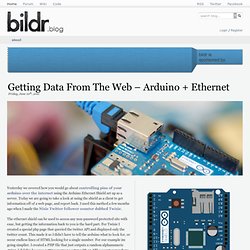
Getting Data From The Web – Arduino + Ethernet. Yesterday we covered how you would go about controlling pins of your arduino over the internet using the Arduino Ethernet Shield set up as a server.
Today we are going to take a look at using the shield as a client to get information off of a web page, and report back. I used this method a few months ago when I made the Nixie Twitter follower counter dubbed Twixie. The ethernet shield can be used to access any non-password protected site with ease, but getting the information back to you is the hard part. For Twixie I created a special php page that queried the twitter API and displayed only the twitter count.
This made it so I didn’t have to tell the arduino what to look for, or scour endless lines of HTML looking for a single number. In the client mode, the ethernet shield is able to access a webpage and return what is read. Because of this, we need a way to tell the arduino what is junk, and what is the good stuff. Code The example php file. <? Muxing Around With The CD74HC4067. Have you ever found yourself running out of pins to read an array of analog sensors?
Don’t worry, you’re not alone, it happens to the best of us, and there is something you can do about it. An analog / digitalmultiplexer like the CD74HC4067 (mux for short) can help multiply the amount of pins you have, and it is insanely easy to connect to your arduino or other microcontroller The CD74HC4067 is a 16-Channel Analog Multiplexer/Demultiplexer. Garage Door Opener. How does a Garage Door Work.

The inability to follow simple instructions. This article talks about the Diecimila, but there is a newer article that talks about the Duemilanove Here’s a departure.
Today I’m going to give a little instruction in how to modify an Arduino board so you can actually do something useful with it – like debug it. But first, since my regular reader expects music, here’s some music. If you hated that, you’ll probably hate all my other music, too. Www.pighixxx.com/PghXxXcnt/Arduino/ProMini/ProMini.pdf. Digispark USB Development Board - Digistump. The Digispark is an Attiny85 based microcontroller development board similar to the Arduino line, only cheaper, smaller, and a bit less powerful.
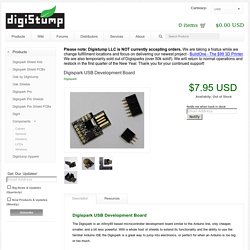
With a whole host of shields to extend its functionality and the ability to use the familiar Arduino IDE the Digispark is a great way to jump into electronics, or perfect for when an Arduino is too big or too much. The Digispark is shipped fully assembled except for the two included and easy to solder headers. Here are the specs: Support for the Arduino IDE 1.0+ (OSX/Win/Linux) Power via USB or External Source - 5v or 7-35v (12v or less recommended, automatic selection) On-board 500ma 5V Regulator Built-in USB 6 I/O Pins (2 are used for USB only if your program actively communicates over USB, otherwise you can use all 6 even if you are programming via USB) 8k Flash Memory (about 6k after bootloader) I2C and SPI (vis USI) PWM on 3 pins (more possible with Software PWM) ADC on 4 pins Power LED and Test/Status LED. Muxing Around With The CD74HC4067. nRF24L01-RF24-Examples. Labs / DC Motor Control Using an H-Bridge.
Overview In this tutorial, you'll learn how to control a DC motor's direction using an H-bridge.
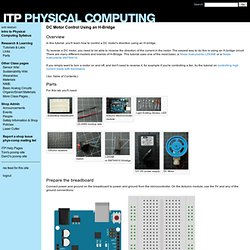
To reverse a DC motor, you need to be able to reverse the direction of the current in the motor. The easiest way to do this is using an H-bridge circuit. There are many different models and brands of H-Bridge. This tutorial uses one of the most basic, a Texas Instruments L293NE or a Texas Instruments SN754410. If you simply want to turn a motor on and off, and don't need to reverse it, for example if you're controlling a fan, try the tutorial on controlling high current loads with transistors. (:toc Table of Contents:) Parts. View topic - - AC control with Arduino - Here's a schematic.
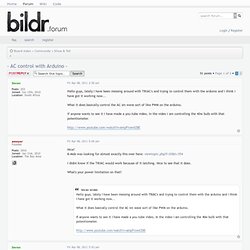
I'll throw up some pictures later. I'll go ahead and throw this out there: don't blindly trust my schematic. I can and have made mistakes! I used this PDF: www.fairchildsemi.com/an/AN/AN-3003.pdf. As always, BE CAREFUL. Also, if you have an inductive load (e.g. motor), you'll want to wire in a snubber, which is also described somewhat in that PDF.
What I basically did is set up the opto-transistors as a NOR gate, so that when zero-crossing happens, a 5 volt pulse is sent out to the interrupt pin. I'm thinking let the Arduino just send a PWM representing what power it wants, and a combination of digital pots, 555 timers and transistors may be able to handle the delay time. PinMapping168. Xbee-arduino - Arduino library for communicating with XBees in API mode. Overview This is an Arduino library for communicating with XBees in API mode, with support for both Series 1 (802.15.4) and Series 2 (ZB Pro/ZNet).
This library Includes support for the majority of packet types, including: TX/RX, AT Command, Remote AT, I/O Samples and Modem Status. Note: This software requires API mode, by setting AP=2.