
Old Calendar Crafts. Gum Wrapper Bracelet ∙ How To. Tootsie Roll Wrapper Belt. It took me about 30-40 minutes to make.

I'd been meaning to make it for a couple of months but I never had enough wrappers. I originally used a buckle from a web belt but the tootsie roll belt was too thin, so I remembered these D-rings I had bought specifically for this occassion. I think they go a lot better and the belt actually stays on with them. baby got back! Excuse my big greek butt. This is my first tutorial so I apologize in advance if anything gets lost in translation. Materials:*wrappers of some sort*scotch tape*clear packing tape*scissors*d-rings - optional. Paper Pod Bead Tutorial. If you think of paper beads you probably think of the mod podge ones that are available all over the net. With that in mind I wanted to show you another way of making very simple paper beads, I call them pod beads. For this tutorial you will need: A paper punch in a symmetrical shape. I used the flower shape called vinca for this tutorial but you can also use a simple circle shape as in the picture above.
My large punches are 25mm (1 inch) diameter. For the necklace I used: Organic hemp twine from the trade aid shop.Couple of wooden beads. Ok so let’s start with the tutorial! Start with punching out heaps of shapes from the paper. Fold the papers in half, making sure you have the colour you want to show off on the inside of your fold. Now the tricky part starts; gluing the whole thing together. Recycled Magazine Bowl. This project took me so much longer than I thought it would.

I may not be finished yet (I'll explain in a minute) but I want to move on to other ideas so I decided to post about it now. I certainly didn't reinvent the wheel with this one but it was something fun and super easy to make. Materials:- a magazine (I didn't use more than half of a magazine)- glue gun I started by making a tight little roll and making the flat circle that I showed you the other day. This can also make a useful trivet if you continue the flat shape to the desired size. Each strip that I used is made from one page of the magazine. I added each strip to my piece by keeping the folded edge outside and the open side toward the inside. As you place each strip down only do so a short piece at a time because the glue dries really fast. I glued each strip of paper down, leaving a small piece unglued so that I could tuck in the following strip under it.
Here's my unfinished bowl. Recycle Magazines Into A Lacy Container. Recycled Magazine Handbag. This particular pattern uses National Geographic magazine but any recycled magazine will work to make your own handbag.
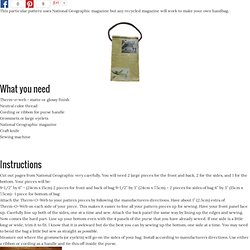
What you need Therm-o-web - matte or glossy finish Neutral color thread Cording or ribbon for purse handle Grommets or large eyelets National Geographic magazine Craft knife Sewing machine Instructions Cut out pages from National Geographic very carefully. You will need 2 large pieces for the front and back, 2 for the sides, and 1 for the bottom. 9-1/2″ by 6″ – (24cm x 15cm) 2 pieces for front and back of bag 9-1/2″ by 3″ (24cm x 7.5cm) – 2 pieces for sides of bag 6″ by 3″ (15cm x 7.5cm)- 1 piece for bottom of bag Attach the Therm-O-Web to your pattern pieces by following the manufacturers directions.
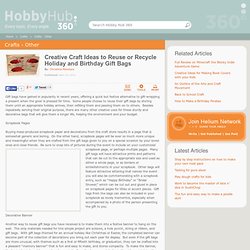
Now comes the hard part. Measure out where the grommets (or eyelets) will go on the sides of your bag. OPTIONS: To make the bag stronger, simply reinforce all 4 panels with additional National Geographic pages. Visit Henriettas Hand Bags. Recycled Magazine Paper Projects. Recycled Magazine Boxes. Magazine Crafts. Crafts To Recycle Gift Bags. Christina Mendoza's image for: "Creative Craft Ideas to Reuse or Recycle Holiday and Birthday Gift Bags" Caption: How to Recycle Birthday and Holiday Gift Bags in Fun DIY Crafts and Around the House Location: Image by: cynthiab Gift bags have gained in popularity in recent years, offering a quick but festive alternative to gift-wrapping a present when the giver is pressed for time.
Scrapbook Pages Buying mass-produced scrapbook paper and decorations from the craft store results in a page that is somewhat generic and boring. Decorative Banner. What To Do With Old Cards & Letters. Gift Bag From Recycled Greeting Cards. Make a gift bag using those old greeting cards.
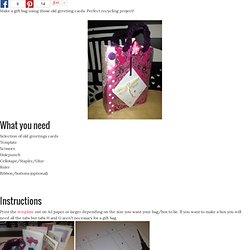
Perfect recycling project! What you need Selection of old greetings cards Template Scissors Holepunch Cellotape/Stapler/Glue Ruler Ribbon/bottons (optional) Instructions Print the template out on A3 paper or larger depending on the size you want your bag/box to be. Decide on the theme of you bag/box and discard any cards or sections of a card that can’t be used. Cut around the template and lay on a flat surface. Take both side pieces (D) and fold them in half vertically. Lay all the card pieces facedown and carefully begin to attach them together using Cellotape. Once all sections are joined the bag/box will begin to take shape. Close the bottom (and the top if you are making a box) using Cellotape or glue. Use the holepunch to make holes for the handles, which you can make from ribbon. Vintage Maps: Woven Notebook Tutorial. Along with the straight up Washi tape peel and stick style notebook covers which need no instruction, I also whipped up this pretty one and thought I'd share the how to with you, I love the look of woven anything and paper?
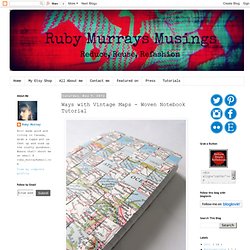
Well it just looks so cute using maps. You'll need two pieces of a Map/Atlas etc that have a mix of watery and land mass areas to give a mix of colours. I chose one piece with solely land and the other was mostly water. Mark up strips on the opposite side you want to use to avoid ugly black marks. So that you can read the name places you'll want one map piece to have horizontal strips and one to have vertical strips my strips measure 1/2 inch wide and long enough to wrap around a mini composition book from top to bottom (vertical pieces obv) and front to back (horizontal pieces)leaving an inch around all sides.
Next I weighted the bottom of the Vertical pieces down with some cans and started weaving Repeat for the top and sides.