
Micro-Macrame Tutorials On YouTube. Stick Weaving Over Needles for Miniatures. Stick weaving is an ancient technique for simple weaving in the round or flat.
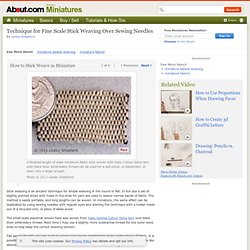
In full size a set of slightly pointed sticks with holes in the ends for yarn are used to weave narrow bands of fabric. The method is easily portable, and long lengths can be woven. In miniature, the same effect can be duplicated by using sewing needles with regular eyes and starting the technique with a holder made out of a recycled cork, or piece of balsa wood. The small scale placemat shown here was woven from Habu textiles Cotton Gima Yarn over black linen embroidery thread.
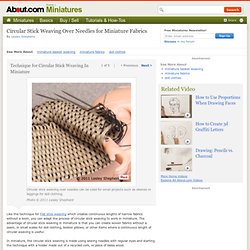
Next time I may use a slightly more substantial thread for the outer warp lines to help keep the correct weaving tension. Flat pieces like this one are quick to weave and can be combined to make wider pieces of fabric. Miniature Circular Stick Weaving Over Needles. Like the technique for Flat stick weaving which creates continuous lengths of narrow fabrics without a loom, you can adapt the process of circular stick weaving to work in miniature.
Vampire Doll Coffin From Cardboard Or Foamboard. Barbie Shoe Earrings. Polymer Clay Heart Cookie Charm, Free Pattern & Tutorial. Heart-Shaped Polymer Clay Cookie Charms by Mo TiptonMaterials polymer clay in white, ecru/tan, and translucent translucent liquid clay, such as Translucent Liquid Sculpey heart shaped cookie cutter or mold artist chalk pastels in the colors of your choice razor blade paint brush needle tool or awl wooden craft stick small bowl toothpicks parchment paper jewelry findings of choice (earring posts, chain, jump rings, etc.) two-part epoxy (if you are gluing your cookies) Instructions Begin by preparing your cookie colored clay.
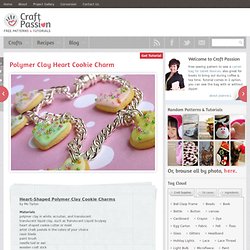
Mix equal parts white and ecru/tan clay, then add translucent clay in an amount that is equal to all of your white/ecru clay mixture. Knead thoroughly until you have an even, consistent mix. To create the heart shapes, you have three options. You can also roll the clay out into a thin sheet roughly 1/16” thick and use a cookie cutter to cut out heart shapes. Dab a dry paint brush in the light brown pigment and brush a thin layer onto your cookies. Enjoy!
SindyClothes.com - Nice DIY Project Section. Baby Bib As A Horse Blanket. Miniature Paper "Pottery" Pieces. Basic "Cold Porcelain" Miniature Flower Making Tutorial. Make an Apple Blossom Gina Bellous has so generously allowed us to reprint her tutorial on Cold Porcelain Apple Blossom flower making.
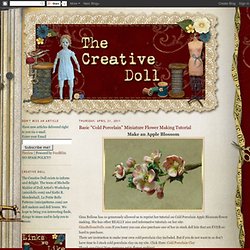
She has other REALLY nice and informative tutorials on her site:GinaBellousDolls.com If you hurry you can also purchase one of her in stock doll kits that are EVER so hard to purchase.There are instruction to make your own cold porcelain clay included. But if you do not want to or don't have time to I stock cold porcelain clay on my site. Doll Accessories & Doll Food Crafts.
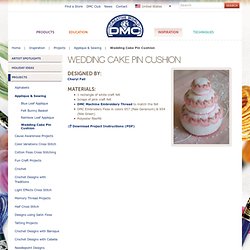
Wedding Cake Pin Cushion. Designed By: Cheryl Fall Materials: 1 rectangle of white craft felt Scraps of pink craft felt DMC Embroidery Floss in colors 957 (Pale Geranium) & 954 (Nile Green) Polyester fiberfill.
Wedding Arch-Arbor. Wired Ribbon Or Fabric Stiffener. Mini Pom Pom Teddy Bear Tutorial. ADDITIONAL NOTE!!
I think it is better with 2 pom poms for the body. They are so small it makes more room for the arms and legs.This is an old standard but well worth repeating...perfect accompaniment for your little set of twins or toddler.Supplies needed:7 ea 3mm pom-poms2 ea 5mm pom-poms3 ea no-hole beads- blacksilk ribbon or thread to make a bow for neckTacky gluetoothpick or your favorite tool. Creating A Miniature Forest For Indoor Photography. Natasha’s Babydoll Coat Rack. I’m still plowing through all of the fantastic projects featured as part of the 2008 d*s diy contest and today we’re sharing one of the more controversial pieces- natasha’s babydoll coat rack. you guys seemed to be divided right down the middle between “that totally creeps me out!”
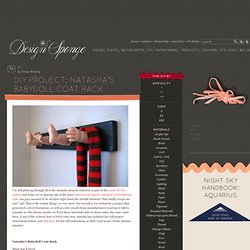
And “that is the coolest thing i’ve ever seen” but overall it was definitely a project that generated a lot of discussion- as well as a few emails from manufacturers wanting to talk to natasha. so who knows, maybe we’ll see these babydoll racks in stores some day soon. until then, if you’d like to know how to build your own, natasha has included her full project instructions below. just click here for the full instructions or click “read more” below. thanks, natasha! Natasha’s Babydoll Coat Rack What You’ll Need: Directions: 1. 2. 3. 4. 5. 6. Outdoor Dollstand Tutorial. DIY: A Cushion For A Doll Chair. DIY Doll Nap Mat. So we are now American Girl fans in the Curtis household.
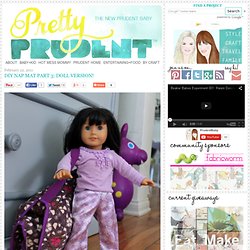
Well, Scarlet is a fan of her doll (and I admit I am kind of living out some childhood fancy-doll fantasies myself, don’t judge me), but the Prudent Dad and I are not so much a fan of shelling out tons of cash on doll accessories. So in the Prudent Mama spirit, I tried to make doll clothes. Then realized I would rather dump cash on clothes then get arthritis piecing together teensy seams all day long.