
A pretty penny: DIY: Natural Deodorant. V and Co how to: jersey knit bracelet. I don't know what it is about this time of year that makes me just want to have my bare feet in the sand, be watching the sun setting into the ocean, and breathing in the warm salty air of the beach...as i get older, more and more i find myself missing that place i used to go to almost every.single.day. as a teen.

(my skin doesn't miss it. as a matter of fact, i now wish i listened more and DID put SPF on my face...hindsight is 20/20). my mom calls me from her walk on the beach almost every morning... *sigh*yeah, i get a little homesick around this time of the year. heck on my pinterest my "dreaming of summer" has the most pictures in it. ah yes. i miss my ocean. case in point. this bracelet, brought a flood of memories, not because i used to have one like it but because i can totally see me wearing it by the beach, not caring that it's gotten salty and wet, because i can totally make another one in like less than 5 minutes flat when i get home. *sigh* okay... *cut off excess tails! DIY Friendship Necklace – HonestlyWTF. As soon as Lauren and I saw this editorial in Flare Magazine, we knew we had to recreate these awesome, friendship bracelet-like necklaces.

We promise they are super easy to make and the perfect way to pass the time during those long summer roadtrips. To make a 2-tone necklace, cut a long piece of rope and wrap two different colors of embroidery thread around its own bobbin. Tie a starter knot along with the two colored threads you are using, leaving at least 3 inches of slack, Tape down the slack to a flat surface or safety pin it something that will help keep it in place (feeling nostalgic yet?). Lay the color that isn’t being used (shown here in purple) in your left hand, along with the rope, and hold them taut.
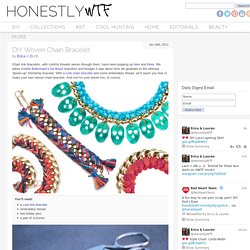
Take the active color (shown here in red) in your right hand, pass it over the rope, loop it under and back through the opening. To alternate colors, simply put the inactive color (red) in your left hand and the new active color (purple) in your right. DIY Woven Chain Bracelet – HonestlyWTF. Chain link bracelets, with colorful threads woven through them, have been popping up here and there.

We adore Aurèlie Bidermann‘s Do Brazil bracelets and thought it was about time we graduate to the ultimate “grown-up” friendship bracelet. With a curb chain bracelet and some embroidery thread, we’ll teach you how to make your own woven chain bracelet. And one for your bestie too, of course. You’ll need:a curb link braceletembroidery threadtwo bobby pinsa pair of scissors Cut 2 sets of 15 strands of embroidery thread, with each strand measuring four times the length of the bracelet.
Lay the second color (blue) over the first color (coral). Repeat the steps until you reach the end of the bracelet. (top images from here and here, rest of images by Honestly…WTF) DIY Lace Earrings – HonestlyWTF. Dolce & Gabbana‘s Spring ’11 collection undoubtedly furthered our already fanatical obsession with lace.

Honestly, how dreamy is the collection?! We thought we’d make good use of some vintage lace trim we had laying around and turn them into earrings similar to the ones we saw on the runway. And thanks to some tips from a DIY previously featured on Poppytalk, making lace earrings proved be a cinch! Mix equal parts glue to water in a bowl. Cut your shapes from your lace trim or doily, making sure both pieces are symmetrical. Submerge the cut shapes into the glue mixture. Articles: DIY: Walnut Heart Necklace — By Johnie Gall — Foam Magazine Articles. DIY Proenza Schouler Rope Necklace – HonestlyWTF. Lauren and I have been waiting for an excuse to use colorful bungee cords for some time now.

And after seeing this Proenza Schouler necklace from their Resort 2011 collection, we jumped at the opportunity to recreate our own version of this amazing piece of jewelry! Start by cutting a 10″ and a 15″ piece of bungee (or climbing rope). Burn the ends with a lighter to prevent fraying. Then, wrap the middle sections with either twine or mason line using the friendship knot technique and use the hot glue gun to secure the ends to your bungee cord. (Click images to enlarge) DIY : Sailor's Knot Bracelet. More Please: Macrame Jewelry. DIY Hex Nut Bracelet. Lace lamp – DIY. We are at our little cottage in Dalarna and we are fixing it up.

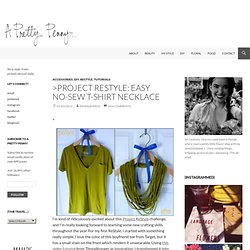
So we are able to use it even in the winter. (Dalarna is in th middle/north of Sweden. To me and Jenny it’s north but Sweden is a very tall country so I guess we are not even in the middle). Anyway it’s great cause I have the time and space to do lots of DIY projects. Starting with this lamp. First we used a huge baloon that I bought at a party store. Then you collect all the old Dollys (?) Paint them with lots of wallpaper glue so they are soaked. Hang the ballon on a string and put the soaked lace on the baloon. Then wait for a while. Pop the baloon when the glue is dry. Update 1:Some of you asked how to get the bulb into the shade. Paper Pages : Nail Design. A pretty penny: Project ReStyle: Easy No-Sew T-Shirt Necklace. I’m kind of ridiculously excited about this Project ReStyle challenge, and I’m really looking forward to learning some new crafting skills throughout the year.

For my first ReStyle, I started with something really simple. I love the color of this boyfriend tee from Target, but it has a small stain on the front which renders it unwearable. Using this video tutorial from Threadbanger as inspiration, I transformed it into a necklace. Read more after the jump to find out how to make your own! All you need is an unwanted cotton t-shirt, a pair of sharp scissors, and about half an hour. Lay the shirt on a flat surface and smooth it out with your hands.
Beginning at the bottom of the shirt and working your way up, cut 1-inch strips to make loops. Stretch out the loops you just made so the cotton curls in on itself and forms long tubes.Double up each tube, matching up the seams at one end.