
Google Image Result for. Sew a quick newborn hat — from a t-shirt. How to make a scarf. Recycled Tee Scarf. 61K+ Recycle all of those tee shirts that you don't wear anymore!

Make a comfy, cute scarf, its easy! STEP ONE: Grab a tee shirt and lay out flat. STEP TWO: Starting at the bottom, cut one inch wide rings. (You can use the hem if you want) You should get around 16 rings. STEP THREE: Stretch out each ring and wrap around your hand three to four times. STEP FOUR: Carefully remove the rings from your hand and set aside. STEP FIVE: Cut this two inch long strips from the remaining shirt. Feeling extra festive? >Project ReStyle: Easy No-Sew T-Shirt Necklace. I’m kind of ridiculously excited about this Project ReStyle challenge, and I’m really looking forward to learning some new crafting skills throughout the year.

For my first ReStyle, I started with something really simple. Make a modular felt trivet. Related to yesterday's coaster project, here's a template for making a larger modular felt trivet.
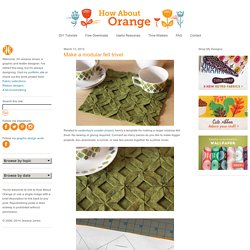
No sewing or gluing required. Connect as many pieces as you like to make bigger projects, too--placemats, a runner, or sew two pieces together for a pillow cover. Download the pattern here. Then print out as many sheets as you need, pin them to a piece of felt, and use a rotary cutter or X-acto knife to cut the slits in each shape. (Press hard to make sure you cut through both the paper pattern and the felt.) Begin locking pieces together by pulling the arrow-shaped tabs through the slots from the back through to the front side. To finish the trivet, trim off the excess felt around the edges and nip the points off the triangular tabs. Scrapbook Paper Christmas Trees. I’m not a big fan of red and green.
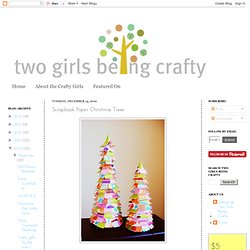
Like the red red and the kelly green. Blech. (No offense to you red + green lovers. T-shirt headband (2) I should just rename my blog “Things Kitty Can do with a Tshirt” Anyway, I was walking through target the other day (wanting to buy every single dress I saw!)

And glimpsed this headband. DIY: T-shirt Beach Tote. 29 June 2012 I woke up a few weeks ago, checked my email, and was beyond happy to see that Gap (of all places?)
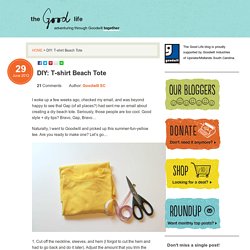
Had sent me an email about creating a diy beach tote. Seriously, those people are too cool. Good style + diy tips? Bravo, Gap, Bravo… Naturally, I went to Goodwill and picked up this summer-fun-yellow tee. 1. 2. 3. 4. Make a No Sew Felt Wine Bag / Wrap {An Inexpensive Hostess Gift} With the holiday season upon us and lots of fabulous parties to attend – here is a simple and quick way to dress up a bottle of wine for the hostess!

{Seriously – you can make this in just a few minutes while ironing your party outfit and pick up a bottle of bubbly on your way to the get-together} No-Sew Felt Wine Wrap Materials Needed:FeltStitch WitcheryPinking Shears {or regular scissors}A Bottle of Wine, Champagne, etc. Double over a single cut of felt {so the crease is at the bottom} and cut a piece measuring 6 inches wide by 24 inches tall {you may need to adjust the measurements as wine bottles do vary in size}. I used pinking shears to give the edges a little design. Lay the bottle on top the felt {crease at the bottom} and measure one inch up from the top – lightly mark a guideline. Sit the bottle right side up and place in the center of the felt; the top edge of the bottle resting on the guideline – trace around the bottom of the bottle. Bow, T-Shirt DIY. Inspiration I saw this cute tank top on Pinterest, and thought that it might make a really cute Tee-Shirt.

I made mine Green for St. Patrick's Day. Tutorial Things you need T- shirtRibbon *about 3 yards~ 3 inches wide. Cut your neck Lay your shirt on a flat surface. lay your ribbon down and trace it with chalk. now carefully cut slits in your shirt. Summer's Breeze 9x12 mixed media original by Southendgirlart. DIY Mother's Day Corsage: Felt Dahlia Flower Brooch - Holidash News. The Pharma Blog. Welcome!

Please don't forget to follow me on RSS feed or Facebook. Thanks for visiting and enjoy "Your Creative Dose of Fun"! I’ve definitely been nesting here lately–hospital bag is packed, baby room is 98% complete, and house is getting in order. DIY: Easy Mirror Makeover. The object of hate: IKEA "Ram" Mirror with wooden frame, 7€ However, not the untreated version but the very special lousily-painted-by-Ann-Kay-version: I think my original idea was to create some kind of carribean vibe in our old apartment's hallway, therefore i wanted a turquoise mirror.

Unfortunately the paint turned out yucky green and i opted to put my awesome stupid idea on ice. That ugly green thing stands in our bedroom now, which is mainly decorated in red and white hues. As you can tell from the curtain's reflection in the mirror this not a pretty color combination, at all.