
High School Story Pots - Ceramics. See Matisse’s rigorously colourful final chapter. Home. Free Online Oil Painting Guide ~ Oil Painting Techniques. Online Oil Painting Gallery Bill Martin's Guide to Oil Painting OIL PAINTING EXERCISES ~ Color and Form You Are Now Ready for Color and Form In this exercise the colored toys provide bright simple forms to practice mixing three values of colors.
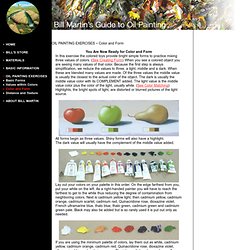
(See Creating Form) When you see a colored object you are seeing many values of that color. All forms begin as three values. The dark value will usually have the complement of the middle value added. Lay out your colors on your palette in this order. If you are using the minimum palette of colors, lay them out as white, cadmium yellow, cadmium orange, cadmium red, Quinacridone rose, dioxazine violet, ultramarine blue and cadmium green. With these things in mind we will paint these toys. The drawing is made with white paint that has been thinned down. Starting with the teapot put in the light value first. Next we put in the dark. How to Draw the Head From Any Angle.
The Basic Forms To draw the head from any angle you must first understand its basic structure.

Look past all the distracting details and visualize the underlying forms. This ability to simplify can be applied to the features of the face, but when starting the drawing you could look even further. Ignore even the features and simplify to the most basic form of the head. I use a method taught by Andrew Loomis in his book, “Drawing the Head & Hands”. The head deconstructed into its basic forms, is a sphere as the cranium and a block as the jaw and cheek bones. A Sphere as the Cranium The sides of the head are flat, so we can slice off a piece from both sides of the ball.
A Block as the Jaw and Cheek Bones. Learning the muscles for figure drawing. This article is part of the Draw Life Beautifully online course.
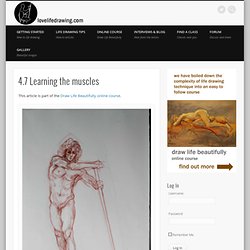
Original drawing – 15-20 minutes – by Mayko Traced outline with pencil, muscles inserted with coloured pencil, based on muscle references. This exercise really helps the next time you draw a figure The skeleton tells you about the structure you are looking at. The muscles give you the tension, relaxation, stretch and much of the sense of energy in the pose.
There’s no need to study all of them for life drawing purposes, but knowing the shapes and contortions of the major muscles that affect the body’s surface will help you to draw bodies expressively. We recommend 3 exercises to improve your knowledge of muscles for drawing: 1. Then the next time you draw from a model or photo, try to sense the pose the model is making within your own body. 2. Fix the tracing paper over the drawing at the corners so that it won’t move. Your aim is just to merge the anatomical diagram into your drawing as best you can. 3. Torso, back Arms Legs.