
Kid’s (Small) Messenger Bag. When my two-year-old son decides he wants to go somewhere he picks up my purse, puts it over his shoulder, and heads for the door.
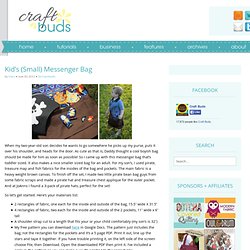
As cute as that is, Daddy thought a cool boyish bag should be made for him as soon as possible! So I came up with this messenger bag that’s toddler sized. It also makes a nice smaller sized bag for an adult. For my son’s, I used pirate, treasure map and fish fabrics for the insides of the bag and pockets. The main fabric is a heavy weight brown canvas. So let’s get started. 2 rectangles of fabric, one each for the inside and outside of the bag, 15.5″ wide X 31.5″ 4 rectangles of fabric, two each for the inside and outside of the 2 pockets, 11″ wide x 6″ tallA shoulder strap cut to a length that fits your or your child comfortably (my son’s is 32″)My free pattern you can download here in Google Docs.
All seam allowances are 3/8″ unless otherwise noted. Gifts for Kids. Make it Do Gift: Cozy Bed Warmers. A cozy bed warmer is one of my favorite things.
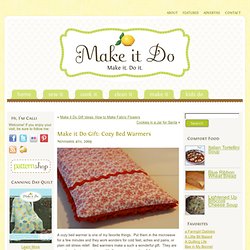
Put them in the microwave for a few minutes and they work wonders for cold feet, aches and pains, or plain old stress relief. Bed warmers make a such a wonderful gift. They are easy to make, inexpensive, and both pampering and useful. For years I would climb into bed in the winter and put my cold feet on my husband’s legs to warm them up. Then my Mom made me a bed warmer. Last year for Christmas, my Mom made them for all of her grandchildren.
My husband steals mine for back or neck aches… come to think of it, maybe he needs one for Christmas. To heat up your bed warmer, simply put it in the microwave for 3 to 4 minutes. You can make a bed warmer filled with feed corn, rice or buckwheat. We have found several fabrics that make good warmers, such as cotton chenille, cotton flannel or cotton fabric. I prefer a bed warmer with a removable, washable cover. Here’s what you will need for this project: Stuffed animal. Gadgets This is actually quite a good idea!
Make It and Love It: Crayon Roll. I have been looking for a crayon roll/holder tutorial but can’t seem to find one.

I have found plenty of these little holders for sale but no directions. So here is my version. And if anyone finds/has other instructions, let me know and we can link them. **These instructions were created for my daughter’s long erasable crayons that are almost twice as long as a standard crayon. It will also fit pencils, pens and colored pencils. You’ll Need: 2 pieces of fabric – 14 x 21 and 8 x 21 (inches)1 piece of ribbon – 20 inches long, give or take.Matching thread **All seams are to be made at 1/2 inch. First, cut out your pieces of fabric… And then fold them in half, lengthwise. Then on the smaller piece of fabric, make a seam right along the fold, close to the edge. Then open up the larger piece of fabric and lay the smaller one on top, matching the two raw edges of the smaller one with the one raw edge of the bigger piece.
Trim all 4 corners before you turn it right side out. Related posts: Bunny Finger Puppets. Besides being adorable, these little puppets are a snap to make.
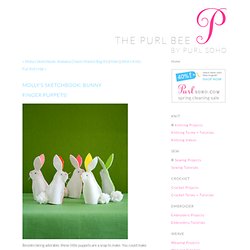
You could make the whole set of five (or more) in one evening with time to spare. I think little handmade touches like these really make something like an Easter basket all the more special. --Molly Materials To make a set of five (or more!) A Spring Felt Bundle Cream, Pink, and Brown Embroidery FlossOne hank of Appleton Tapestry Yarn in NeutralA Bunny Finger Puppet Template (available for free download here) and instructionsEmbroidery Needles You will also need: A water soluble fabric marker Cutting Using the template cut two bunnies from the white felt and two from one of the bright colors. Sewing.