
DIY Portable Wedding Photo Booth. The first item that I solved was what photo booth software to use.

I wanted something that automated the entire process, you click a button and eventually your photos get printed out. That is the limit to the user interaction that I wanted. Since I was attempting to make due with many of the resources I had around the house I was limited to a windows operating system, and all of the apple solutions were no longer an option. I couldn't justify a new computer for this project! After looking at the price and features I settled on DSLR Remote Pro. Display Screens The software allows you to design custom display screens with operating instructions to the people in the booth. Print Options There print options provided by the software were overkill for what I needed, and it really only took a few test prints to get exactly what I wanted.
We'll take all of the copies and eventually frame them into what will be our guest book. LED Cube 8x8x8. A wireframe box is a good geometric shape to show in a monochrome 8x8x8 LED cube.
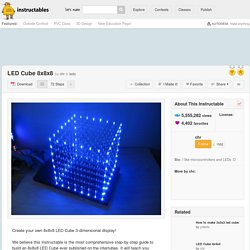
It gives a very nice 3d effect. We made two box animation functions for the LED cube. Effect_box_shrink_grow() draws a wireframe box filling the entire cube, then shrinks it down to one voxel in one of 8 corners. We call this function one time for each of the 8 corners to create a nice effect. Effect_box_woopwoop() draws a box that starts as a 8x8x8 wireframe box filling the entire cube. Here is how effect_box_shrink_grow() works. It takes four arguments, number of iterations, rotation, flip and delay. To make the function as simple as possible, it just draws a box from 0,0,0 to any point along the diagonal between 0,0,0 and 7,7,7 then uses axis mirror functions from draw.c to rotate it. 1) Enter main iteration loop. 2) Enter a for() loop going from 0 to 15. 3) Set xyz to 7-i. 4) When i = 7, the box has shrunk to a 1x1x1 box, and we can't shrink it any more. 7) Do the rotations.
Here is how it works: Materials And Tools. The Four Player Coffee Table Pong Video Game. UPDATE 12 APRIL 2011Important!
I have been made aware of a problem with the circuit board design with respect to the two push buttons. In order to get the buttons to work properly you need to connect them to the expansion port instead of the designated player select and mode button connections on the circuit board. Connect them to PIN D and PIN E on the expansion port. You will then need to connect a resistor from PIN D to GND and then another resistor from PIN E to GND. Finally, you will need to connect the other side of each button to VCC.
Okay scratch that - I have updated the circuit board and everything is working as advertised (and as written on the circuit board) Boards can be purchased direct from iteadstudio for $3 - link is in the instructable. UPDATE 12 APRIL 2011 The circuit boards are now for sale direct from the manufacturer. UPDATE 10 April 2011 I have just released the sourcode for the 'Knockout' version of this game. Are you tired of your old boring coffee table? Ordering components. We see a lot of people asking for part numbers for DigiKey, Mouser or other big electronics stores.
When you're working with hobby electronics, you don't necessarily need the most expensive components with the best quality. Most of the time, it is more important to actually have the component value at hand when you need it. We are big fans of buying really cheap component lots on eBay. You can get assortments of resistor, capacitors, transistors and everything in between. If you buy these types of assortments, you will almost always have the parts you need in your part collection. For 17 USD you can get 2000 resistors of 50 different values. Try doing som eBay searches and buy some components for future projects! Another one of our favorite stores is Futurlec ( They have everything you need.