
DIY Rhinestone Sliding Knot Bracelet. I suppose we can call this week’s tutorial somewhat of a refresher course on how to master the perfect sliding knot.
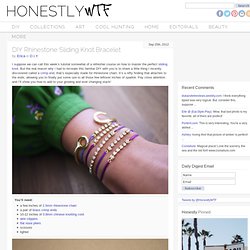
But the real reason why I had to recreate this familiar DIY with you is to share a little thing I recently discovered called a crimp end, that’s especially made for rhinestone chain. It’s a nifty finding that attaches to the ends, allowing you to finally put some use to all those few leftover inches of sparkle.
Pay close attention and I’ll show you how to add to your growing and ever changing stack! You’ll need: LIFEANNSTYLE: DIY Bohemian Braided Bracelets. Wrapped Cord Bracelet. Step 1 Cut the cord to twice the length of the desired bracelet size PLUS 12 inches.

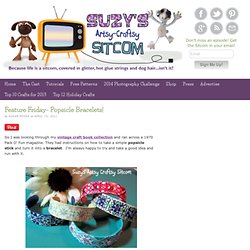
For example, a 7.5-inch bracelet will require 27 inches of cord. Slide a button to the center of the piece. Tie both lengths into an overhand knot beneath the button. Step 2. Rhinestone Bangles. I’ve had this project on the back burner for a long time and I’m so happy to have finally finished it to show you all! These bangles make great sparkly accessories for the holiday season or easy DIY presents for your fabulous friends! *NOTES: I bought a stack of 20 simple bangles at Target for less than $5. The rhinestone strands are from Michaels. You can use dots of glue to help start and finish off the thread wraps if you find it easier and less stressful than tucking and wrapping. Photos: Courtesy of Ashley Weeks Cart. Popsicle Stick Bracelets. So I was looking through my vintage craft book collection and ran across a 1970 Pack O’ Fun magazine.
Enjoy! How to Create a Beaded Leather Wrap Bracelet. How to Make a Survival Bracelet. Holst + Lee inspired rope bracelet. I am loving rope jewelry right now.

Bright, fun, tribal, and perfect for Spring. In my opinion, Holst + Lee does it the best. This necklace? Wow. Or this one? What you will need: Begin by taping your embroidery floss to the rope. Wrap your embroidery floss around the rope once, and then add the chain – wrapping in between the first two crystals. Continue to wrap, wrapping around 3x between each crystal. Hold it steadily, and wrap away. When you are halfway through, knot on your second color, and keep wrapping. (Go back and snip off the ends later.) Keep on wrapping… when you get to the end, tape the end down, just as you had done in the beginning. Apply a small drop of Gorilla Glue to each end, and slide on the end cap. Dip Dyed Nautical Rope Bracelets DIY Fashion.
Perusing Lonny Magazine last week, I spied these adorable dip-dyed braided rope bracelets by Tanya Aguiniga retailing for $85 and thought, really, what an easy DIY this has to have been done already.
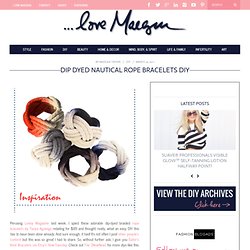
And sure enough, it has!! It’s not often I post other people’s content but this was so great I had to share. So, without further ado, I give you Sailor’s Knot Bracelets via Etsy’s How-Tuesday. Check out The {NewNew} for more diys like this. * 3.5 yards of rope. * 14 ounce can for a smaller bracelet or a 20 ounce can for a larger bracelet. . * Wrap one end of the rope around the can to shape an X. *Wrap the long end of the rope around the can again and bring it up to the middle of the X. . * Next, move the upper left leg of the X over the right leg of the X to create an oval shape. V and Co how to: jersey knit bracelet. I don't know what it is about this time of year that makes me just want to have my bare feet in the sand, be watching the sun setting into the ocean, and breathing in the warm salty air of the beach...as i get older, more and more i find myself missing that place i used to go to almost every.single.day. as a teen.

(my skin doesn't miss it. as a matter of fact, i now wish i listened more and DID put SPF on my face...hindsight is 20/20). my mom calls me from her walk on the beach almost every morning... *sigh*yeah, i get a little homesick around this time of the year. heck on my pinterest my "dreaming of summer" has the most pictures in it. ah yes. i miss my ocean. case in point. this bracelet, brought a flood of memories, not because i used to have one like it but because i can totally see me wearing it by the beach, not caring that it's gotten salty and wet, because i can totally make another one in like less than 5 minutes flat when i get home.
*sigh* okay... *cut off excess tails! Fishtail Braid Friendship Bracelets. Today’s DIY project is inspired by one of my favorite things to do to my hair in the summer – the fishtail braid. (The Beauty Department has an easy tutorial and A Cup of Jo has a fun twist on it – check them out.) The end result is snazzier than a classic braid, but considerably easier to make than a classic knotted friendship bracelet, with the same chevron pattern. My personal favorite is to use a bunch of similar shades for an ombre effect, but you can really do anything… get creative! {All you need for this project is some embroidery floss. Also, the tiny delicate bracelet is a new fave from gorjana.}