
T-shirt sleeve to steampunk spat styled wrist cuff -with tutorial and lotta pics. Okay, I have enough privileges to embed photos, so here goes!
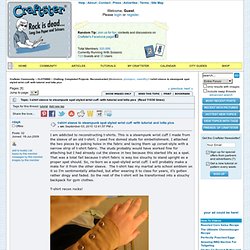
Steampunk Cuff from old t-shirt You will need: 1 t-shirt4-20 dome studs, depending on your preference (can also use buttons if you don't mind more sewing)screwdrivertailor's chalkneedle and threadscissors2-5 safety pins Cut one or both sleeves off the t-shirt, depending on whether you want one or two cuffs. Save the rest of the t-shirt for another use (or wear as a muscle tee!) Trim the sleeve if you want a shorter cuff (the one in my photo is a short scrap - it is just for demo purposes - you'll probably want your cuff to be longer). This is not your cut line! The second line is your cut line, so cut it, then fold the fabric underneath so that it is lined up with the first line: Another view of the fold in case it's not clear.
Now use your tailor's chalk to mark the spots where you want the studs (or buttons) to go. Hey everyone!
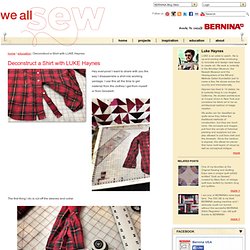
I want to share with you the way I disassemble a shirt into working yardage. I use this all the time to get material from the clothes I get from myself or from Goodwill. The first thing I do is cut off the sleeves and collar. What I am doing is getting all the pieces off that will damage my rotary cutter or aren’t worth the time it would take to pick out the seams. I cut a little slit next to both sides of the button placket and rip them off.
Continuing with cutting off the seams that are dense and will make later sewing difficult I cut on both sides of the seam on the upper sleeve. Refashion Co-op. This is what happened to the pretty outfit I got for Mother’s Day.
It has i sleeveless shift dress with a same length jacket. (Church is always cold.) Pointing no fingers at the landlords cousin who had to use that expanding caulk to fill the vent he put in my dryer room. When and how isn’t the problem getting it out was. So Here goes… Dryel solvent… nope… Goo Gone… nope…Amway solvent(not pictured) but, nope anyway… Hmmmmm not one to give up so away I went. Well I decided the mini one would work best for this application. Charity Shop Chic. Finger-less Gloves made from Socks! I suck at knitting and crocheting.

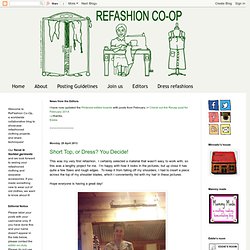
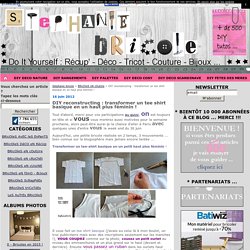
Even though I taught myself to sew, I cannot for the life of me knit something that will actually LOOK nice. :) However, I've been drooling (not literally though) over all these beautiful "finger-less glove knitting patterns. " and then I had this brilliant idea, "use socks! " So off to the dollar store I went, and I found some cute wool socks (OH YEAH!) To help me "fake" it. First, determine the "fit" you want for your sock gloves. I wanted mine to be pretty long. Next, turn your sock inside out. You can totally do this by hand. DIY reconstructing : transformer un tee shirt basique en un haut plus féminin ! Tout d'abord, merci pour vos participations au quizz, on est toujours en tête et si vous vous montrez aussi motivées pour la semaine prochaine, alors peut-être aurai-je la chance d'aller à Paris avec quelques unes d'entre vous le week end du 30 juin Aujourd'hui, une petite bricole réalisée en 2 temps, 3 mouvements ... bien connue sur la blogosphère mais jamais encore tentée ...
TUTO DIY RECUP - faire un coussin "chouette" avec un pull et ... CADEAUX A GAGNER !!!!!!!!!!!! Pas fêté les 2 millions de visiteurs, pas fêté les 4 000 abonnées ... (4 200 ce matin !!!
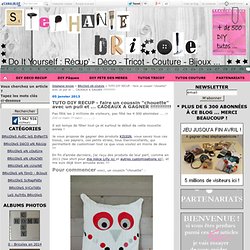
Merci ..........) Il est temps de fêter tout ça et surtout le début de cette nouvelle année ! Je vous propose de gagner des produits KISIGN, vous savez tous ces tissus, ces papiers, ces petits strass, tous thermocollants, qui permettent de customiser tout ce que vous voulez en moins de deux !!! Tutorial ~ Sweater Refashion. I shared this sweater refashion at Me Sew Crazy last week.

I am posting this here today just in case you missed it! {You will need} SweaterFabric Laces, Ribbons and buttonsMatching thread {How to} 1. 2. 3. 4. 5. 6. 7. 8. 9. Tuto pour transformer un pantalon avec des pattes d'eléphant - L'atelier d'Aradia. Bon à la base le patte d'éléphant c'est hippie mais bien entendu c'est ajustable à tout les styles. J'en suis la preuve vivante! Lol (J’adore les pantalons à pattes d’elph ! ^^) Vous prenez un pantalon qui commence à vous ennuyer avec sa banalité, vous le décousez sur le bas jusqu'aux genoux environs( un côté extérieur ou intérieur ou les deux), vous coupez des triangles de tissu de la longueur décousue et vous cousez leurs bords sur les côtés décousus de votre pantalon de façon à ce que ça fasse pièce rajoutée, vous faites ensuite un ourlet aux morceaux triangulaires (ou les laissez comme ça si votre pantalon est déjà destroy en bas comme certains des miens^^).Et voilà, votre pantalon s'est transformé en un magnifique patte d'éléphant!
Acid Dreams + Sugar Highs: DIY Studded Vest from a White Men's Shirt. My brother gave me an old ripped work shirt to fix because he had ripped the sleeve.

It had torn away from the seam so it wasn't worth fixing and then he left the country. So rather than throw it away I made it into something for myself. I started with this. I cut the sleeves off finished the edges with an internal bind and added some studs. Récup' et relook - 2 robes faites à… - mini-fleurs en… - collier en boutons… - paminatelier.com.
T Shirt into 50s Dress Upcycle DIY Tutorial by ~Lolanova on deviantART. UN TOP BLANC DANS UNE CHEMISE D'HOMME. Tutorials.