
Paper Clay Leaves Tutorial. It’s amazing how some things bring you back to your childhood.

I have been playing around with CREATIVE PAPERCLAY and memories flood back of my childhood playing with play dough or watching my kiddies making cookies with play dough and cookie cutters which brings me back to what I have been doing. Early last month Scrapbook Paradise hosted a cake decorating class and I went along to cover the shop floor while Elena was creating with the cake ladies. I must admit that I was takin by it all and was wondering how I could incorporate it into paper crafting.
It hit me about an hour later! PAPERCLAY!!! Here’s how I did it! To make these leaves you will need non stick craft mat, or baking paper, craft rolling pin, or your child’s rolling pin from their play dough set, CREATIVE PAPERCLAY, and leaf cutters or a knife to cut shapes. Roll Paperclay out on your craft mat. Once rolled, press your leaf cutter into your Paperclay and make as many as you like. Paperclay is an air dry product. Like this: Яблоневый цвет из самозастывающей пластики. Всем доброго времени суток!
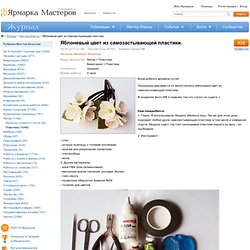
Предлагаю вам вместе со мной слепить яблоневый цвет из самозастывающей пластики. В создании фото-МК я новичек, так что строго не судите :) Нам понадобится:1. Глина. Я использовала Модену (Modena clay). 2. Начинаем! Готовим проволоку - нарезаем ее на куски 7-8 см и с помощью плоскогубцев, загибаем на конце петельку. Делать цветок мы начинаем с центра - пестика и тычинок. Теперь берем шарик глины размером с мааленькую горошинку и придаем ему форму капли. Смазав кончик проволоки клеем, надеваем нашу зеленую капельку округлой стороной на петлю. Теперь нужно поместить тычинки. Таким образом, делаем нужное количество заготовок для цветов. Для лепестков нам нужно покрасить глину в белый цвет. Для лепестка берем маленькую горошинку и придаем ей форму вытянутой капли. Слегка сплющиваем каплю и помещаем ее на вторую фалангу указательного пальца.
Стеком начинаем раскатывать от центра к краям, придавая капле форму лепестка. Orchid.pdf. Hibiscus Tutorial. Learn how to make a beautiful sugar/ gumpaste Hibiscus. Hibiscus Tutorial There are more than 200 species in the Hibiscus (Malvaceae) family of plants, with flowers ranging in colour from white to pink, red, purple and yellow, and in size from around 2" to more than 6" in diameter. The flower demonstrated here is based on the flower the petal veiner was made from. A Google search of images will bring you many examples of this stunning exotic looking flower, and should you wish to make an alternative, you should consider whether you need to change the method shown here for shaping and drying your petals.
What you will need To make the pistil(column) Take a small pea sized piece of well worked flower paste, roll into a sausage and thread a dampened 24g piece of wire into the paste. Leaving the tip of the pistil slightly thicker than the rest makes it easier to insert the stamens and stigma. Cut your stamens into very short lengths and insert around the top of the pistil as equally as possible with a pair of tweezers. To make the petals Making a bud. Fleur "Orchidée" - Tout sur la pâte polymère. Perles et fleurs - tous d'argile de polymère. Sugar flower tutorial. This is one of the simplest flowers you could ever find to make, and should be within the capapabilities of most, whether you are new to the craft or more experienced.
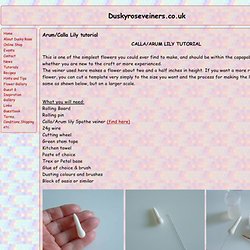
The veiner used here makes a flower about two and a half inches in height. If you want a more realistic sized flower, you can cut a template very simply to the size you want and the process for making the lily will be the same as shown below, but on a larger scale. What you will need: Rolling Board Rolling pin 24g wire Cutting wheel Green stem tape Kitchen towel Paste of choice. Bílý fimokvět. Розочка из полимерной глины. Clay Flower Tutorial For Beginners by MissClayCreations. How to make Clay Flower Iris tutorial / Polymer Clay / Sugar Craft / Cake Decoration. Tutoriel d'une rose en Fimo.