
Composition book cover. To make this cover you will need:*strips of varying widths with at least 16 inches in length.*2 rectangles of muslin cut out to 5 1/4 by 11inches*one long rectangle with the measurement of 25 by 11 inches*one button*one elastic hair band. first get you a boring looking composition book measure your composition book. mine was 10 in length and when i measured from one end of the cover to the other end, it turned out to be 15 inches in width. cut strips with at least 16 inches in length and i varied my widths because i wanted it to look a little wonky...you will want to make your strips come out to at least the width of 11 inches total when sewed together. sew your strips and press them flat with an iron. trim sown your middle section to 15 1/2 by 11 inches next i used one of my daughters hair ties. and placed it in the middle just like the picture above (on the left side, because this will be your back side) pin it down. sew to the left and right of your strips the muslin blocks.

Minijournal. Textblocks. A Beautiful Mess: SCRAPBOOK. I always stumble upon beautiful handkerchiefs at antique malls, but with no practical use for them I usually pass them by.

But today I will be sharing how to turn those pretty hankies into a photo-a-day journal. This is a great project to commemorate the last of your summer days! You could an instant camera or print off Instagram photos! You'll Need: Vintage handkerchief, sewing machine, book pages or other paper, embroidery thread, letter stickers, Instant photos or other printed photographs. 1. Now fill up your pages with a photo-a-day project.
Longstitch Bookbinding Tutorial for a Leather Journal. The most common type of sewn bookbinding that I often default to, falls into the category of longstitch binding.

It’s really a general categorization for many different methods of sewn binding. People have invented their own patterns and techniques and have probably called it something else as well. Suffice to say, it’s a general way to denote sewing your paper to the cover of your book. I’m sure you’ve noticed journals out there with exposed sewing in the binding in a variety of patterns and designs. They are all technically longstitch binding techniques, but in different patterns. The materials for this project include leather, paper, thread, needle, an awl and cutting device of some sort. Regarding the thread, I’m using a natural linen thread in this example, but you can also use waxed thread sold specifically for bookbinding to prevent knotting up when sewing. Regarding my little awl, I use it to punch holes in the paper.
This is what you see on the outside binding… Related Posts: Tacket binding - CaiLun.info - Artist Books Paper & Bookbinding Blog - Cai Lun - Dennis Yuen. I have always loved tacket binding, because its sasuage-like packing on the spine is so cute.

I have just finished one for my co-worker's boyfriend, Todd, and I think I might have perfected my tacket binding skill so it's about time to share it as much as possible. I have been devising my own tacket binding method, as I haven't actually seen one physically to deconstruct and examine its construction. My method may or may not be the same as the conventional one, but so far, it works. Pierce 4 holes for every single tacket pattern. Contruct the "backbone" for the packing with the 2 holes that are the furthest apart. Each section is stitched individually with 1 single thread. Pull the thread out from A2 to the outside and you're ready to create the tacket pattern on the top "backbone".
Pull the thread out from B2 to the outside to beging packing the lower pattern. Curiously crafty. Welcome to the wonderful world of journalling! The Basic Binding of Books: A Tutorial. Tutorials | About Me | Contact | Soapmaking Tutorial Page 1 of 8 1 | 2 | 3 | 4 | 5 | 6 | 7 | 8 | Leave a comment!
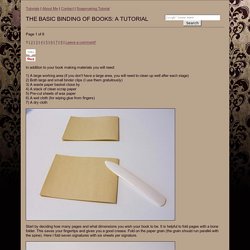
In addition to your book making materials you will need: 1) A large working area (if you don't have a large area, you will need to clean up well after each stage) 2) Both large and small binder clips (I use them gratuitously) 3) A waste paper basket close by 4) A stack of clean scrap paper 5) Pre-cut sheets of wax paper 6) A wet cloth (for wiping glue from fingers) 7) A dry cloth Start by deciding how many pages and what dimensions you wish your book to be. Clamping the spine end with large binder clips (here I use cardboard to protect the pages) and allowing to compress overnight helps with having flatter signatures for sewing.
It helps to make a pattern of your page for later use in measuring and cutting board, endpages, etc. Lay one of your signatures on a blank page and trace, then cut. Perfect. Measure and cut linen tape and mull cloth for the backbone.