
Makeup Geek - Tips, Video Tutorials,... This article is especially for those of you who may feel stuck with your everyday makeup look and desire to branch out, but just can’t seem to figure out the best way to do it.
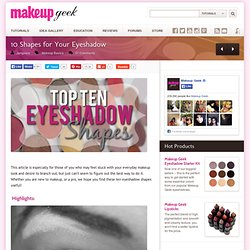
Whether you are new to makeup, or a pro, we hope you find these ten eyeshadow shapes useful! Highlights: Makeup is, after all, just a trick of the light. By highlighting certain areas, you can easily create the illusion of a brighter eye. Using lighter shades in areas to help them stand out, and deeper shades to add depth, pushing them back. My favorite sweet spots to highlight are the inner corner of the eye, the center of the eyelid, and along the brow bone. Different Eyeshadow Shapes: There are countless ways for one to use eyeshadows. Bust out the box and experiment with a new eye shape today! Inner Corner: Add a darker shadow to the inside of the lid. Outer Corner: Adding dark shades to the outer corner of the lid is flattering to most eye shapes, but particularly for those with close set eyes.
Both Corners: DIY: Furniture Makeovers - StumbleUpon. I'm obsessed with making-over old, worn out furniture.

It's amazing how almost any old piece can be totally transformed with new paint, hardware and a little imagination! Here are three examples from Ladies Home Journal...click here to read the entire article. Out-dated side table with stone top transformed into a bright and cheerful accent piece! *First they removed the hardware and stone top, sanded the table all over, and applied a coat of primer. *Then they gave it two coats of semigloss latex paint in a lively citrus hue. *They cut a length of seagrass wallpaper to fit the inset and topped it with a pane of 1/4-inch glass. Old dresser transformed into a chic sideboard with plenty of storage! *They gave the whole piece a light sanding, a coat of primer, and two coats of semigloss latex paint in a pale blue shade on the outside and a deeper blue inside for contrast. *To dress up the doors, they picked out a pair of modern nickel pulls. DIY Friendship Bracelet - Honestly WTF - StumbleUpon.
For several months now, we’ve been receiving emails requesting a friendship bracelet DIY.
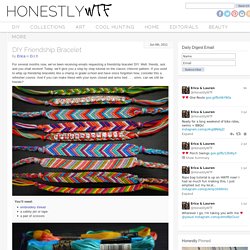
Well, friends, ask and you shall receive! Today, we’ll give you a step by step tutorial on the classic chevron pattern. If you used to whip up friendship bracelets like a champ in grade school and have since forgotten how, consider this a refresher course. And if you can make these with your eyes closed and arms tied . . . umm, can we still be friends? You’ll need:embroidery threada safety pin or tapea pair of scissors Start by cutting several strands of embroidery thread at about 24 inches each. Start on the left side with the outermost color (shown here in red) and make a forward knot by creating a 4-shape over the 2nd color, loop it under and back through the opening. Pull up and to the right to tighten. Now pick up the outermost color on the right side (show here in red) and make a backward knot, creating a reverse 4-shape over the 2nd color, loop it under and back through the opening.