
Pixel Artist - Syosa. Japanese pixel artist Syosa joined PixelJoint 1.5 years ago and has developed a refreshing new style, beautiful animations and the cutest girls!
A 23 year old living in Osaka, Japan and studies Neuroscience at Osaka University. When not creating pixelart and video games he analyzes cell morphology and performs experiments from morning to night. About 4 Years ago, Syosa became addicted to making computer games and found himself practicing pixel art. LOL: Hello Syosa, nice to meet you! I understand creating your own computer games originally drove you to discover creating pixelart. SYO: This question relates to the reason why I decided to start making games. When I pixel, I do not only use my artistic sensibilities. LOL: We are glad you have chosen to make pixel art too! SYO: I've worked with 2 to 5 color palette challenges, size restricted challenges and downsizing challenges in Japanese pixel art forums. This is an old 2 color work of my laboratory professor: LOL: About your job. HMONGHOT.COM - Orianart-how-to-make-2d-game-tilesets-setup-amp-the-basics. Pixel art tile set templates. I thought I'd share some templates for creating pixel art tile sets, since that's something I always use when I make tiles.
Also, I'll add some general advice when it comes to constructing sets with a ridiculous tile count. The tools If you use a pixel editor such as Pro Motion or Pyxel Edit to create your tiles, you can simply draw over the templates I've made, and all the identical tiles in the map will be updated as you draw. You can also easily erase all instances of unneeded tiles. This can save a lot of time and effort, and allows for a more polished result.
The tiles are 16 by 16 pixels in size and have been drawn with a thick border for readability. All the tile set templates are licensed under a Creative Commons license. Set 1: Base tiles This is a good starting point. As you can see, the tiles are color coded to make it easier to gauge the amount of work you can save by flipping the tiles. Waterflow imitation. Animated tiles of water with Adobe Photoshop and ImageReady - Photoshop tutorials and Pixelart tutorials, smiles and pixelart. This method allows you to create animated tiles of water by means of Adobe Photoshop and Adobe ImageReady.
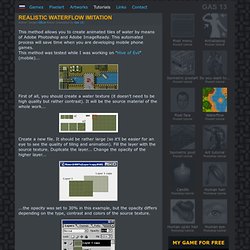
This automated process will save time when you are developing mobile phone games. This method was tested while I was working on "Hive of Evil" (mobile)... First of all, you should create a water texture (it doesn't need to be high quality but rather contrast). It will be the source material of the whole work... Create a new file. ...the opacity was set to 30% in this example, but the opacity differs depending on the type, contrast and colors of the source texture. Switch to ImageReady... Here in this examples you can see the changes that were gained by changing movement directions and parameters of the layer...The best results you're getting should be saved as gif using your working pallete...
Now all you need is to get the real frames of your water animation and crop the tiles to get the waterflow tileset...Open your gif animation in ImageReady and switch back to Photoshop... Pixel Art Tutorials. Isomteric pool pixel art tutorial - Photoshop tutorials and Pixelart tutorials, smiles and pixelart. First to say this is my first tutorial, and though I hope to work many others, this is the only one for now.
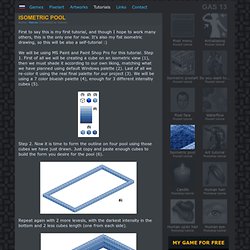
It's also my fist isometric drawing, so this will be also a self-tutorial :) We will be using MS Paint and Paint Shop Pro for this tutorial. Step 1. First of all we will be creating a cube on an isometric view (1), then we must shade it according to our own liking, matching what we have planned using default Windows palette (2). Last of all we re-color it using the real final palette for our project (3). Step 2. Repeat again with 2 more levesls, with the darkest intensity in the bottom and 2 less cubes length (one from each side). Step 3. We create our floor tile using 2 deep blue tones, but you can define any tile you like to personalize your image. So we have an... empty pool... we are missing something... Ok... nice but then what do I do with that solid fill? Now to "cut" our texture just selkect your fill color (in MS Paint) as transparent color and overlay it on the texture.
DITHERING TUTORIAL - Basics by ~kitted on deviantART.