
Photoshop Podcasts And Radio Shows - PODCAST DIRECTORY. Justin Seeley Has Some Photoshop Quicktips To Share Photoshop Quicktips is a new video podcast hosted by Photoshop Expert Justin Seeley that is aimed at both amateurs and creative professionals alike.

Each week Justin guides you step-by-step through a new Photoshop video tutorial. On the Photoshop Quicktips website you can download all of the past episodes and pretty soon, Justin promises, you'll be able to purchase instructional DVDs. Pixelicious — Photoshop, Lightroom And Digital Photography Podcast Photoshop, Lightroom and digital photography tutorials, tips, tricks and digital photo news and info, that's what you'll find at Pixelicious, a podcast featuring award-winning photographers and best-selling authors Ken Milburn and Doug Sahlin.
Ken Milburn Ken Milburn has been a photographer, both full- and part-time, for nearly five decades. Doug Sahlin Doug Sahlin, A.K.A. Bert Monroy Launches PixelPerfect Photoshop Podcast New Adobe Lightroom Podcasts From George Jardine Yahoo!
Photoshop Tutorials: How To Straighten Crooked Photos In Photoshop. Written by Steve Patterson.

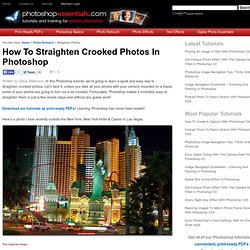
In this Photoshop tutorial, we’re going to learn a quick and easy way to straighten crooked photos. Let’s face it, unless you take all your photos with your camera mounted on a tripod, some of your photos are going to turn out a bit crooked. Fortunately, Photoshop makes it incredibly easy to straighten them in just a few simple steps and without any guess work! Here’s a photo I took recently outside the New York, New York Hotel & Casino in Las Vegas: The original image.
Typical tourist-quality photo. Step 1: Select The "Measure Tool" To best way to straighten images in Photoshop is by using the Measure Tool, which takes all the guess work out of it. Select the Measure Tool in the Tools palette. Step 2: Click And Drag Along Something That Should Be Straight Look for something in your image that should be straight, either horizontally or vertically.
The Options Bar showing the angle of the line drawn with the Measure Tool. However, life goes on. Select the Crop Tool. Non-Destructive Dodge and Burn in Photoshop - Photo Editing Tutorial. Written by Steve Patterson.

It may be hard to believe these days, but there was a time not so long ago when cameras were not digital, and photo developing was done in a lab, not on your computer. Digital cameras and Photoshop may have brought the world of photo editing out of the darkroom and into your living room (or wherever your computer happens to be), but many of Photoshop's tools and features have their roots in traditional film development. Two great examples of this are Photoshop's Dodge and Burn tools, both of which are found in the Tools palette. The terms "dodge" and "burn" refer to techniques that were used to either lighten (dodge) or darken (burn) specific areas of a photo by increasing or limiting the exposure in those areas. The Dodge and Burn tools in Photoshop are the digital versions of these techniques and are often used to either lighten underexposed areas of a photo or darken overexposed areas. Make Your Amateur Photos More Professional.
With everyone and their grandmother having a digital camera you can make almost anybody look like a professional photographer, well, better-than-amateur at least.

You can use this simple process on almost any photo you take. Let’s start with our regular, old, point-and-shoot photo. This one was taken with a little higher-end camera, but it can still use a lot of work. First, we’re going to sharpen our image a bit using the Unsharp Mask [Filter > Sharpen > Unsharp Mask]. We don’t want anything too drastic, so I used some low settings. Now we’re going to add a Levels Adjustment layer [Layer > New Adjustment Layer > Levels]. Next step is to add a Brightness/Contrast Adjustment layer [Layer > New Adjustment Layer > Brightness/Contrast].
One more adjustment layer… the Hue/Saturation Adjustment layer [Layer > New Adjustment Layer > Hue/Saturation]. Now you can probably already see how much of a difference these few steps make. It’s a subtle change, but it usually makes the photo look nicer. Photo Retouching. Contrast LayersReviewed by Denny Tang on Sep 11Rating: In this page, we’ll create the two contrast adjustment layers.

One will be for the highlights of the image and the other for the shadows.