
Cut Out + Keep · Make and share step-by-step craft tutorials. Triple Layer Flower. This is my design for a decorative flower worked up in three layers.
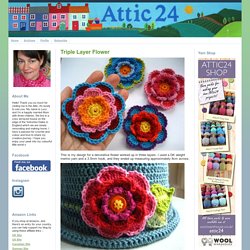
I used a DK weight merino yarn and a 3.5mm hook, and they ended up measuring approximately 8cm across. I originally designed the flower to add some decoration to my hat, you can read more about that here. But this flower is beautifully versatile I think...it would make a super corsage/brooch, or could be applied to crochet bags, cushions, hair bands etc.
It will provide lots of colourful flowery goodness, that's for sure! So before we begin, a little summary of the basic stitches. Sl st [slip stitch] :: insert hook, yarn over, pull the loop back through the stitch, then through the loop on your hook. dc [double crochet] :: insert hook, yarn over, pull the loop back through the stitch (two loops on hook), yarn over and pull through both loops on hook (note :: this is equivalent to the US sc stitch) dtr [double treble] :: yarn over TWICE, insert hook, yarn over, pull loop back through stitch (four loops on hook). Chain 3. Bird nest necklace} I have been seeing a lot of bird nest jewelry around lately.
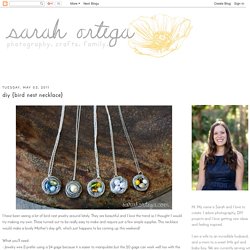
They are beautiful and I love the trend so I thought I would try making my own. These turned out to be really easy to make and require just a few simple supplies. This necklace would make a lovely Mother's day gift, which just happens to be coming up this weekend! What you'll need: - Jewelry wire (I prefer using a 24 gage because it is easier to manipulate but the 20 gage can work well too with the help of some round nose pliers) - pearls or glass beads - necklace chain - jump ring and a clasp Select the beads you want, string them onto your wire and arrange them as you'd like. then simply wrap the wire around the beads wrap some wire in the space between each bead (I like the look of three loops but you could just do one or two if you prefer) this is what the back looked like. Now attach a jump ring and a clasp to the end of a necklace chain and this is what you end up with :) Re-purposing: Tshirts into 5-strand-braided-headbands.
I was walking through Target a few weeks ago and noticed this little knit fabric headband that was not just braided together…….but woven.
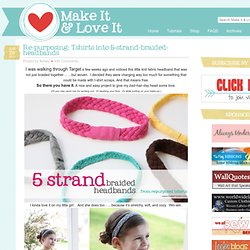
I decided they were charging way too much for something that could be made with t-shirt scraps. And that means free. So there you have it. A nice and easy project to give my bad-hair-day head some love. (Or you may need one for working out. I kinda love it on my little girl . She always has little hair fly-aways that get into her face…….and this helps with that problem.
It even works great with her hair down…..and keeps that hair tucked behind her ears. And yep, good for me too. Thanks little t-shirt scraps. Want to make your own? First, find some old t-shirts. Then, cut your fabric into long strips. Next, stack your 5 strips on top of each other and sew together at one end. Now, pull on each strip of fabric so that they kind of curl on the edges. But let me explain a little better. First, you’ll work on the left side. And that’s it. Ariel. Welcome to day THREE of the Disney Inspired Ribbon Sculpture Patterns.
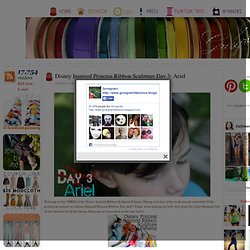
During each day of the week (except weekends) I'll be posting the pattern of a Disney Inspired Princess Ribbon. Fun, huh?! Today we're starting out with Ariel from The Little Mermaid. Get all the tutorials for all the Disney Princesses as I post them in the link below: Ariel is the most unique of all the Disney Princesses with her braided mermaid tail. Materials: Hot glue. Ver v i a l s por spacepearls en Etsy. Disney Princess Inspired Ribbon Sculpture Patterns! Powered By Blogger Widgets | Customized By: Blogging Tips close 17,754 readers RSS feed | E-mail Search This Blog Grosgrain Archives This Blog Linked From Here The Web Disney Princess Inspired Ribbon Sculpture Patterns!
July 26, 2012 Click on day pics to be taken to full tutorial. I have something I've been working on for some time. 28 {comments}: Rie said... Wauw!!! July 26, 2012 at 3:34 PM mamagwenm said... Wow, that's awesome! July 26, 2012 at 3:59 PM Eric and Carrie said... Adorable! July 26, 2012 at 5:58 PM Welcome to Penguin Says Hi! These are AWESOME!! July 26, 2012 at 9:52 PM Erin said... OMG so cute! July 27, 2012 at 1:35 AM Leah said... So cute and perfect for our trip to Disney later this year. Collar con dije en forma de la casa de El Hobbit. SHOP WIDE SALE Your Child's Handwriting or Signature por J4JCharms.