
Wall-E Art. DIY Bracelet Tutorials. DIY Macrame Bracelet - Honestly WTF. Growing up by the beach in Southern California, the ability to knot a macrame bracelet was practically a right of passage.

Although those days are long behind us, we’ve never forgotten the ever-so-simple square knot technique. This time, however, we’re replacing hemp and wooden beads for more updated elements like colorful nylon cord and glossy metal charms. Happy knotting! You’ll need: Start by cutting the knotting cord into two 30 inch, two 20 inch and one 10 inch lengths. Center the 30 inch cord under the two middle strands.
Pull tightly and slide the knot up to the top. Finish the 2nd half of the square knot by folding the left cord over the middle strands and under the right cord. Pull tightly and repeat the steps – left, right, left, right . . . To finish the knots, thread one of the cords onto a needle and sew up the center of 3-4 knots along the backside. Repeat the same step on the other cord. After sewing up both knotting cords, trim away any excess. DIY Party Animal Candles.
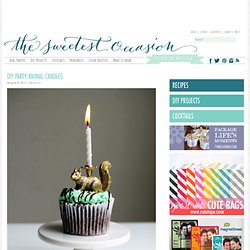
Hi there, it’s Jenny from Hank + Hunt with a fun and super easy diy today!

As soon as I thought of making these I got a huge kick out of naming them Party Animals. Hilarious, but if you hear groaning…it’s coming from my house. Regardless of how cheesy the name is, these turn out awesome. Your kid’s favorite animal holding that birthday candle minus those red eyes that are oh so typical for plastic creatures, awesome. Supplies - plastic animalsplastic candle holdersdrill with 1/8″ drill bitpliersgold spray paint For the plastic animals, you can use any kind you can find. Hold the animal with the pliers and drill a hole straight down, being careful not to pop out the other side. {Valentines day} pixel-y popup card.
I‘ve been scratching my head trying to come up with a card for my hubby {AKA the non-romantic type}.
I finally decided to make this pixely popup heart card! They are really minimal (which I love) and take about 20 minutes to make (that includes the card, insert and envelope). You can even make some pixely confetti to put inside the card (if you are a big kid like me!). Full instructions and printable templates below! (BTW I remember seeing something similar in a popup book years ago. How to 1. (If you have a cutting machine then see note at end of post!) Cut along the black lines and score the grey lines. 3. Scissors cut nail design by ~LaMoccacino on deviantART. Embroidery Designs at Urban Threads - Projects. Vintage suitcase chair. My latest sytyc project for ‘upcycle’ week.

A little less sewing than usual and a little more decor-y. I love vintage luggage! It’s so nostalgic to me, I always am reminded of my grandfather’s travel journal that he wrote in the 40s. As a bonus, this suitcase smelled like my grandpa’s house when I bought it! Talk about nostalgia. When I think of upcycling, I think of turning something into something completely different. I love that it still looks like a suitcase, it has an old world appeal. Tutorial: You need: vintage suitcase 4 legs 4 screw on leg attachments 1 piece of thin plywood cut to fit inside your suitcase foam or pillows to fit in your suitcase fabric Suitcase sizes vary so you’ll have to figure out how much pillow or foam you want to make your cushions how you want them.
Step 1: spray paint legs step 2: cover the pillows/foam with your fabric and tuft them. I used a pattern of 3 tufts, 2 tufts, 3 tufts, in a brick pattern. Once your holders are all set, screw in your (dried) legs.