
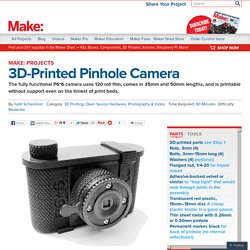
TORTUGA 5 - panoramic pinhole camera. 3D-Printed Pinhole Camera. Step #1: Print your camera parts PrevNext Download the 3D files from Thingiverse and print the camera parts: A — Knob, used to advance the filmB — Cap, snaps onto the bodyC — BaffleD — Winder, engages the take-up spoolE — Film clip, keeps film tightly wound on the spool during unloadingF — Frame slide, allows viewing of frame number on film backingG — BodyH/I — Body clip and leveling spacer, prints as joined piecesJ — Extension, 50 mm or 35 mm lengthK — Pinhole disc, replaceable pinhole mountL — Pinhole clampM — Shutter bladeN — Shutter clampO — Trim ring When preparing the STL files for printing, use the following slicing settings: 0.25mm layer height2 perimeters (or “shells”)3 solid layers top and bottom 50% infill Step #2: Gather tools and materials NOTE: Relax — The pinhole is not as critical as it seems.
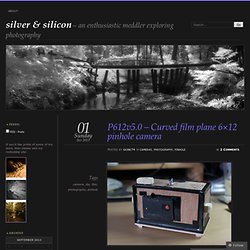
You can purchase a precisely laser-drilled pinhole on the Internet or easily make your own from brass shim stock, a soda can, pie plate, etc. P612v5.0 – Curved film plane 6×12 pinhole camera. If you’ve browsed through this blog before you might have noticed a fondness for pinhole photography every now and then.
For me it’s an extension of the process of taking the photograph all the way back from the developed film to designing the camera itself. There is something extra satisfying about holding up a roll of film to see a fixed image when the camera that took it was put together with your own hands, and pinhole cameras are the simplest way to achieve that. If I could make a functioning camera with a proper lens I’d certainly do that but I fear the precision required is beyond me.
The joy of pinhole construction is that the most critical component in any camera with a lens – the focusing system – is not required. A bonus is that since pinholes are tiny the effective f-number is usually very large, which means long exposures. Design and Build your own Pinhole Camera. First thing, what is a pinhole and why does it have optical properties?
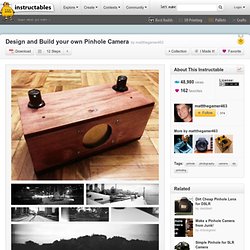
A pinhole has the ability to function like a glass lens because it excludes all light rays which are not reflecting off the subject that the camera is pointed at. When light hits an object, it is scattered in all directions; this is why the object is visible from any angle. If all this light was entering a camera and hitting the film, no image would be produced.
The light needed for a photo has to be aligned to make a focused image. Panoramica. New Panoramic Pinhole camera Project. Square format 35mm camera. Megagonzorama 618 inner workings. Heartbeat: Beautiful DIY Pinhole Cameras Powered by Watch Movements. Pinhole cameras can be easily and cheaply made using things you have lying around the house… or you can go to the opposite end of the spectrum and fashion yourself a highly intricate pinhole camera.

That’s what Korean photographer Kwanghun Hyun did with his Heartbeat cameras. The two cameras created so far feature one crazy design choice: they use intricate watch movements as their internal timing mechanisms. The world of watches and clocks, movements are the internal mechanical mechanisms that make the devices “work.” Kwanghun, whose formal education was in metalwork at Hongik University in Seoul, decided to stuff one of these systems into brass pinhole cameras. The movements are used by the Heartbeat pinhole cameras in order to track exposure time, precisely controlling how long the camera’s shutter is open for. The first camera, named Heartbeat 1 (shown above), is created out of a brass box. Here are some sample photographs captured using the two cameras: Francesco Capponi. Drill Your Own Precision Pinhole Apertures. Directions for making your own accurately sized apertures Items that you’ll need: an appropriately sized quilting needlea pin vicea micrometera cardboard drink coaster from a local eating establishmenta magnifying device (for us older folks)a suitable pinhole material, the thinner the betterextra fine sandpaper, I like to use 1000 or 1500 gritscissors Gather all of your materials and use a clean, well lit area on which to work.
Having everything at hand will make the job go smoother and be less frustrating. Pinholes provide better image (more “sharp”, as it were) the more accurately “round” they are. Lay out your pinhole material; the thinner the material, the better. You’ll need to dial the desired number into your micrometer. Take a quilting needle that won’t fit through the measuring rods when set to your pinhole size.
Bring the pin vice collets up over the other end of the needle and gently tighten the pin vice. Now, to drill your own pinholes; patience is the key. Marquardt International Pinhole - 4x5" Large Format Pinhole Camera by Chris Marquardt. Curved (film plane) pinhole camera. Design and Build your own Pinhole Camera. First thing, what is a pinhole and why does it have optical properties?
A pinhole has the ability to function like a glass lens because it excludes all light rays which are not reflecting off the subject that the camera is pointed at. When light hits an object, it is scattered in all directions; this is why the object is visible from any angle. If all this light was entering a camera and hitting the film, no image would be produced. The light needed for a photo has to be aligned to make a focused image. P612v5.0 – Curved film plane 6×12 pinhole camera. 120 Pano Pinhole. The “Reality so Subtle 141″ is a 6×17 Panoramic Pinhole camera that creates 57x172mm images on 120 film with a wide (141°) angle of view and even exposure across the negative.

Contructed with walnut wood, brass, stainless steel and aluminium.Curved film plane with a radius of 70mm (focal length).Anti-friction coating on film plane.Large 6x17cm (57.4×172.5mm) negative giving 4 shots per roll of film (120 roll film).Angle of view: 141 degrees horizontal, 44 degrees vertical. 2x Laser drilled 300 micron (0.3mm) pinholes (f/233).Magnetic shuttersDual pinhole allows horizon to be placed on upper or lower third (camera level).Accurate aiming lines for composition.Large disc spirit level.Film winds in either direction (suits left or right handed).
I have been shooting a homemade panoramic camera just like this one for a few years now and along the way I’ve had lots of interest from people who wanted to know where to get a camera like mine. The camera weighs 0.7kg (1.5lbs) when loaded with film.
Qualität der Lochblenden / Pinhole Quality - Skink Pinhole Pancake. Das Herzstück des Lochkameraobjektivs, nämlich das Loch selbst bzw. dessen Beschaffenheit ist nun einmal entscheidend für eine hohe Bildqualität.
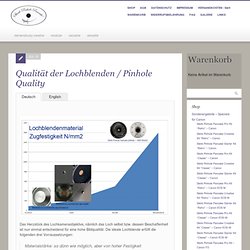
Die ideale Lochblende erfüllt die folgenden drei Vorraussetzungen: Materialstärke: so dünn wie möglich, aber von hoher Festigkeit Beschaffenheit des Lochs: absolut rund und gratfrei Lochgröße: entsprechend der jeweiligen Brennweite bemessen Die Bildqualität steigt in dem Maße, wie diese drei Vorbedingungen erfüllt werden können. Dabei spielt sowohl das verwendete Ausgangsmaterial, als auch der Produktionsprozess eine wichtige Rolle. Lochblenden aus Kupfer oder Aluminium sind wegen Korrosionsanfälligkeit bzw. zu geringer Reißfestigkeit nur bedingt als Lochkameraobjektiv geeignet, dafür aber billig in der Herstellung.
Aber auch die Lochgröße ist nicht egal, sie sollte der jeweiligen Brennweite (Abstand zwischen Lochblende und Sensor bzw. Unsere Lochblenden werden vor dem Versand nochmals einzeln unter dem Mikroskop kontrolliert.