
Tutorial: Cycles - Decals and Multiple UVs. Blender 2.71 Tutorial - Make and Use Panoramic HDRIs in Blender. Blender Tutorial: Cycles Materials Overlook. Blender HDRI Tutorial: Cycles. This is a Blender HDRI tutorial using Blender's Cycles rendering engine.

We will be using a free sample of a Hyperfocal Design V-HDRI sky, which is a downsized version of the original. To follow along or view the finished scene, you can download a free VHDRI Skies image and the Blender scene above. You can view this tutorial as simple text/images or watch on youtube: For reference, we are using version 2.67. Ok firstly, we need to use Cycles for anything in this tutorial to make sense. Delete the lamp so we are only using HDR lighting, then add a plane so we can see the shadows cast from the cube by the HDRI light source. Now to load in the HDR Environment map, go to the World tab, then Surface.
Change to rendered view mode to check the lighting. To solve this firefly issue, go back to World tab, Settings and change Importance Sampling to 1024 or 2048. If you have lots of bouncing/reflected light, try upping Filter Glossy to something around 0.1 to 0.5, in Render tab -> Light Paths. Cycles Archives. Introduction to Blender Cycles Render Engine. Hello and welcome to this Blender Cycles Render Engine Introduction!
In this video tutorial we introduce you to the new Blender Cycles render engine that is now available for Blender 2.6. Cycles offers a much more realistic, interactive rendering workflow than the current Blender Internal engine and is a lot of fun to work with. What you’ll learn This Blender Cycles tutorials will introduce you to the basics of using Cycles including how to set up your lighting, creating materials with the shader node system, adjusting the environment, and finally how to render a very nice glass bottle filled with red liquid. Environment/HDR Lighting in Cycles. El Brujo de la Tribu: Blender Cycles: Rendering Tips (WIP) Hi everybody. In this article I'm going to write brief tips that I use in my cycles renders.
I hope they will be useful for you. This article is in process. Free HDRI Map: Complex Roof Lights. Blender Fluid Tutorial: How To Make A Beer. Modelling the Glass 1.
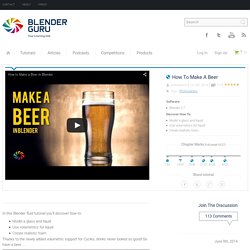
Delete the default Cube and Lamp. Add a Cylinder with these dimensions: 2. Delete the top and bottom faces of the Cylinder. 3. 4. Blender 2.70 Tutorial - Getting to Know Nodes. Using Blender's Light Path Node for Cycles. How to fake bubbles in Blender. Morbius Productions. Morbius Productions. Blender Cycles Material Tutorial: Metallic, Pearlescent and Opalescent Paint. Baking with Blender Cycles (Blender 2.70)
Blender Cycles tutorial: Creating realistic glass. Baking with Blender Cycles (Blender 2.70) Blender Cycles Tutorial : Cracks With Worn Edges. Blender Cycles tutorial: Creating realistic glass. Introduction to Cycles Baking. Introduction to Texturing with Cycles in Blender. Doc:2.6/Manual/Textures/Mapping/UV. From BlenderWiki The most flexible way of mapping a 2D texture over a 3D object is a process called "UV mapping".
In this process, you take your three-dimensional (X,Y & Z) mesh and unwrap it to a flat two-dimensional (X & Y ... or rather, as we shall soon see, "U & V") image. Colors in the image are thus mapped to your mesh, and show up as the color of the faces of the mesh. Use UV texturing to provide realism to your objects that procedural materials and textures cannot do, and better details than Vertex Painting can provide.
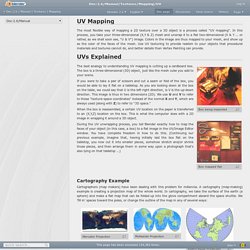
Box being inspected Box mapped flat The best analogy to understanding UV mapping is cutting up a cardboard box. If you were to take a pair of scissors and cut a seam or fold of the box, you would be able to lay it flat on a tabletop. When the box is reassembled, a certain UV location on the paper is transferred to an (X,Y,Z) location on the box. Cartography Example Cartographers (map makers) have been dealing with this problem for millennia. Half-Sphere Example. Manual/Textures/Influence/Material/Bump and Normal. From BlenderWiki Mode: All Modes Panel: Shading/Texture Context → Image Hotkey: F6 Description In CGI, bump maps can be applied to 3D models and thus serve to alter surface appearances.
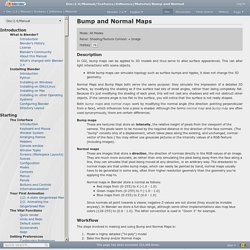
While bump maps can simulate topology such as surface bumps and ripples, it does not change the 3D geometry. Normal Maps and Bump Maps both serve the same purpose: they simulate the impression of a detailed 3D surface, by modifying the shading as if the surface had lots of small angles, rather than being completely flat. Both bump maps and normal maps work by modifying the normal angle (the direction pointing perpendicular from a face), which influences how a pixel is shaded.
Bump maps These are textures that store an intensity, the relative height of pixels from the viewpoint of the camera. Normal maps These are images that store a direction, the direction of normals directly in the RGB values of an image. Intro to Blender 3D, Environment - Materials and Rendering Part 7. Creating a Realistic Orange. Vertex Painting. Creating an Ocean Scene with OceanSim and Cycles. In this Blender 2.6 video tutorial, we take a look at using the Ocean Sim modifier in conjunction with the Cycles render engine to create a gorgeous ocean scene.

This tutorial covers the entire process needed to create the final result, including generation of the ocean, the sky background, rendering in Cycles, and setting up the composite nodes to create the final effect. Note: I mixed up during the tutorial, and wrongly attributed the Sky Texture. The actual author is David Keyes, and the texture comes from his sky pack that you can download here: Download our Sky Texture pack here: part 1 | part 2. Blender 2.68 Super Easy Very Basic Cycles Render Tutorial.
6. Rendering with Cycles - Blender Cookie. How to Make Fire in Cycles. Simulating fire and smoke is probably one of the coolest things that Blender does.
Other 3d software users have to pay for expensive plugins to get smoke, but Blender users get it free. And it’s so good! Once you figure out the basics of the smoke sim it’s a real blast to play with :) I made a fire tutorial almost 5 years ago to date, and things have changed a bit since then. We’ve got Cycles – which now supports fire and smoke rendering – a host of smoke and fire improvements, plus a new workflow for creating fire. So it’s time for a new tutorial.
This tutorial will cover the fire creation only. Can you make something cool with this tutorial? Summary Coming soon! Thanks for your patience :) Close Summary.