

DIY Gretchen Jones Necklace + Giveaway. A couple of months ago, while visiting New York, we met the lovely Gretchen Jones and were fortunate enough to spend an entire day crafting in her über charming Brooklyn apartment.

Not only is she amazingly talented and fascinatingly storied, Gretchen is one of the most humorous and genuine people we’ve gotten to know. After raiding a local hardware store for supplies and hardware, we spread out over her workspace, and whipped up several pieces of jewelry while sharing anecdotes. Variations. As you can see, using two colours of yarn at ninety degrees gives a helical pattern.
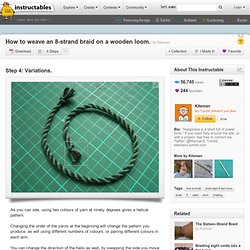
Changing the order of the yarns at the beginning will change the pattern you produce, as will using different numbers of colours, or pairing different colours in each arm. You can change the direction of the helix as well, by swapping the side you move - top-right to the bottom, bottom-left to the top. It is possible to change the direction of the helix part-way through the braiding as well. With care, you can weave so many steps one way, then the same number of steps the other way, and produce a zig-zag pattern. Of course, you can also use this loom to weave the seven strand braid, and probably many other combinations as well. {macramé: half knot spiral} washer & wingnut bracelet. By Kate on October 25, 2011 Hello there!
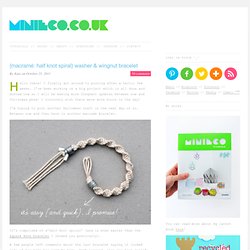
I finally got around to posting after a hectic few weeks. Girly (yes, girly) hardware flower brooch - CRAFTSTER CRAFT CHALLENGES. I found some really girly-looking things at Lowe's, so I decided to make a piece of jewelry.
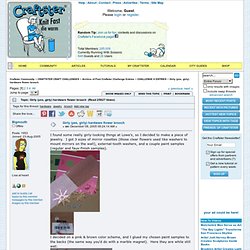
I got 3 sizes of mirror rosettes (those clear flowers used like washers to mount mirrors on the wall), external-tooth washers, and a couple paint samples (regular and faux-finish samples). I decided on a pink & brown color scheme, and I glued my chosen paint samples to the backs (the same way you'd do with a marble magnet). Here they are while still wet: I cut "leaves" from green paint samples and painted two of the washers. I tore the ugly fabric flower off a brooch that came on a shirt I bought at Goodwill a while back, covered the front with a green paint sample, and then glued everything on it.
Metal Coil Necklace. Make a Hammered Pendant from Washers. We made this simple, elegant pendant with only copper washers and scrap sterling silver wire.
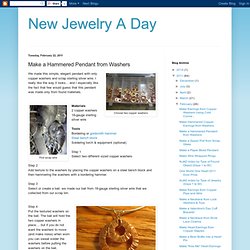
I really like the way it looks... and I especially like the fact that few would guess that this pendant was made only from found materials.Materials 2 copper washers 18-gauge sterling silver wire Tools Bordering or goldsmith hammer Steel bench block Soldering torch & equipment (optional) Step 1 Select two different sized copper washers. Step 2 Add texture to the washers by placing the copper washers on a steel bench block and then hammering the washers with a bordering hammer. Step 3 Select or create a bail. we made our bail from 18-gauge sterling silver wire that we collected from our scrap bin. Step 4 Put the textured washers on the bail.
DIY rope bracelet from a J.Crew shopping bag! « sideoats + scribbles. I must confess, I love jcrew so much.
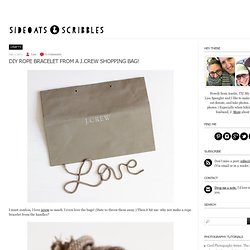
I even love the bags! (Hate to throw them away.) DIY Rope Bracelet « greeneyed.com. ANNOUNCEMENT: A select number of these bracelets are available for sale here. I know, I know, MORE friendship bracelets. I can’t stop myself. I am a friendship bracelet making machine. How To’s-Day: Washer necklaces. I’ve been planning this post for weeks.

But sometimes when I make plans I forget that I’m a mom. And I forget that cars can die, that kids get sick, that friends will need last minute help, that stores don’t like to carry exactly what I need or they purposely make it very hard to find, that family events tend to take all day… for three days in a row, and that my kids need to see my face from time to time. So here it is but not without the help of three people who love me enough to dig me out of the hole I buried myself in this week: my awesome husband and my good friends Lanae Shrope and Stephanie Shumway. (And thanks to Lori Nielsen for the loan of her alphabet stamps!) Lanae is responsible for the chains and cords on the necklaces along with some of the work that went into making them.
Home Depot here we come! Hardware Stretchy Bracelet + Home Depot Giveaway « This year has been the year of the arm!

From Man Repeller’s Arm Parties to the rebirth of the friendship bracelet, wrists seem to be getting all the attention these days. It’s not about chunky bangles but it’s all about the tiny bracelet…. lots and lots of tiny bracelets. There’s nothing like a wristful of bracelets. DIY Wrap Bracelet. You should all know by now that we are all about stacking bracelets on our wrists.

The more, the better. In fact . . . the most, the best! DIY Braided Bead Bracelet. It’s been awhile since our last bracelet DIY.

DIY Box Braid Necklace. The moment we saw Phillip Lim‘s Box Braid Collar Necklace, we were immediately overcome with a wave of nostalgia. Our memories of a neon, plastic box braid lanyard was suddenly transformed into a sophisticated leather jewelry component. Honestly, brilliant! Inspired by our fondness of Lim’s necklace and our love of utilizing hardware, we made our own interpretation of a box braid necklace.
And in case you forgot how to make your favorite childhood summertime craft, take a trip down memory lane with us! Start by cutting the suede in 4 three-yard pieces. Repeat the box braid until you are ready to add washers to the necklace. Once the necklace is finished, trim the ends. Wear it as a necklace, wrap bracelet or even a headband! (top image via Ssense, rest of images by Honestly…WTF) DIY Braided Hex Nut Bracelet. We’re nuts for nuts. Is there a more versatile and inexpensive DIY component than a hex nut from the hardware store?