
GIMP Tutorials. GNU Image Manipulation Program Skip to page contents [ News | Screenshots | Features | Downloads | Documentation | Get Involved ] [ Plug-in Registry | GIMP Development ] [ Donations ] [ Tutorials [ Beginner | Intermediate | Expert | Photo Editing | Web | Script Authoring ] Beginner GIMPLite Quickies Use GIMP for your graphics needs without learning advanced computer graphics methods.
Simple Floating Logo The famous "GIMP Floating Logos" rescued from the original GIMP web site and slightly modified to fit here. Draw On Selections Borders Use the selection tools to draw simple or complex shapes. Paths (Bezier Selections) Use paths (bezier curves) like the GIMP Masters do. Quickmask Use Quickmask to make a vignette of your photos. Red Eye Removal Use the Channel Dialog in one method of removing red eye from photos. Straight Line Tutorial 'Tis somewhat rude. Intermediate Drawing Shapes With Paths Make a dimensional box with paths (bezier curves) and gradients. Expert Photo Editing Web Script Authoring. Beginning RAW processing. With all the people I hear talking about RAW processing and the many that have come away from their first attempts at RAW rather disillusioned, I thought it only natural to produce a tutorial with a bit of advice for beginners.

This will be elementary advice for those relatively new to RAW and should help you produce images that are significantly better than what you get by shooting jpg. However, this is only a beginning, we aren't even going to get past the first tab, but my hope is that if you can build a little confidence with these tools that you will seek out the advice you need to take this even further. I am going to be talking about Adobe Camera Raw (ACR) that some prepackaged with Photoshop CS, Photoshop Elements and Lightroom. If you use GIMP you may want to download the free processor from UFRAW that will allow you to work on RAW files and then export them directly to GIMP. HDR photos with the GIMP. A tutorial on making High Dynamic Range photos using the GIMP or similar software. This instructable is aimed at a range of people, so you can skip to the bits relevant to you with the information below. I apologise for the verbosity of the main instructions, but I figure you can skip parts you already understand, and I may as well put in the detail for people who don't.
If you don't know what High Dynamic Range (HDR) is or how it works, read on.If you are comfortable with the concept of HDR and want to know how to do it in photo editing software, go to step 3If you are familiar with the process of making HDR images and just want details of how to do it in the GIMP, go to step 4If you are familiar with the interface of the GIMP and just want a quick set of instructions on how to make HDR (for instance if the theory bores you and you just want to make some HDR images), go to the recap stage in step 10. The details of each step are in... the relevant step. By popular request....workflow tutorial. - Canon Digital Photogr. Hello to all!!
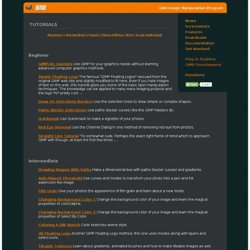
While I do not consider myself an expert with PSCS or photography in general, I have been asked many times (since I began posting pictures of my daughter Julia) if I could describe my workflow. I don't think I do anything extreme or different than many of you but I know from my own learning experience that one can often glean a small trick or step that maybe was overlooked or forgotten. Here is a step-by-step explanation as to how I processed the following shot and made it ready for the web.
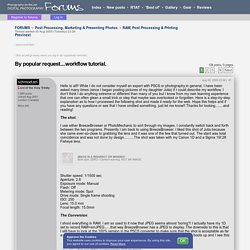
Hope this helps and if you have any questions or see that I have omitted something, just let me know!! Thanks for looking........and reading! The shot. I use either BreezeBrowser or PhotoMechanic to sort through my images. Shutter speed: 1/1500 secAperture: 2.8Exposure mode: ManualFlash: OffMetering mode: SpotDrive mode: Single frame shootingISO: 250Lens: 15.0 mmFocal length: 15.0mm The Conversion. I shoot everything in RAW. As you can tell, I didn't have my white balance set correctly.