
DIY: Concrete Picture Frame. Remember Ananda?
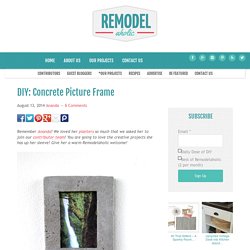
We loved her planters so much that we asked her to join our contributor team! You are going to love the creative projects she has up her sleeve! Give her a warm Remodelaholic welcome! Hello to all the fabulous readers at Remodelaholic! I am so thrilled to share a fun and easy project with you today! You probably know how much I love concrete from my previous tutorial here at Remodelaholic on how to make geometric concrete wall planters. How to Make a Concrete Picture Frame Materials and tools: pourable concrete mix, such as Quikrete 3000lb (used here) or 5000lb.cardboard or cereal boxes for making moldsplastic containers to mix concrete, plastic bags for curing concreteexacto knife or scissors, glue and/or tape for the moldsgloves, dust maskpicture frame hardware, such as hangers, screws and turn buttons, all available on amazon, and small sections of wood pieces cut from branchesglass from an old frame, 5″x7″ is what we used here, and acid free card stock backing.
HomeMade Modern. Images For > Diy Concrete Planters. Cire b ton. DIY et tuto étoile en béton. Mardi 21 août 2012 2 21 /08 /Août /2012 14:42 bonjour!

Me revoilà avec un nouveau tuto, ça faisait un petit moment. Je vous présente ma méthode pour réaliser des objets déco en mousse cimentée (de myself ), heu mais quoikes??? Comment m'est venue cette idée... C'est en bricolant et en appliquant un enduit à l'éponge, j'avais laissé sécher l'éponge pleine d'enduit, Il m'en faut pas plus pour que l'ampoule s'allume... Donc pour réaliser ces objets, il faut: * Du ciment et de l'eau * j'ai utilisé de la mousse un peu dense (récup) * un couteau électrique (outil magique) cet appareil est juste génial pour couper la mousse c'est un truc de tapissier, mon astuce de pro, le mien m'a coûté 2 euros sur une foire à tout,
HOME & GARDEN: DIY : Le béton, c'est canon! Le béton, en ce moment, c'est tendance.

Et ce ne sont pas les DIY qui manquent à ce sujet ! Voici mes préférés ! - Un tabouret en béton home made - - De jolies lettres en béton - Read more - Toutes les explications sur Decocrush - Et pourquoi pas, planter des papyrus miniatures dans de beaux pots trompe-l'oeil en béton - Des objets déco à faire avec du béton ciment. Des objets déco à faire avec du ciment Que faire avec du ciment ?
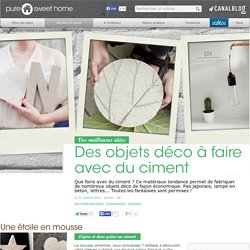
Ce matériaux tendance permet de fabriquer de nombreux objets déco de façon économique. Pas japonais, lampe en béton, lettres... Toutes les fantaisies sont permises ! Le 31 octobre 2014 - photos : DR Légère et dure grâce au ciment La mousse cimentée, vous connaissez ? Happy. DIY Laced Cement Votive. By Claire of Fellow Fellow Hi there, it’s Claire from Fellow Fellow here!

I’ve got a really cute DIY for you today! A laced cement votive, perfect for summer nights spent outdoors. Keep reading to see the full tutorial after the jump! Here’s what you’ll need:– Cement powder – Paper cups to mix cement in – Wooden sticks to stir cement mix – Coins – Petroleum Jelly (or cooking spray) – Optional (I’m not sure how much it helps) – Sticker tape (like: – A disposable container (plastic, or paper cup) for the outside of your votive – A smaller disposable container (I used a medicine cup), big enough to hold a tea light – Sandpaper – PliersA few tips: – It’s best to keep the outside container fairly small (mine was about 2.5″ diameter) and made from either plastic, or paper (a paper cup works well).
It shouldn’t be anything precious as it will have to be cut/torn off at the end. Step 5. Concrete Garden Bench. Concrete lighting. Concrete is a really cool material to work with and it is not very complicated if you are well prepared.
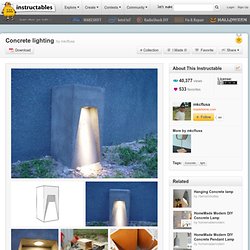
Design: - I designed the light in SketchUp. This way it gives you a great idea of how it looks in 3D. It is important that it is possible to get the shape out of the mold you make. So the more advanced a your design, the harder it can be to get it out of the mold undamaged. . - I printed the drawing out with measurements and got started on making the mold from plywood and 2x4's. The mold was made so almost all parts and sides could be taken apart. Varnish/lacquer: - Then all the parts were given a few thick coats of varnish/lacquer. Wiring and Inner mold: It is important to plan for the wiring.
There are several ways of running the wire and below, I try to explain various ways which can be combined to suit your design. Styrofoam: You can use Styrofoam in places where you want the cavities. Inner mold: (see photo #8) You can make an inner mold to make the lamp more hollow and weigh less.