
DIY - DIY heart rope fun heart cool creative diy rope easy crafts diy ideas diy crafts do it yourself easy diy diy images diy photos easy diy craft ideas diy tutorial diy tutorials diy tutorial. Little Wishes - Beyond Beyond. Well, we are dusting off our obligatory black armband over in Beyond Beyond land for one of our most favourite shops ever – Early Bright (mega sad face) they have been the purveyors of some delicious and inspirational bling that is more art than jewellery. And we just want to share one of the most beautiful pieces every a wish in a jar. We used to shake dandelion bushes when we were little in the vain belief that we would get a Barbie dream house, Michael Jackson tickets, the ability to breakdance overnight (although we never progressed beyond being able to do backspins), millionaire moolah, or our favourite wish was that we had been dropped off at the wrong house (sorry parental units) and we were really the offspring of some family with the financial clout of Daddy Warbucks and the Rothschild’s combined.
About the author I'm the big kahuna with the whole shebang. Bird nest necklace} I have been seeing a lot of bird nest jewelry around lately.
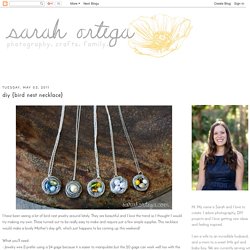
They are beautiful and I love the trend so I thought I would try making my own. These turned out to be really easy to make and require just a few simple supplies. How to Create Rosette Accessories Using Duct Tape. What up duct tape?
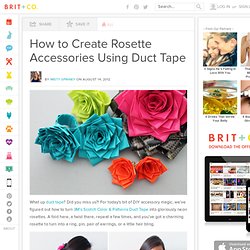
Did you miss us?! For today’s bit of DIY accessory magic, we’ve figured out how to turn 3M’s Scotch Color & Patterns Duct Tape into gloriously neon rosettes. 5 Ways to Turn Zippers into Awesome Arm Candy. UPDATE: By popular demand, Zipper Bracelet Kits ($15) and readymade Zipper Bracelets ($20) are now available in the Brit + Co. shop!

You know we love turning unconventional materials into wearable accessories. Today, we’re tackling zippers! We figured out 5 simple, beautiful ways to create bracelets, cuffs, and bangles out of metal, plastic, and repurposed zippers. Materials: - zippers - E-6000 quick hold contact adhesive - velcro or snap buttons - leather crimps + clasps - Tools: needle nose pliers, sharp scissors First thing to do is get your zippers! 1. These bangles are sweet, and have a definite friendship bracelet vibe. Use colored zippers for these, in whatever colors you like. Attach cord ends so that you can add a clasp and loop. 2.
How To Make Cozy Winter Cuffs. Remember that rustic looking mason jar wreath from a few weeks ago?
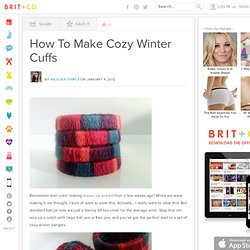
While we were making it we thought, I kind of want to wear this. Actually… I really want to wear this! Hanging Chains Headband. While browsing Topshop last week, I came across this fun hanging chains headband and thought with Coachella right around the corner, an easy DIY for something similar would be fun.

I used an old plastic zig zag stretchy comb headband I’ve had for years because it was the most logical choice to hang chains from but you can use an elastic band in a similar way. DIY Braided Bead Bracelet. It’s been awhile since our last bracelet DIY.

I don’t know about you, but our wrists have been begging for another colorful addition for months now. So after playing with some materials that were already on hand, we’ve created a tutorial for a braided bead bracelet, which is a not so distant cousin of the hex nut and wrap bracelet. Because honestly, you can never have too many . . . You’ll need: Cut the waxed linen cord into a 26″ and 19″ piece. Tie a knot about half an inch down from the loops. Start braiding the strands. Push the bead against the base of the braid, and cross the left strand over the middle. Keep a finger at the base of the braid, holding the beads in their place and keeping the braid tight. Finish the bracelet with another inch of braided cord, measuring it against the wrist.
Thread on a two hole button – two strands through one hole and one strand through another. Trim the end. Your bracelet is finished! DIY Fabric Button Earrings. Dritz button kit (you can find this at any craft store or online) I about died when I realized how easy it was to create personalized earrings out of buttons.
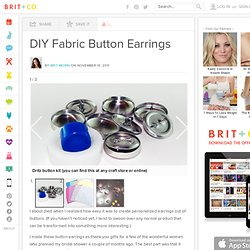
(If you haven’t noticed yet, I tend to swoon over any normal product that can be transformed into something more interesting.) I made these button earrings as thank you gifts for a few of the wonderful women who planned my bridal shower a couple of months ago. DIY Proenza Schouler Rope Necklace. Lauren and I have been waiting for an excuse to use colorful bungee cords for some time now.

And after seeing this Proenza Schouler necklace from their Resort 2011 collection, we jumped at the opportunity to recreate our own version of this amazing piece of jewelry! Start by cutting a 10″ and a 15″ piece of bungee (or climbing rope). Burn the ends with a lighter to prevent fraying. Then, wrap the middle sections with either twine or mason line using the friendship knot technique and use the hot glue gun to secure the ends to your bungee cord.
(Click images to enlarge) Lay the center of the twisted cord in between the two pieces of covered bungee, twist twice at the top of the necklace and bring both sides down to create a small loop. Wrap each glued section with mason line or twine and trim any excess twisted cord. Your Proenza Schouler inspired necklace is ready to wear! (top image from here, rest of images from Honestly…WTF) DIY Lace Earrings. Dolce & Gabbana‘s Spring ’11 collection undoubtedly furthered our already fanatical obsession with lace.

Honestly, how dreamy is the collection?! We thought we’d make good use of some vintage lace trim we had laying around and turn them into earrings similar to the ones we saw on the runway. And thanks to some tips from a DIY previously featured on Poppytalk, making lace earrings proved be a cinch! Mix equal parts glue to water in a bowl. DIY Tiered Ombre Necklace. We were so inspired by the combination of chain and brightly-colored spandex from Tuesday's chunky necklace hack that we created another little something.
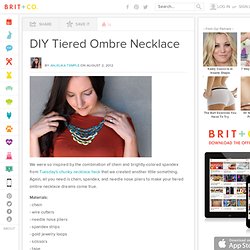
Again, all you need is chain, spandex, and needle nose pliers to make your tiered ombre necklace dreams come true. Materials: - chain - wire cutters - needle nose pliers - spandex strips - gold jewelry loops - scissors - tape You'll be cutting 6 different lengths of chain for this so make sure you've got a good set of wire cutters. Cut the first length of chain to size. This will be the piece that goes around your whole neck so it should be around 24 inches. Now get your spandex prepped. To thread the spandex through the chain, use a piece of tape to create a needle at one end of the spandex, kind of like the end of a shoelace. Cut the next length of chain 1-2 inches shorter than the colored portion of the first chain. Then 2 with the next color. Now time to attach! Use needle nose pliers to fasten everything. And you're done! Flirty Fluorescent Feathers: Another Win for Duct Tape.
UPDATE: By popular demand, Feather Earring Kits ($15) and readymade Feather Earrings ($20) are now available in the Brit + Co. shop! DIY Prada Rose Earrings. We’re stopping to smell the roses with this week’s reader requested DIY. Prada‘s spring jewelry collection, comprising of necklaces, bracelets, brooches and earrings featuring large resin flowers and crystals, is flawlessly retro and delightfully feminine.
With the abundance of assorted resin cabochons and pear-shaped rhinestones available online, you’ll have a ball customizing your very own pair of danglers. Honestly! You’ll need: Using the wire cutters, snip off any hooks or attachments fastened to the rhinestone frog closure. The tip of the eye pins will be glued to the top of each rhinestone drop.