
DIY: Easy-to-make Instagram magnets - CNET Mobile. Editors' note: This guest post is the second in a five-week series of Photojojo's best photography tips.
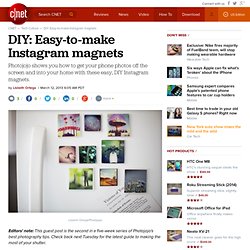
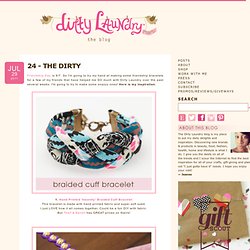
Check back next Tuesday for the latest guide to making the most of your shutter. You're addicted to shooting photos with your favorite mobile companion, but there's just one problem: your photos seem to be stuck in your phone. There are plenty of quality Instagram printing services, like PostalPix (check out our collab with them on this Instagram album), Printstagram and Stickygram, to name a few. These services are great for printing Instagrams in a pinch, but it's actually surprisingly easy to make your own at home. DIY Macrame Bracelet. Growing up by the beach in Southern California, the ability to knot a macrame bracelet was practically a right of passage.

Although those days are long behind us, we’ve never forgotten the ever-so-simple square knot technique. This time, however, we’re replacing hemp and wooden beads for more updated elements like colorful nylon cord and glossy metal charms. Happy knotting! You’ll need: Start by cutting the knotting cord into two 30 inch, two 20 inch and one 10 inch lengths. Center the 30 inch cord under the two middle strands. Pull tightly and slide the knot up to the top. Finish the 2nd half of the square knot by folding the left cord over the middle strands and under the right cord. Pull tightly and repeat the steps – left, right, left, right . . .
To finish the knots, thread one of the cords onto a needle and sew up the center of 3-4 knots along the backside. Repeat the same step on the other cord. After sewing up both knotting cords, trim away any excess. DIY $220 Wrap Bracelet for $5. 24 - THE DIRTY - Dirty Laundry - {the blog} Friendship Day is 8/7.
Surprise DIY. Log in Username Password Forgot password ? Views. DIY / Et si tu bricolais? Bath bomb recipe. Here is a Friday Flashback about making bath bombs.
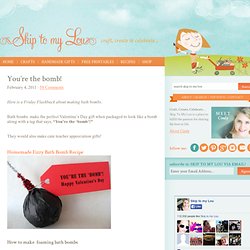
Bath bombs make the perfect Valentine’s Day gift when packaged to look like a bomb along with a tag that says, “You’re the ‘bomb’!” They would also make cute teacher appreciation gifts! How to make foaming bath bombs Supplies: 2 Cups Baking Soda 1 Cup Citric Acid 4 teaspoons massage oil ( or 2 teaspoons essential oil and 2 teaspoons olive oil) Spray bottle with water mold (60 mm 2 part plastic ball) (I am also thinking the bottoms of two large Easter eggs could be used) This amount only made 5 bath bombs.
Mix baking soda and citric acid in large mixing bowl. Add in 4 teaspoons of scented massage oil (or other combination of skin safe essential oil for scent and another oil for moisturizing the skin). This next step can be a bit tricky because you don’t want your bath bomb to start fizzing. You will continue spraying until the mixture will clump in your hand when squeezed. Fill one half of your mold. Gently remove the ball from mold. Enjoy! DIY. Curbly-Original Easter is a little less than two weeks away, which means you'll probably be decorating some eggs for this holiday sooner rather than later.
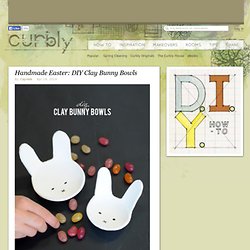
There are ton of options out there, whether you're more into traditional dyeing techniques or more unique ideas. So, to make it easier for you to decide, I've rounded up 14 of my favorite DIY Easter egg decorating tutorials. You're bound to find at least a couple that you like from this… Continue Reading. DIY: Wrap-turned-Scarf. How to tie a Turk's Head. Uses: The Turk's Head (ABOK # 1303 - 5, p 232) is widely used as a slide, or woggle, for scout's scarves.
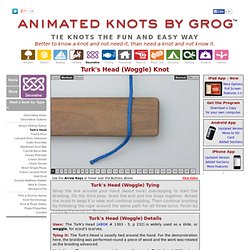
Tying it: The Turk's Head is usually tied around the hand. For the demonstration here, the braiding was performed round a piece of wood and the work was rotated as the braiding advanced. Variations: There are many variations on the simple Turk's head. With a large enough loop, many more braids can be created before making the end follow the lead of the first round of braiding; more than one strand can be used; and the number of times the end follows the lead can be varied. Polo Refashion. A few months ago Philip and I weeded through our closets and made a big pile of stuff to donate to Goodwill.
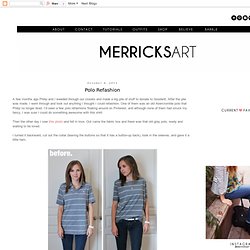
After the pile was made, I went through and took out anything I thought I could refashion. One of them was an old Abercrombie polo that Philip no longer liked. I'd seen a few polo refashions floating around on Pinterest, and although none of them had struck my fancy, I was sure I could do something awesome with this shirt. Then the other day I saw this photo and fell in love. Out came the fabric box and there was that old gray polo, ready and waiting to be loved. Doily lamp tutorial. Finally! Well, it only took me three months, but I promised that I'd finally get around to showing you how I made the doily light for Penelope's nursery.

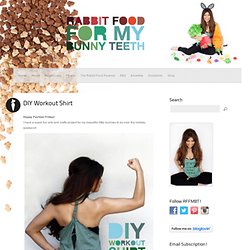
Unfortunately I can't take credit for this awesome idea - I saw this version on Pinterest awhile back - but here's my version it and some tips that I found useful.... So a mere week before Christmas, and only ten days before I went into labor, my husband came home to this going on in the middle of our kitchen. Luckily, we've been together for about 11 years, so he's pretty used to my crazy projects taking over our house. I used one of those giant punching bag balloons that I found at the dollar store since they are perfectly spherical vs the typical balloon shape. Plus, they seem to be a little thicker than a normal balloon, and less likely to pop during the process. DIY Workout Shirt : Rabbit Food For My Bunny Teeth. Happy Fashion Friday!
I have a super fun arts and crafts project for my beautiful little bunnies to try over the holiday weekend! I love buying new clothes, but sometimes I love making them even more!