
Doll House Miniatures & Scale Doll Houses. Beads & Jewelry Findings As Dollhouse Accessories. What I did for my summer holiday Part 1 of 3 We had a great time visiting friends and family in England last month. One highlight of the trip was a visit to cousin Barbara in London. She is a dollhouse designer and interior decorator who does amazing work. I remember staring at her tiny 1/12 scale slice of kiwi fruit made with Fimo clay and marveled at her skill in making it so tiny and yet look realistic.
She definitely has a creative eye as she uses rather familiar items to make some of her dollhouse accessories! If you know little girls or even not so little girls who have doll houses, you could make them some little gifts from your stash. As you can see from the photos, in Barbara's hands, beads, crystals and metal rondelles, even bails become exquisite perfume bottles sometimes complete with trays. The picture below left shows a goblet on the left made by gluing two bead caps together. Dollhouse Miniatures Tutorials. Tutorials for Miniatures. How To Make A 1 Inch Scale Wicker Table & Faux Tile Top.
This is the little wicker table we are going to make.

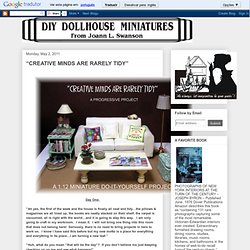
I haven't gotten complicated with different weaving techniques, just the standard over and under. The faux tile top comes from my good friend, Mary. Crafter's Living Room Vignette. Day One: “Ah yes, the first of the week and the house is finally all neat and tidy…the pillows & magazines are all lined up, the books are neatly stacked on their shelf, the carpet is vacuumed, all is right with the world…and it is going to stay this way.
How To Make A Kitchen Dresser From Mat Board With An Aged Finish. You might think this is a lot of trouble to go through when you are using mat board and not basswood to make this kitchen dresser.
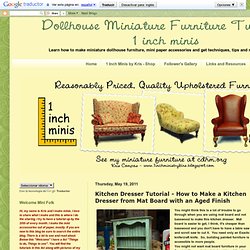
Mat board is easier to get, I think, it's cheaper than basswood and you don't have to have a table saw and scroll saw to cut it. You need only an Exacto knife/craft knife. So, building painted furniture is accessible to more people. You might not want mat board furniture in your finest dollhouse, but painted mat board furniture is certainly fine for small projects and gift projects. Painted mat board furniture makes fine rustic country cabinets but don't leave out a more delicate look for the shabby chic touch.
To experiment cut a strip of mat board and spray with a matte finish. Using 320 grit sand paper sand the top color make you base color show. Use a rock with lots of different points to dent the surface of the mat board. Use MINWAX WATER BASED WOOD STAIN, I used walnut. This picture shows the two colorways. Start by making the base cabinet. How To Make A Vintage Kitchen Table. This is the table that matches the chairs in the last month's tutorial.
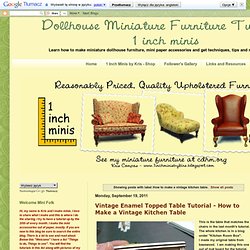
The whole kitchen is in a blog under "Kitchen Room Box". I made my original table from basswood. I am making this one out of mat board for the tutorial. If you want to use basswood the directions are pretty much the same. I am using 1/8" diameter aluminum tubing and 1/16" diameter aluminum tubing. Creating Bottles From Holiday Tree Lights. In the winter of 2011, while shopping, a string of LED lights caught my eye because they were bottle-shaped, in an almost perfect scale.
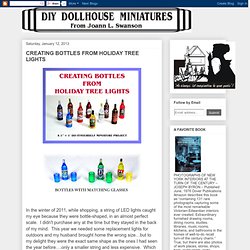
I didn't purchase any at the time but they stayed in the back of my mind. This year we needed some replacement lights for outdoors and my husband brought home the wrong size…but to my delight they were the exact same shape as the ones I had seen the year before….only a smaller string and less expensive. Dorm Room Miniatures Tutorials. How To Make A 1 Inch Scale Shabby Chic Bed & No Sew Mattress. I saw this bed on-line at a full-size furniture site and thought it would be a good candidate for card stock.
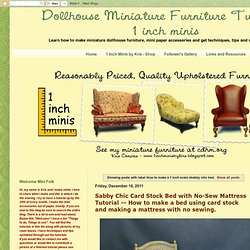
For this tutorial I am making a twin size. You can adjust the size for whatever you need, the instructions would be the same. I hope to have a picture of it painted by the end of this blog, I am waiting for the glue to dry. We are going to make the mattress and box spring first. Make A Shamrock Plant. The Shamrock is a traditional symbol of Ireland & thought to bring good luck.
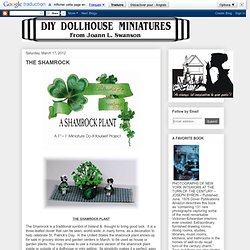
It is a three-leafed clover that can be seen, world-wide, in many forms, as a decoration to help celebrate St. Patrick’s Day. In the United States the shamrock plant shows up for sale in grocery stores and garden centers in March, to be used as house or garden plants. You may choose to use a miniature version of the shamrock plant inside or outside of a dollhouse or mini setting. Its simplicity makes it a perfect, easy and fast, miniature project for you or for a group Instructions: Use a sponge of large brush to coat both sides of the colored paper with a wash of water color or watered down acrylic paint. DIY 1:12 Scale Dollhouse Furniture.