
(Tutorial) Alternative Printing Process for your Photographs: Use Mulberry Paper. (Tutorial) Alternative Printing Process for your Photographs: Use Mulberry Paperby Brittni | 26 comments I miss the days of having a film camera and being able to hold the photographs in my hand rather than clicking through hundreds on my computer.
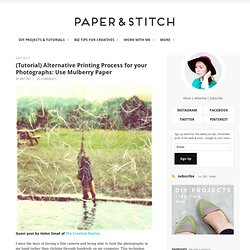
This technique allows me to pick out my favourite digital images and print them in a special and unusual way. The delicate and soft texture of the paper appear so much more beautiful to me than printing images on to regular glossy photo paper. Another great thing about this technique is that anybody can do it! Supplies You Will Need: 1. Step by Step Instructions: 1. Have fun experimenting with printing your photographs on to different surfaces. About Helen. Tiny Polaroid Magnets. Hi there!
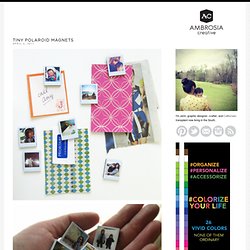
It’s felt like forever since I’ve last blogged, and has felt like an eternity since I’ve done anything crafty and nifty. Since my morning sickness has gone into full speed (yes, we’re expecting our third this fall!) I haven’t felt like myself. But nothing like inspiration to wake one out of a reverie — or nightmare, in my constantly sick state. I came across these DIY Pantone chip magnets on How About Orange and wanted to do something similar.
You will need: Cardboard (mine was the backing of a sketchbook — much thicker than the back of a regular spiral bound notebook) or 2-3 sheets of white cardstock or poster board spray-mounted together to use as a sturdy backing to the magnetsOpaque white marker (necessary only if your cardboard is not white) Craft knife Metal straight edge/ruler Clear packing tape or frisk film. Step 1: Download a Photoshop file of the Polaroid frames below. Step 2: Print out photos onto photo paper. Step 4: Trim out photos with craft knife. 487 Comments. How To Create a Family Yearbook: Controlling the Chaos of Digital Photos. If you're like me, you have a hard drive full of photos, a cell phone full of the same, and a nagging sense in your brain that they're just going to keep piling up over the years — yet you keep on photographing… you can't stop!
I decided a few years ago to tackle the mess and start a yearly, well… yearbook. Yes, occasionally I print the odd photo here and there for display, but most of my photos — even the photos from my phone — get printed in our yearbook.Throughout the year, when I download photos from my camera I put them in their yearly (and then monthly) folders. Sometimes I don't do anything with the photos at all until yearbook time! Then, once a year — usually in January — I compile the past year's photos, edit them down a bit, and throw them all in a book in chronological order. I've used several print-your-own-book companies in the past, but the past two years have been with blurb, and I've been very satisfied.
(Images: Sarah Dobbins)