
Song Lyric Wall Art / D.I.Y. Project. A couple weeks ago, I found a paint-by-number at an unbeatable price.
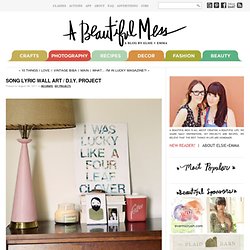
I can't pass these things up even though I already owned this particular design. I thought that I could maybe use it to make a fun D.I.Y., but my new rule is that all thrifts that I purchase with the intent of restyling need to get done right away. I have way too many half finished projects in my life. With that little bit of motivation I came up with a fun D.I.Y. to display some of my favorite song lyrcis in our newlywed home. Enjoy.... Here's how I did it... I displayed our piece in our bedroom, on Jeremy's side of the bed. Style Scrapbook: DIY "OMBRE DENIM SHIRT".
December 29, 2011 in Uncategorized by Andy I FINALLY got around to do this DIY but since I didn’t want to ruin one of my favorite denim shirts, I went and bought a cheap one at a small store and luckily, the operation was successful!.
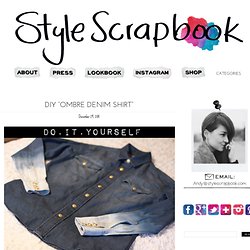
…This DIY is as simple as they come so if you are feeling adventurous, here is what you need and the step by step: *Special fabric bleach in powder (if you can’t find it, use normal bleach) *Gold buttons (make sure they are the same size as the buttons you are replacing) Bracelets/Headbands. I was walking through Target a few weeks ago and noticed this little knit fabric headband that was not just braided together…….but woven.
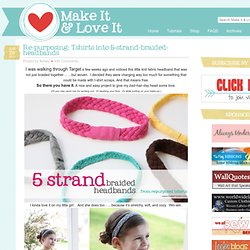
I decided they were charging way too much for something that could be made with t-shirt scraps. And that means free. So there you have it. A nice and easy project to give my bad-hair-day head some love. (Or you may need one for working out. I kinda love it on my little girl . She always has little hair fly-aways that get into her face…….and this helps with that problem. It even works great with her hair down…..and keeps that hair tucked behind her ears. And yep, good for me too. Thanks little t-shirt scraps. Want to make your own? First, find some old t-shirts. Then, cut your fabric into long strips. Next, stack your 5 strips on top of each other and sew together at one end. Now, pull on each strip of fabric so that they kind of curl on the edges. But let me explain a little better. First, you’ll work on the left side. DIY Bracelets.
Watermark Tee. Hello U-Create readers!
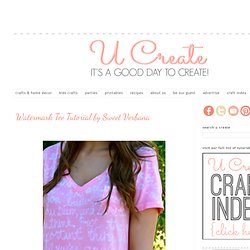
I am so excited to be guest posting here today. It just so happens to be my first guest post and I'm still a little shocked that it's here at Ucreate, one of my favorite blogs! A little bit about me.. I'm from a little town called Keller, Texas. I'm a junior at Texas A&M University (whoop!).