
Bending Popsicle Sticks for a Wooden Helix Vase. Why didn't I think of that... / Too sweet! DIY wooden picture. I Want My Two Dollars! From: kkoller@nyx10.cs.du.edu (Captain Sarcastic) Date: December 17, 1993 On my way home from the second job I've taken for the extra holiday ca$h I need, I stopped at Taco Bell for a quick bite to eat.

In my billfold is a $50 bill and a $2 bill. That is all of the cash I have on my person. I figure that with a $2 bill, I can get something to eat and not have to worry about people getting upset at me. ME: ``Hi, I'd like one seven layer burrito please, to go.'' At his point I open my billfold and hand him the $2 bill. IT: ``Uh, hang on a sec, I'll be right back.'' He goes to talk to his manager, who is still within earshot.
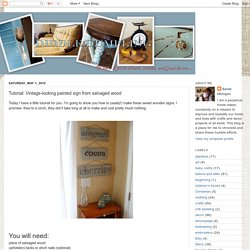
IT: ``Hey, you ever see a $2 bill? '' He comes back to me and says IT: ``We don't take these. He goes back to his manager who is watching me like I'm going to shoplift, and IT: ``He says I have to take it.'' The manager approaches me and says MG: ``Sorry, we don't take big bills this time of night.'' SG: ``Yeah, Mike, what's up? '' Security guard walks over to me and says. Tutorial: Vintage-looking painted sign from salvaged wood. Today I have a little tutorial for you.

I'm going to show you how to (easily!) Make these sweet wooden signs. I promise- they're a cinch, they don't take long at all to make and cost pretty much nothing. You will need: piece of salvaged wood upholstery tacks or short nails (optional) hammer acrylic paint (background color) black acrylic paint (or other color to fill in letters) large paint brush small paint brushink jet printer twine Sharpie Marker or other dull, rounded tool This project started with a pile of cedar fence pieces that we've had sitting in our backyard for ages.
I loved how grey and weathered they had become from sitting outside. Next, distress the wood to your liking. Next, choose your paint. (I wasn't really sure if I was going to be doing a tutorial for this or not until I was finished, so I'm afraid I'm missing a few photos for some of the steps. Once you're happy with the paint, put the wood aside to dry and head to your computer. P.S. Button Flower Bouquet. Fashion Infographic by ~JakeGcreate on deviantART. Skinny Ties. One of Ralph’s requests for his birthday was skinny ties.

They are surprisingly hard to find — either too long or too expensive for a 13-year-old’s wardrobe. So a few weeks ago, I had an idea: I would buy some old fat ties at a thrift shop and take them to a tailor to have them altered. Brilliant, right? But then, of course, I forgot about the idea till 3 days before his birthday. At which point, I tried to rush and make it happen. But since I had the ties in hand, and since they only cost $1 each, I figured I’d try it myself. Here is the before shot. Here is the after shot: DIRECTIONS: 1) Turn your too-wide thrift store tie upside down. Keep un-stitching till you get to the skinniest part of the tie: 2) Pull the tie form fabric out of the lining (there is probably a real name for this, but I don’t know what it is). 3) Trim one side of the tie-form fabric. 4) If you traced it, then cut out the second side. 5) Your tie-form material should now look like a skinny tie.
And that’s it! Unusual (and fun!) Date Ideas.