
Making and Sewing Binding. The binding we're making for this quilt is straight-grain double-fold binding.

The strips we cut for our binding were cut on the grain, rather than on the bias. There are pros and cons to both straight-grain and bias binding. Straight-grain binding: Requires less fabricIs easier to work with, particularly for making sharp corners. Bias binding: Is useful for binding curved edgesCan be a more interesting way to show off geometric prints like plaids or stripesMay wear longer, since the creases aren't right on the grain I use straight-grain binding for most quilts and think it's a good choice for a simple quilt like this. Start by cutting enough 2.5" strips to go around your finished quilt, plus a couple of extra inches. I usually sew my binding together end-to-end, using a half inch seam allowance. Alternately, you can sew bias seams in your binding, as shown above. Use the method you feel most comfortable with. Free-Motion Quilting Basics. This is a simple overview of free-motion quilting on a home machine.
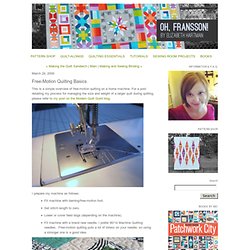
For a post detailing my process for managing the size and weight of a larger quilt during quilting, please refer to my post on the Modern Quilt Guild blog. I prepare my machine as follows: Fit machine with darning/free-motion foot.Set stitch length to zero.Lower or cover feed dogs (depending on the machine).Fit machine with a brand new needle. I prefer 90/14 Machine Quilting needles. Free-motion quilting puts a lot of stress on your needle, so using a stronger one is a good idea. For this quilt, I used cotton thread in a light warm tan to match the natural Essex cotton/linen I used for the sashing. Because free-motion quilting takes so much thread, I like to fill a number of extra bobbins before I start. I prefer to use a quality 100% cotton thread like Aurifil 50 wt for both piecing and quilting. Better threads tend to do well in most machines, but sometimes machines are finicky.
Making the Quilt Sandwich. Start by laying out your batting on a clean, smooth floor.
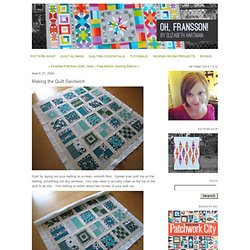
Spread your quilt top on the batting, smoothing out any wrinkles. You may need to actually crawl on the top of the quilt to do this. Trim batting to within about two inches of your quilt top. Starting from the top, carefully roll your batting, as shown. Continue rolling until you have a batting tube like this and set it aside. Now spread your quilt back on the floor, right side down. Bring back the batting roll and, starting at the bottom, slowly unroll the batting and top onto the quilt back. Depending on the width of you top back fabric, you may have several extra inches at the top of your quilt. Once again, smooth out your quilt top and batting. Once your fabric is arranged the way you want it, use curved safety pins to secure all three layers at the center of each block. Placing these pins is awkward at first, but it's something you're likely to get the hang of with practice! Basics. All original photos, blog posts, tutorials, and patterns on this site were created by Elizabeth Hartman (me) and may not be republished or distributed without my express written permission.
For more on this subject, please refer to this post . In addition to the posts here, please reference my book, The Practical Guide to Patchwork . If you want to know how to make a quilt, this book will tell you how! Quilting and Finishing Making a Quilt Sandwich Free-Motion Quilting Basics Tips for Free-Motion Quilting a Larger Quilt (on the Modern Quilt Guild blog) Making and Sewing Binding Orange Peel Quilting (free-motion pattern) Dogwood Quilting (free-motion pattern) Loopy Flower Quilting (free-motion pattern) Class Samples (multiple examples of straight line and free-motion quilting patterns) Sewing Room Improvements Building a Design Wall TV Tray Pressing Table Other Simple Machine Applique (via the Billboard Quilt-Along) Charm Squares 101 All About Online Quilting Bees.